

 Login
Login- Consulting
- Training
- Partners
- About Us
x
An application developer can tell you that, Docker is an open-source application allowing administrators to create, manage, deploy, and duplicate applications using containers. Using docker you can make your python project portable by placing them inside a container.
Let us extend our learning about Docker and lay a foundation on containers. An earlier blog on Docker can shed more light on containers. Click here to read more.
Now we will discuss how you can Dockerize a Flask Application. So, if you are not familiar with Flask, then Flask is nothing but a web development framework of Python. Python has two popular web development frameworks; the first one is Django and the other one is Flask. Django is quite heavier than Flask as it has many dependencies. So, we will see how you can deploy a simple Flask Application on Docker.
1. Install Python on your machine.
For installing Python on Windows, visit this URL https://www.python.org/downloads/ and download the latest Python version.
If you are using an Ubuntu machine, then use the following command.
|
1 2 |
sudo apt update -y sudo apt-get install python3-pip -y |
2. Install Flask library. You can run the below command to install Flask.
|
1 |
pip install flask |
Make sure that pip is also installed as well.
Now, you need to create a python file with the name app.py inside a folder. And paste the following code in that file.
|
1 2 3 4 5 6 7 8 9 |
from flask import Flask app = Flask(__name__) @app.route('/') def index(): return "<h2>This is just a basic Flask Application</h2>" if __name__ == "__main__": app.run(host ='0.0.0.0', port = 8080, debug = True) |
This a simple Flask Application to print some message on the browser. It will create a server and run that on port number 8080. You can choose any port as per your requirement. Now, save that file and run python app.py in the command prompt.
You will notice that a development server gets started.
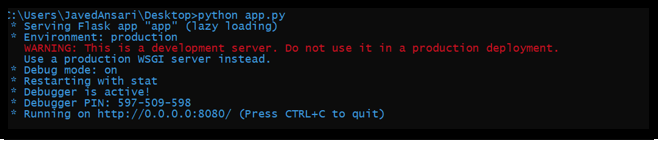
Now, when you browse this URL: http://localhost:8080, the content that was written inside the return keyword will get displayed there.
It means that your Flask Application is working perfectly fine.
The next thing that you need to do is to create a file with the name requirements.txt and write a flask inside that file. This is just to install the flask library.

After that create a Dockerfile with the name Dockerfile. And make sure that you are not putting any extension at the end of the file name. And paste the below command in that.
|
1 2 3 4 5 6 7 |
FROM python:alpine3.7 COPY . /myapp WORKDIR /myapp RUN pip install -r requirements.txt EXPOSE 8080 ENTRYPOINT [ "python" ] CMD [ "app.py" ] |
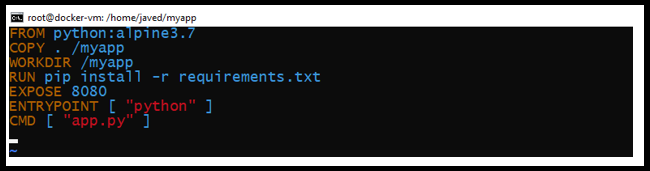
FROM keyword is used to download the base image, which is of python and alpine3.7 is its version. Next, we are copying all the file in the current directory in the directory to my app which is inside the container. WORKDIR is used to define the working directory. If you will not use that keyword, then it will treat root as the working directory. RUN is used to run the command that we want to execute. pip install -r requirements.txt will install all the module which is written inside the file. Port 8080 will get exposed by EXPOSE command. In the code we have mentioned that the development server should run at port 8080. That’s why we need to expose that port. The last two lines are used to run the application automatically once you create a container.
So, this is about the commands which are written in Dockerfile.
The next thing that you need to do is to install Docker on your machine. Or you can launch a virtual machine and install Docker in it. The command to install Docker in an ubuntu machine is:
|
1 |
sudo apt-get install docker.io -y |
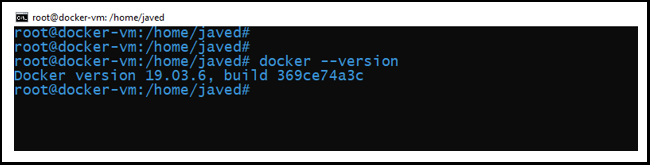
Make sure that Docker is properly installed on your system. You can verify that by running the below command.
|
1 |
docker --version |
If you are using a virtual machine, then you need to copy all the files in that VM. And run the following command to build the Dockerfile.
|
1 |
docker build -t flask-image . |

It will create an image with the name flask-image. After creating the image, you need to create a container from that image. So, you can run the below command for that.
|
1 |
docker images |

|
1 |
docker run -d -p 80:8080 --name flask-container flask-image |
It will launch a container, and when you browse your public IP of your VM along with the port number, then you will see that your Flask Application is running.

In this guide, you have learned to create and deploy a Flask application to a Docker container. You can scale the application with the help of Docker with ease. If you do not want to deploy directly to a virtual machine, then you can use this method to containerize the application using Docker. To attain a deep knowledge of Docker, Operating System, Virtualisation or Containerisation concepts and the use of containers for deploying & managing applications on Docker get certified through the foundation and Docker Essentials courses.
CloudThat offers extensive online and classroom training on Docker Essentials – Level 2 for beginners and Kubernetes Essentials for foundation-level courses. After completing this course, you will understand the best practices to use Docker.
Drop a comment for feedback or any queries you have relating to Docker, containers or Kubernetes and we will get in touch with you.
Stay tuned for more updates.
|
Voiced by Amazon Polly |

CloudThat is a leading provider of cloud training and consulting services, empowering individuals and organizations to leverage the full potential of cloud computing. With a commitment to delivering cutting-edge expertise, CloudThat equips professionals with the skills needed to thrive in the digital era.
SHARE


AI/ML, Cloud Computing
By Livi Johari

Jul 20, 2026

AI/ML, Cloud Computing
By Livi Johari
Jul 20, 2026

AWS, Cloud Training
By Himisha Raval
Jul 14, 2026

AWS, DevOps
By Himisha Raval
Jul 14, 2026


Artificial Intelligence, Data science
By Himisha Raval
Jul 14, 2026
Our support doesn't end here. We have monthly newsletters, study guides, practice questions, and more to assist you in upgrading your cloud career. Subscribe to get them all!


Shubham Kumar
Apr 9, 2021
Great…it’s working.