

 Login
Login

 July 29, 2025
|
Voiced by Amazon Polly |
Overview
Ever found yourself juggling between multiple AWS consoles while trying to manage your development workflow? Backstage is Spotify’s open-source developer portal, changing the game for engineering teams worldwide. What makes Backstage truly powerful isn’t just what it does out of the box, but how you can transform it through its flexible plugin ecosystem.
Integrating DevOps tools directly into Backstage for teams building on AWS isn’t just convenient, it’s transformative. Imagine having your entire AWS development pipeline visible and manageable from a single pane of glass. No more context switching, no more hunting through different interfaces.
In this first part of our guide, we dive into four AWS services integrations: AWS CodePipeline, AWS CodeBuild, Amazon Elastic Container Registry, and Amazon Elastic Container Service. You won’t just learn how to set these up, you’ll see exactly how they fit into real-world development scenarios. We will walk through practical configurations, highlight time-saving features, and show you how to create that seamless developer experience your team has been craving.
Note: Make sure that the AWS IAM role(s) used by Backstage have permissions (least privilege) for the services.
Pioneers in Cloud Consulting & Migration Services
- Reduced infrastructural costs
- Accelerated application deployment
AWS CodePipeline Plugin
AWS CodePipeline Plugin provides:
- Entity content that displays the AWS CodePipeline executions related to that specific entity
- Entity card that displays the status of the AWS CodePipeline stages related to that specific entity
Installation Steps:
- Frontend Package:
Install the frontend package in your Backstage app:
|
1 |
yarn workspace app add @aws/aws-codepipeline-plugin-for-backstage |
Edit packages/app/src/components/catalog/EntityPage.tsx to add AWS CodePipeline content to the CI/CD tab of the entity page:
|
1 2 3 4 5 6 7 8 9 10 11 12 13 14 15 16 17 18 19 |
import { EntityAwsCodePipelineExecutionsContent, isAwsCodePipelineAvailable, EntityAwsCodePipelineCard, } from '@aws/aws-codepipeline-plugin-for-backstage'; // For example in the CI/CD section const cicdContent = ( <EntitySwitch> <EntitySwitch.Case if= {isAwsCodePipelineAvailable} > <EntityAwsCodePipelineExecutionsContent / > </EntitySwitch.Case> // For example in the overview section const overviewContent = ( <Grid container spacing={3} alignItems="stretch"> // ... <Grid item md={6}> <EntityAwsCodePipelineCard /> </Grid> |
2. Backend Package:
Install the backend package in your Backstage app:
|
1 |
yarn workspace backend add @aws/aws-codepipeline-plugin-for-backstage-backend |
Add the plugin to the packages/backend/src/index.ts:
|
1 2 3 4 5 |
const backend = createBackend(); // ... backend.add(import('@aws/aws-codepipeline-plugin-for-backstage-backend')); // ... backend.start(); |
3. Annotations:
The annotation references a specific AWS CodePipeline by ARN. This is done with the aws.amazon.com/aws-codepipeline-arn annotation:
|
1 2 3 4 5 6 7 8 9 |
# Example apiVersion: backstage.io/v1alpha1 kind: Component metadata: # ... annotations: aws.amazon.com/aws-codepipeline-arn: arn:aws:codepipeline:us-west-2:1234567890:myapp-pipeline spec: type: service |

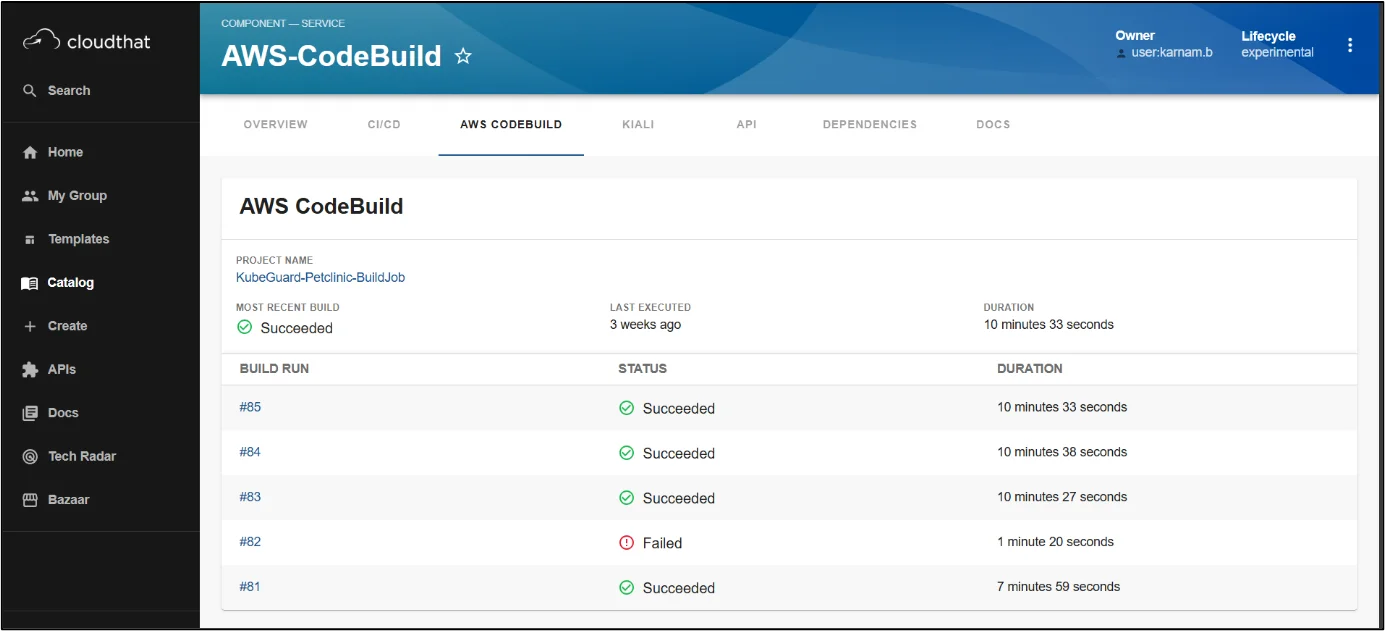
AWS CodeBuild
AWS CodeBuild provides:
- An entity card that displays the build history of AWS CodeBuild projects related to that entity.
Installation Steps:
- Frontend package:
Install the frontend package in your Backstage app:
|
1 |
yarn workspace app add @aws/aws-codebuild-plugin-for-backstage |
Edit packages/app/src/components/catalog/EntityPage.tsx to add the AWS CodeBuild card to the entity page:
|
1 2 3 4 5 6 7 8 |
import { EntityAwsCodeBuildCard } from '@aws/aws-codebuild-plugin-for-backstage'; // For example in the overview section const overviewContent = ( <Grid container spacing={3} alignItems="stretch"> // ... <Grid item md={6}> <EntityAwsCodeBuildCard /> </Grid> |
2. Backend package:
Install the backend package in your Backstage app:
|
1 |
yarn workspace backend add @aws/aws-codebuild-plugin-for-backstage-backend |
Add the plugin to the packages/backend/src/index.ts:
|
1 2 3 4 5 |
const backend = createBackend(); // ... backend.add(import('@aws/aws-codebuild-plugin-for-backstage-backend')); // ... backend.start(); |
3. Annotations:
The annotation is to reference a specific Amazon ECS service by ARN. This is done with the aws.amazon.com/aws-codebuild-project-arn annotation:
|
1 2 |
annotations: aws.amazon.com/aws-codebuild-project-arn: arn:aws:codebuild:us-west-2:1234567890:project/myapp-build |
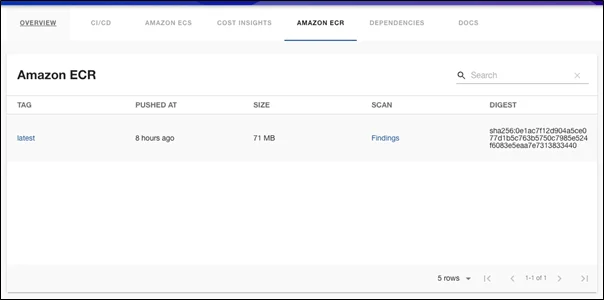
Amazon Elastic Container Registry (Amazon ECR)
Amazon Elastic Container Registry provides:
- Entity content that displays the Amazon Elastic Container Registry repositories related to that specific entity
- Ability to see scan findings for individual images
Installation Steps:
- Frontend package:
Install the frontend packages in your Backstage app:
|
1 |
yarn workspace app add @aws/amazon-ecr-plugin-for-backstage |
Edit the packages/app/src/components/catalog/EntityPage.tsx and add the imports
|
1 2 3 4 5 6 7 8 |
import { isAmazonEcrAvailable, EntityAmazonEcrImagesContent, } from '@aws/amazon-ecr-plugin-for-backstage'; //Overview Content <EntityLayout.Route path="/ecr" title="Amazon ECR" if={isAmazonEcrAvailable}> <EntityAmazonEcrImagesContent /> </EntityLayout.Route> |
2. Backend package:
Install the backend package in your Backstage app:
|
1 |
yarn workspace backend add @aws/amazon-ecr-plugin-for-backstage-backend |
Add the plugin to the packages/backend/src/index.ts:
|
1 2 3 4 5 |
const backend = createBackend(); // ... backend.add(import('@aws/amazon-ecr-plugin-for-backstage-backend')); // ... backend.start(); |
3. Annotation:
The annotation is to reference a specific Amazon ECR repository by ARN This is done with the aws.amazon.com/amazon-ecr-arn annotation:
|
1 2 |
annotations: aws.amazon.com/amazon-ecr-arn: arn:aws:ecr:us-west 2:1234567890:repository/myapp-repository |
4. Configuration:
There are configuration options available to control the behavior of the plugin.
Add the below in app-config.yaml file
|
1 2 3 4 |
aws: ecr: maxImages: 100 # (Optional) The maximum amount of images retrieved from a repository maxScanFindings: 100 # (Optional) The maximum amount of scan findings retrieved from an image |
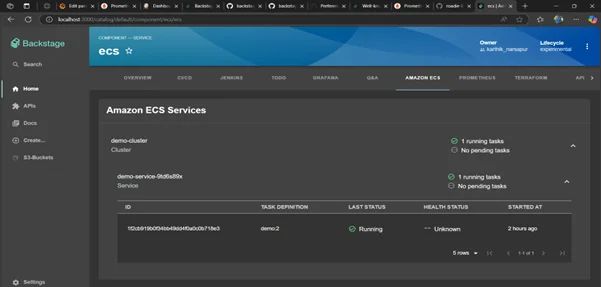
Amazon Elastic Container Service (Amazon ECS)
Amazon Elastic Container Service provides:
- Entity content that displays the status of Amazon ECS services related to that specific entity.
Installation Steps:
- Frontend package:
Install the frontend package in your Backstage app:
|
1 |
yarn workspace app add @aws/amazon-ecs-plugin-for-backstage |
Edit packages/app/src/components/catalog/EntityPage.tsx to add an Amazon ECS service tab to the entity page:
|
1 2 3 4 5 6 7 8 9 10 |
import {EntityAmazonEcsServicesContent} from '@aws/amazon-ecs-plugin-for-backstage'; //.... const serviceEntityPage = ( <EntityLayout> //.... < EntityLayout.Route path = "/ecs" title = "Amazon ECS" > <EntityAmazonEcsServicesContent / > </EntityLayout.Route> < /EntityLayout> //.... ); |
2. Backend package:
Install the backend package in your Backstage app:
|
1 |
yarn workspace backend add @aws/amazon-ecs-plugin-for-backstage-backend |
Add the plugin to the packages/backend/src/index.ts:
|
1 2 3 4 5 |
const backend = createBackend(); // ... backend.add(import('@aws/amazon-ecs-plugin-for-backstage-backend')); // ... backend.start(); |
3. Annotation:
The alternative is to reference a specific Amazon ECS service by ARN. This is done with the aws.amazon.com/amazon-ecs-service-arn annotation:
|
1 2 3 4 5 6 7 8 9 10 |
# Example apiVersion: backstage.io/v1alpha1 kind: Component metadata: # ... annotations: aws.amazon.com/amazon-ecs-service-arn: arn:aws:ecs:us-west-2:1234567890:service/cluster1/myapp-service spec: type: service # ... |
Conclusion
But this is just the beginning of your Backstage DevOps journey. In Part 2, we will explore how to extend your toolkit with ArgoCD, Jenkins, Grafana, and Kubernetes plugins, creating a truly unified platform that bridges AWS services with the broader DevOps ecosystem.
Drop a query if you have any questions regarding Backstage and we will get back to you quickly.
Empowering organizations to become ‘data driven’ enterprises with our Cloud experts.
- Reduced infrastructure costs
- Timely data-driven decisions
About CloudThat
FAQs
1. Do I need AWS credentials configured on my Backstage instance to use these plugins?
ANS: – Yes, your Backstage instance requires proper AWS authentication. The recommended approach is to use AWS IAM roles with the principle of least privilege. Configure credentials through environment variables and AWS profiles, or, for production environments, consider using AWS IAM roles for Amazon EC2/Amazon EKS if Backstage is hosted on AWS.
2. Can I customize which AWS CodeBuild projects appear in my Backstage catalog?
ANS: – Absolutely! You can filter AWS CodeBuild projects using annotations in your component’s catalog-info.yaml files. This allows you to associate specific components with their corresponding build projects, ensuring developers only see relevant builds for their services rather than your entire AWS account’s projects.

WRITTEN BY Karnam Bhargava
Karnam Bhargava, Research Associate at CloudThat, combines AWS knowledge with DevOps skills. His passion for cloud technologies and infrastructure automation translates into insightful technical content. Continuously expanding his knowledge across containerization, GitOps, and emerging cloud services to deliver valuable community insights and innovative solutions.


Comments