

 Login
Login- Consulting
- Training
- Partners
- About Us
x
Cloud Computing, OpenStack, Private Cloud
 4 Mins Read

 May 12, 2014
OpenStack’s 9th release Icehouse is here and I decided to give it a spin. I will be performing the installation on RHEL 6.5 and what better way to try out OpenStack than Red Hat’s RDO. For starters RDO is a community version of Red Hat Enterprise Linux OpenStack Platform. Read more about RDO here.
I encountered a lot of errors during the installation and it was not as straight forward as mentioned in the RDO quick start guide. So the steps outlined here along with the changes is a result of my experience with the installation process. I performed some additional pre-requisites and ran some additional commands to ensure a smooth installation. The changes are highlighted in bold.
Get a Linux Virtual Machine ready. If you don’t have one, use of the compatible distributions to create one. Be sure to provide at least 2GB RAM, 2 CPU cores and most importantly make sure “H/W Virtualization like Intel VT-x/EPT or AMD-V/RVI” is enabled/checked in the virtual machine properties.

NAT worked fine for me but if you end up facing some issues with networking during installation or post installation change the networking mode to “Bridged“.
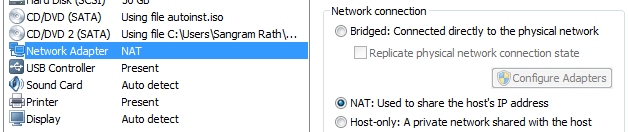
Once the virtual machine is ready, launch it.
After logging on to the Virtual Machine, open a terminal and run the below commands in order.
|
1 |
<strong>sudo setenforce permissive</strong> |
This command is to ask SELinux not to enforce policies. I would recommend using this instead of disabling SELinux completely.
|
1 |
<strong>sudo yum update -y</strong> |
The above command updates the current packages in the distribution. Mine was already the latest so there was nothing to do.
|
1 |
<strong>sudo yum install -y https://rdo.fedorapeople.org/rdo-release.rpm</strong> |
This command installs the RDO repositories needed for the successful installation of OpenStack.
Additional step:
|
1 |
<strong><em>sudo yum-config-manager --enable rhel-6-server-optional-rpms</em></strong> |
This command enables the optional RPMs which contains some of the dependency packages like rubygems and rubygem-json.
|
1 |
<strong>sudo yum install -y openstack-packstack</strong> |
Next step is to install the packstack utility which uses Puppet to deploy various components of OpenStack either in a single machine or multiple machines over network using SSH.
Additional step:
|
1 |
<strong><em>sudo yum install -y puppet</em></strong> |
This command installs Puppet. I encountered numerous errors on multiple occasions during the installation related to Puppet, including a point where it failed to install Puppet properly too. So I decided to install it separately before starting the Packstack installation.
|
1 |
<strong>packstack --allinone</strong> |
This starts the OpenStack Icehouse installation.
Once installation is complete, you will get a summary with the IP address of the Horizon Dashboard and some other services. The successful completion will look something like this screenshot below.

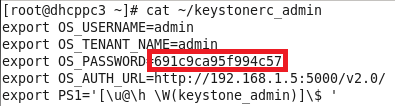
You are now ready to test drive OpenStack Icehouse. Open a browser and point it to the IP address for Horizon Dashboard noted earlier. The default login is “admin” and in order to get the password for the first time login, open a terminal and run the commands below as root:
|
1 |
<strong>cat ~/keystonerc_admin</strong> |
This will printout the keystone credential details for admin user, note down the password.
Enter username and password at the Horizon Dashboard login screen and sing in.

Overview of the fresh setup.

We are now ready to play around with OpenStack Icehouse. This was a simple one machine installation. RDO can also be used for multiple machine installation of course with some modifications and tweaks.
If you are interested in learning more about OpenStack and getting some hands-on, we offer Red Hat OpenStack Administration (CL210) course. If you are interested, click here for more details and to fill out the form. And we will get back to you.
If you liked the post, please share and keep coming back for more articles around OpenStack.
|
Voiced by Amazon Polly |
SHARE


AI/ML, Cloud Computing
By Livi Johari
Jul 20, 2026

AI/ML, Cloud Computing
By Livi Johari
Jul 20, 2026

AWS, Cloud Training
By Himisha Raval
Jul 14, 2026

AWS, DevOps
By Himisha Raval
Jul 14, 2026


Artificial Intelligence, Data science
By Himisha Raval
Jul 14, 2026
Our support doesn't end here. We have monthly newsletters, study guides, practice questions, and more to assist you in upgrading your cloud career. Subscribe to get them all!

OpenStack on AWS | CloudThat's Blog
May 20, 2014
[…] my previous blog, I wrote about my experience installing a single-node OpenStack Icehouse on a desktop/laptop using […]
Thilak
May 14, 2014
Really cool informative blog post!!Thanks!