

 Login
Login
 December 21, 2021
|
Voiced by Amazon Polly |
This blog post is a step-by-step guide illustrating how to set up AWS EKS Clusters with Windows Nodes. The process requires certain prerequisites before beginning with the setup steps.
Start Learning In-Demand Tech Skills with Expert-Led Training
- Industry-Authorized Curriculum
- Expert-led Training
Prerequisites:
This guide assumes you have already connected to the AWS management console apart from knowing the concepts of AWS such as CloudFormation, EC2, VPC, IAM, EKS to the Kubernetes concepts. Awscli and Kubectl are needed.
To perform the following steps, you will require the eksClusterRole and eksNodeRole (you can choose your name for this one).
In case you don’t have them click here and ——–à here respectively to create them.
For this step-by-step guide, I have applied the commands using Git Bash.
This step will be further explained in detail, but to have a successful EKS cluster having windows nodes, you will require at least 1 Linux node.
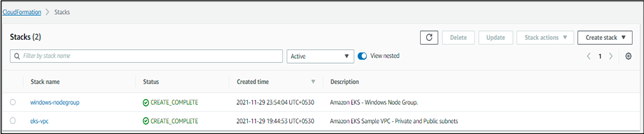
Step 1: Creating a VPC
In this step, we will be creating the VPC and the other requirements using CloudFormation (it will pop up a few more times). For the cluster, I’ll be adding both private and public subnets; in case you prefer only public or private subnets click here and follow the steps given there.
To create your cluster VPC with public and private subnets
- Open the AWS CloudFormation console
- From the navigation bar, select a Region that supports Amazon EKS, I’ll be going with us-east-1.
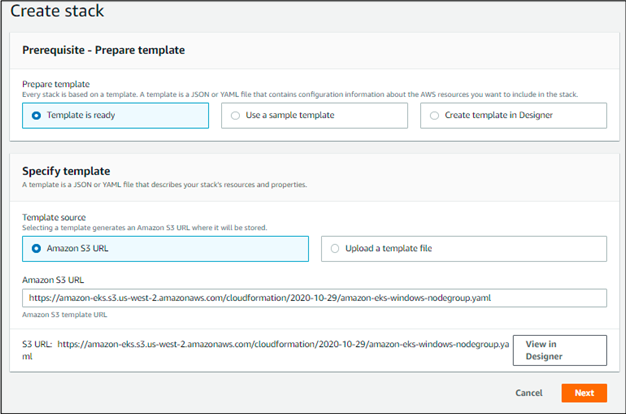
- Choose Create stack, With new resources (standard). And for Choose a template, select Specify an Amazon S3 template URL.
Paste the following URL into the text area and choose Next:
Run this URL to download the file, see what all resources will be added, and choose what should be added.

Choose a stack name and a VPC CIDR range for the subnets, if you don’t prefer the default one.


You can optionally choose to tag the generated resources and go through the advanced configurations on the options page.
Head on over to the review page and click create stack when satisfied.
Final output:

Step 2: Creating an EKS cluster
Here we’ll be creating the cluster manually, by going to the EKS console page and entering the details that we require.
On the first page, name your cluster, choose the version, by default it chooses the latest version for you, and add the cluster role that you created earlier if it is not already added. You can also add secret encryption to the cluster and provide tags.

On the next page, add the VPC name that was created earlier and the subnets are automatically added. Add the ControlPlaneSecurityGroup from the dropdown box of the security group.

Choose the endpoint access type; I chose public for simplicity.

Choose the versions for the networking add-ons on the same page. I chose the latest for all.

In the Configure Logging page, I left all the options of logging disabled.
After reviewing, click Create. And after about 15 minutes, your cluster will be up and running.

To connect with your cluster, run the following command after replacing the region code and cluster name
aws eks update-kubeconfig \ –region <region-code> \ –name <cluster-name>
![]()
Step 3: Adding the OIDC provider
This step is important to set up the VPC CNI plugin and add services like a cluster autoscaler.
Before setting it up, copy the OIDC URL from the details tab.

To set it up, go to the EKS console,
- Open the IAM console at https://console.aws.amazon.com/iam/.
- In the navigation panel, choose Identity Providersunder Access management. If a Provider is listed that matches the URL for your cluster, then you already have a provider for your cluster. If a provider isn’t listed that matches the URL for your cluster, then you must create one.
- To create a provider, choose Add Provider.
- For Provider Type, choose OpenID Connect.
- For Provider URL, paste the OIDC issuer URL for your cluster, and then choose to Get thumbprint.
- For the Audience, enter amazonaws.command choose Add provider.

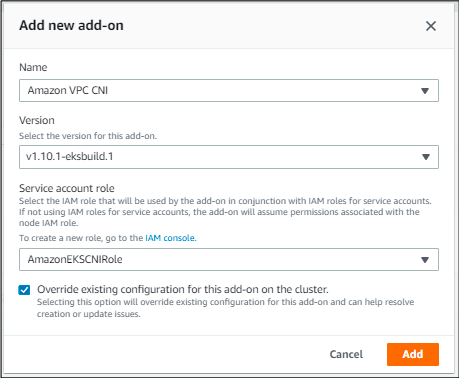
Step 4: Configuring and managing the VPC CNI plugin
The method to configure the VPC CNI plugin is given below


Note: Since we haven’t created the Linux node as of yet, the 2nd, 3rd and 4th commands in annotating the AWS-node are not necessary, unless you skipped ahead to that part.


![]()
Managing the Amazon VPC CNI add-on

The process and outputs for the above steps
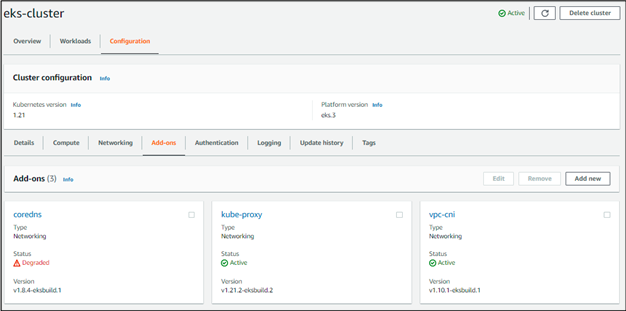
Note: coredns is degraded as it requires a Linux node, and we haven’t created one yet.
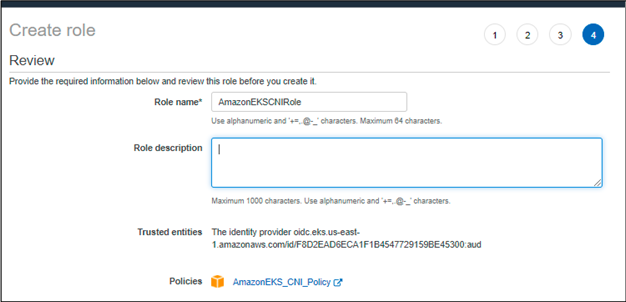
We will be using the EKS CNI role that we created earlier
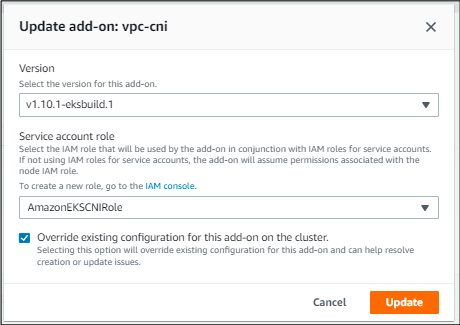
In case you received an error when trying to add it, click on the specific add-on, click edit and then override the existing configuration.
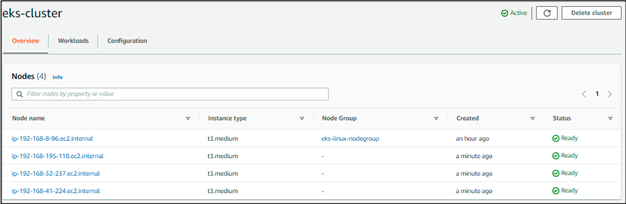
Step 5: Creating and Linux nodes to the cluster
The Linux node is absolutely necessary and has to be created first before we add the windows nodegroup. Why? Because Host networking mode is not supported for Windows workloads and we need to expose the networking in windows with CNI plugins that we embed in a Linux node, which we’ll keep running as long as we use the cluster.
I recommend using an instance type of no less than a t3.medium as it gives an ample number of pods for us to deploy the necessary tools and for additional services such as cluster-autoscaler.
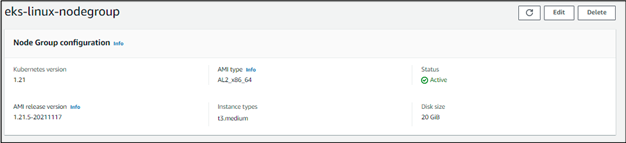
Go to the configuration tab > compute tab of the EKS management console and then click “add node group”

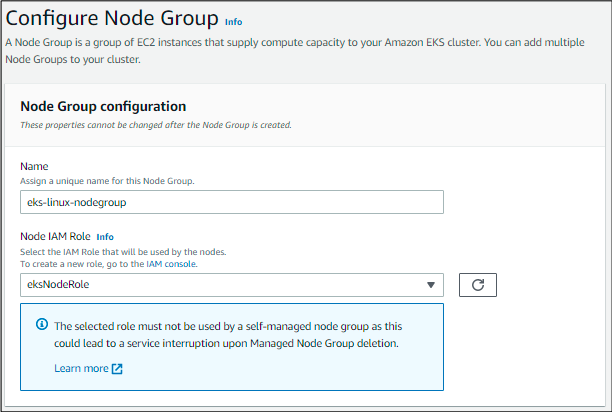
enter a name and select the node role, created at the beginning, from the drop-down box.


Enter the desired AMI type, capacity type, instance type, and disk size. You can always edit the maximum, desired and minimum number of nodes in the nodegroup, using the autoscaling tab in the EC2 section of the management console later.

Note: Add the subnets that you want the nodes to run on. And especially enter the keypair, as it might be necessary later on, if not in the immediate future. If you don’t have one, create them from here. For simplicity’s sake, I haven’t added the specific security groups that I want the nodes to use.
Head on over to the review page, and then click create
Step 6: Enabling Windows support to the cluster
I know what the headline says, but it is more of adding stuff to the Linux node.
There are 2 types of windows supports, where the current one is for EKS cluster version 1.17 onwards. The legacy is for the earlier versions. To find out more, or to install the legacy method click here.
First, we need to see if our initial cluster role has a policy called AmazonEKSVPCResourceController attached to it. And if you have been following along with this, you basically won’t have it. So, run the next steps.

Where the vpc-resource-controller-configmap.yaml has the following content.
apiVersion: v1
kind: ConfigMap
metadata:
name: amazon-vpc-cni
namespace: kube-system
data:
enable-windows-ipam: “true”
Step 7: Launching self-managed Windows nodes
We finally reached the last step and the one we’ve all been waiting for, the creation of the windows nodegroup.
We’re going to need to use CloudFormation again for this, so that takes away most of our problems in setting it up.
1: To launch self-managed Windows nodes using the AWS Management Console
Download the template from this URL below to understand and remove anything you deem unnecessary.
The process is similar to what we did while creating the VPC, so given below are the images of the process, rather than explaining it again.

Add the stack name, EKS cluster name, the security group that was created with the VPC, and the name of the nodegroup.

Specify the limits of the scaling part, mention the instance type (t3.medium is pretty decent to accommodate a few applications), add the AMI family for the windows operating system there are only 4 windows AMI families and you can find the link for it over here, I recommend the windows server 2019 full AMI.
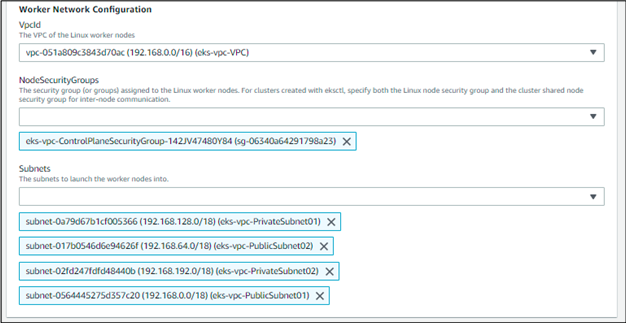
Note: we find this at the bottom of the page, where we must add the VPC id, all the security groups that the Linux node is using (we set the access from everywhere instead of a specific security group, so we can put any). And since we created 4 subnets, we might as well use all of them. The next page is full of tags, advanced configurations, and whatnot, so we’ll keep that as the default and move on to the review page where we click create stack after acknowledging that CloudFormation might create resources.
2: To enable nodes to join your cluster
In case you thought it was over, think again. The nodegroups have been created, but can’t be seen on the EKS console, so we have to tweak some stuff in order for the nodegroups to pop up on the console.
Get the nodeinstancerole of the windows nodegroup from the outputs tab of the windows nodegroup stack and keep it for the next steps.
You also need to get the nodeinstancerole (or the nodegroup arn) of the Linux node in the EC2 section, search for the node used for the Linux node and then copy the rolearn of that role.
Run this following command in your command line:
curl -o aws-auth-cm-windows.yaml https://amazon-eks.s3.us-west-2.amazonaws.com/cloudformation/2020-10-29/aws-auth-cm-windows.yaml
Open the aws-auth-cm-windows.yaml file and replace only the rolearn lines with the nodeinstanceroles of the linux and windows nodegroups respectively
Don’t modify any other lines in this file.
apiVersion: v1
kind: ConfigMapmetadata:
name: aws-auth
namespace: kube-systemdata:
mapRoles: |
– rolearn: <ARN of instance role (not instance profile) of **Linux** node>
username: system:node:{{EC2PrivateDNSName}}
groups:
– system:bootstrappers
– system:nodes
– rolearn: <ARN of instance role (not instance profile) of **Windows** node>
username: system:node:{{EC2PrivateDNSName}}
groups:
– system:bootstrappers
– system:nodes
– eks:kube-proxy-windows
After replacing the values, save the file and run the next command.
kubectl apply -f aws-auth-cm-windows.yaml
It will take a few minutes to finish, in the meanwhile you can run this command to know the node has been added to the cluster when the status has reached ready.
kubectl get nodes –watch

Final step: Running a windows application on the node
And now for our closing act, we will demonstrate a working application on the windows node.
Note: Since we are using windows and linux nodes, we must add a nodeselector to our yaml files specifying the os as linux or windows, or else the application will fail to start.
Given below is the content for the yaml file eks-sample-deployment.yaml
apiVersion: apps/v1kind:
Deploymentmetadata:
name: eks-sample-windows-deployment
labels:
app: eks-sample-windows-appspec:
replicas: 3
selector:
matchLabels:
app: eks-sample-windows-app
template:
metadata:
labels:
app: eks-sample-windows-app
spec:
affinity:
nodeAffinity:
requiredDuringSchedulingIgnoredDuringExecution:
nodeSelectorTerms:
– matchExpressions:
– key: beta.kubernetes.io/arch
operator:In
values:
– amd64
containers: – name: windows-server-iis
image: mcr.microsoft.com/windows/servercore:ltsc2019
ports:
– name: http
containerPort: 80
imagePullPolicy: IfNotPresent
command:
– powershell.exe
– –command
– “Add-WindowsFeature Web-Server; Invoke-WebRequest -UseBasicParsing -Uri ‘https://dotnetbinaries.blob.core.windows.net/servicemonitor/2.0.1.6/ServiceMonitor.exe’ -OutFile ‘C:\\ServiceMonitor.exe’; echo ‘<html><body><br/><br/><marquee><H1>Hello EKS!!!<H1><marquee></body><html>’ > C:\\inetpub\\wwwroot\\default.html; C:\\ServiceMonitor.exe ‘w3svc’; ” nodeSelector:
kubernetes.io/os: windows
As you can see, the nodeselector is at the bottom, ensuring the only nodes that the application can land on is that of a windows node.
Run the next 3 commands and after a few minutes, you’ll see the application pods running.
![]()
![]()

This concludes our session and for those of you who felt that this is a long method, don’t fret, there’s a way to do it all with eksctl for the resource ClusterConfig. This is to show the entire process that goes on behind the scenes. Let me know if you have any queries and I will try to answer them quickly. Stay Tuned.
Upskill Your Teams with Enterprise-Ready Tech Training Programs
- Team-wide Customizable Programs
- Measurable Business Outcomes
About CloudThat

WRITTEN BY CloudThat
CloudThat is a leading provider of cloud training and consulting services, empowering individuals and organizations to leverage the full potential of cloud computing. With a commitment to delivering cutting-edge expertise, CloudThat equips professionals with the skills needed to thrive in the digital era.


Comments