

 Login
Login- Consulting
- Training
- Partners
- About Us
x
Azure, Cloud Computing, DevOps
 6 Mins Read

 October 4, 2020
In this blog, I will be showing you the steps to set up an AKS cluster on Microsoft Azure and also host a simple voting application on top of it. So, let’s start with the introduction of everything that I have just mentioned.
What is an AKS Cluster, and what is it used for?
Azure Kubernetes Service is a managed Kubernetes service in Microsoft Azure that lets you quickly deploy and manage Kubernetes clusters. Before AKS came into the picture, we had to manage the servers/nodes, select an appropriate networking protocol, write scripts to configure the master and worker nodes, and manage the entire infrastructure along with it. AKS eliminated this burden by providing an easy way to manage your Kubernetes cluster even without in-depth knowledge of container orchestration. AKS supports the agile project method of software development, including Continuous Integration(CI) and Continuous Deployment(CD). Azure AKS is compliant with ISO, HIPAA, and HITRUST, thus ensuring that it’s a secure and compliant service to have in your infrastructure. Scaling your infrastructure using just a couple of mouse clicks on the Azure dashboard has made it easier to work with containers. These are the major advantages of working with Azure Azure Kubernetes Service(AKS).
So, an AKS cluster is used to host containerized applications that predominantly use Docker containers.
If you are still reading, then you must already know what Kubernetes cluster and containers are. If you aren’t sure what they are, kindly mention it in the comment section below and I can prepare another blog on those topics depending on the requirement.
Pre-requisites for following this blog:
I will be providing some important information along with the steps to do the configuration. So, let’s start.
Step 1.
Login to your Microsoft Azure account using the URL www.portal.azure.com and search for Kubernetes Services in the search box. After that, click on the service as I have shown in the below screenshot.

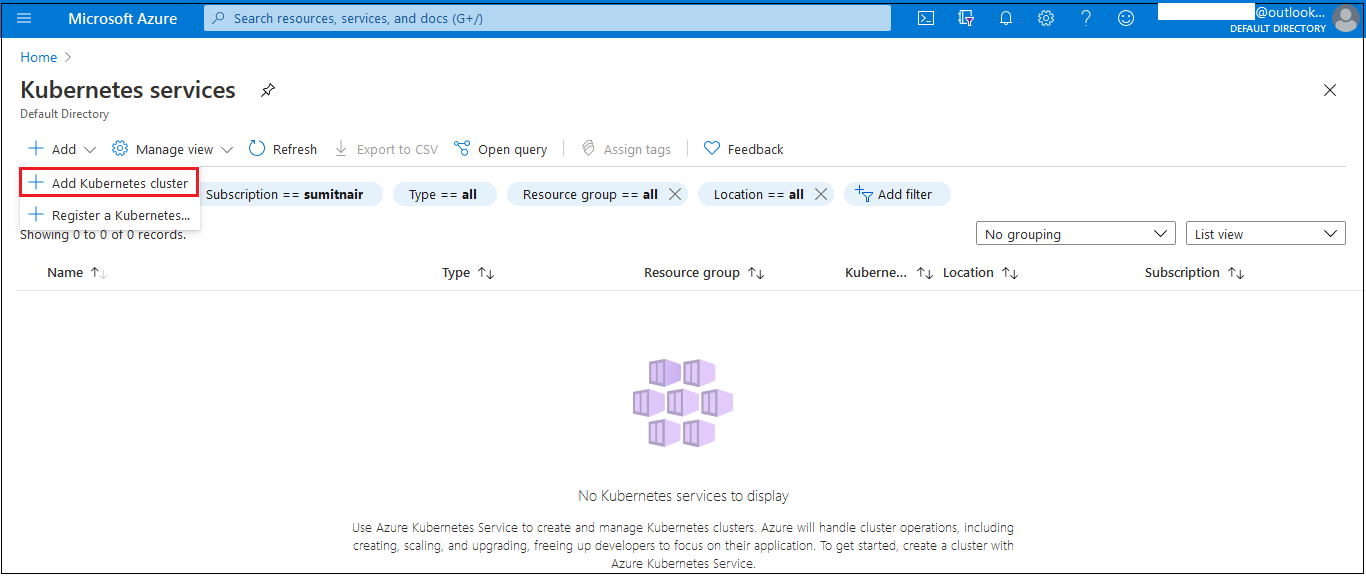
Step 2.
Once the service window opens, click on ‘+Add’ dropdown button and select ‘Add Kubernetes Cluster’.

Step 3.
Fill in the details like Resource Group name, Cluster Name and Region.
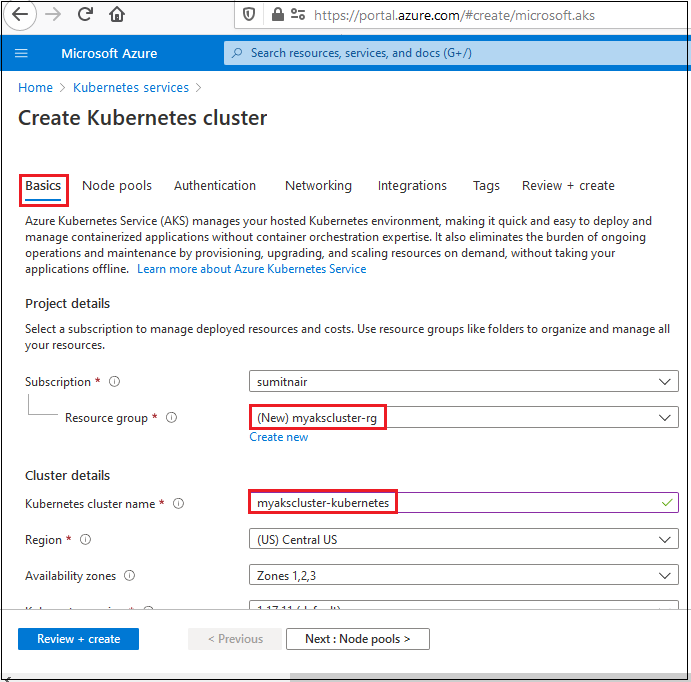
Step 4.
Also, you can select a Kubernetes version that you require. This helps when you know that your application works perfectly with a specific version of Kubernetes. Select the Node Size and Node Count that you require. I am going to be selecting a Standard DS2 v2 and keep the Node Count to 1. You can resize the Node Count later, but you cannot change the Node Size once the cluster has been created.

Step 5.
You can check other tabs on the same page for various options like Node Pools, Authentication and Networking but you can keep everything with default settings and this testing will still work.
Click on ‘Review + Create’ button.

Step 6.
After clicking on Review + Create, Azure will run a final validation before creating our cluster. You can see a ‘Validation Passed’ message once it’s done after which you can click on ‘Create’ button at the bottom.
It will take a couple of minutes for Azure to create your cluster. Once it’s done, you will see a ‘Your deployment is complete’ message on your screen.

Step 7.
Click on ‘Go to Resource’ and the next task will be to connect to your cluster. Click on ‘Cloud Shell’ icon on top right of the page, which will open a terminal for you.

Step 8.
Select Bash from the dropdown option in the terminal. If you are opening Cloud Shell for the first time, it will ask you to create a Storage Account, but it’s a one-time thing.

Step 9.
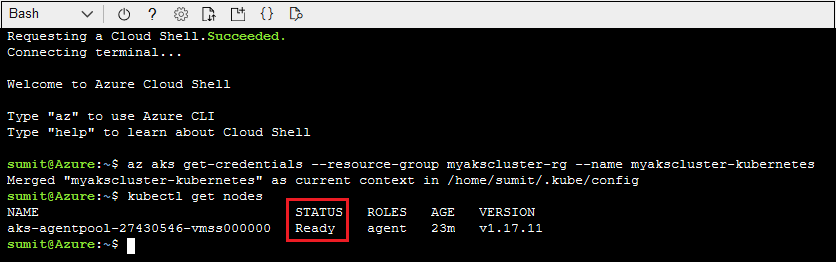
Now you need to configure the connection to your Kubernetes cluster here. It’s a simple command as shown below; using this command, you will be connecting to the Kubernetes cluster through Bash.
|
1 |
$ az aks get-credentials --resource-group myakscluster-rg --name myakscluster-kubernetes |

Step 10.
To verify the connection, we can use the Kubernetes command given below to see the nodes.
|
1 |
$kubectl get nodes |
Since we gave the minimum count as 1 for Nodes, we will see that node here. Make sure the Status of the Node is showing Ready, which means our configuration was correct.
Step 11.
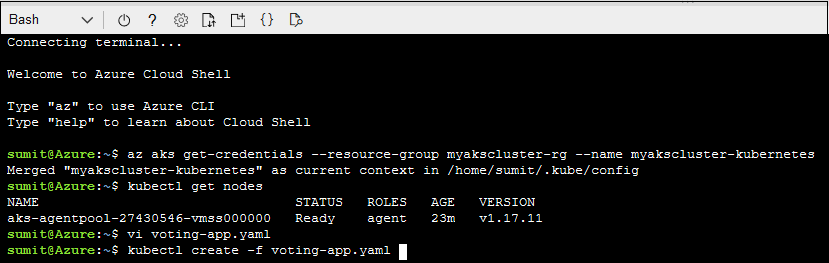
Next, we need to configure our application, and for that we will be using a YAML file. If you are about to work on Kubernetes a lot, make sure you know your way around YAML files because it’s ubiquitous in the Kubernetes world.
So, let’s create a new YAML file using Cloud Shell for our application. I will be giving the file an appropriate name, say, voting-app.yaml.
|
1 |
$ vi voting-app.yaml |
You can get the content of the YAML file from the official Azure Github documentation here. I have used the same script here and saved the file as voting-app.yaml.
Step 12.
The next step will be to run the YAML file using Kubernetes commands. The command is a simple one and I have provided the same below. ‘kubectl create’ command basically creates everything that is mentioned in the YAML file mentioned, so you should be cautious while creating and running YAML files.
TIP: Similar to Linux command line, tab spaces does autocomplete in Azure Cloud Shell.

The ‘kubectl create’ command mentioned in the previous step won’t take much time to run and it will be over in 3 seconds. I have mentioned the output in the above screenshot and notice that it all says ‘created’ without any errors.
Step 14.
Now it’s time to test the application. Please note that it will take a couple of minutes for Azure to actually deploy our application and to check the same, we can run the below command:
|
1 |
$kubectl get service azure-vote-front –watch |

If you are running this command right after the creation, you will see a ‘pending’ status under the External IP’ column. I ran this command after a while; hence, it’s showing the IP for me in the first run itself.
Step 15.
Copy the external IP; paste it in your browser and hit enter. You will be able to see a simple voting app that intakes the number of votes for cats and dogs. You can click on them and it does the counting.

Simple, right? We just hosted our containerized application on Azure AKS.
Step 16.
This is an important step because this is where we clean up the resources that we have created to avoid unnecessary bills. You can use the portal to delete the cluster.

Refresh the window and check the status changing from ‘Deleting’ to ‘Deleted’ in the Azure Activity Log.
I hope this blog was helpful in understanding the configuration of a simple containerized app on Azure while setting up an AKS cluster.
If you want to know more about Kubernetes and Azure services kindly check our courses here and here
Please comment if you have any questions.
|
Voiced by Amazon Polly |
SHARE

AWS, Cloud Training
By Himisha Raval
Jul 14, 2026

AWS, DevOps
By Himisha Raval
Jul 14, 2026


Artificial Intelligence, Data science
By Himisha Raval
Jul 14, 2026

AI, Data Analytics
By Himisha Raval
Jul 14, 2026

Agentic AI, Prompt Engineering
By Himisha Raval
Jul 14, 2026


Our support doesn't end here. We have monthly newsletters, study guides, practice questions, and more to assist you in upgrading your cloud career. Subscribe to get them all!

Comments