

 Login
Login- Consulting
- Training
- Partners
- About Us
x
Cloud Computing
 7 Mins Read

 November 23, 2015
A Domain helps in the centralized management of the computers and users in an organization. Domain Controllers are the servers that play an important role of managing the workstations and users. Microsoft Active Directory helps in configuring domain controllers on a Windows machine. Active Directory Domain Services(AD DS) provides the feature to promote a windows machine as a Domain Controller. Active Directory Domain Services provide secure, structured, hierarchical data storage for objects in a network which includes users, computers, printers, and services. Promoting a Windows server as a domain controller: Task 1: Launch a windows server and install AD DS in it. Task 2: Promote the server as the Domain Controller. Task 3: Move the other workstations to the domain. TASK 1: LAUNCH A WINDOWS SERVER AND INSTALL AD DS Considering Windows 2012 R2 server is provisioned, we now promote the server as a domain controller for handling the workstations under a particular domain, follow the below steps: Step 1: Navigate to the Server Manager feature of Windows server. The Server Manager can be accessed easily by clicking the Windows button on the home screen & choosing Server Manager.  Step 2: In the Server Manager window, click on Manage at the top right corner of the window.
  Step 3: Right click the Manage option, and choose Add Roles and Features option.
  Once the Add Roles and Features Wizard has started up, select Next. Step 4: The default settings can be used on the Before You Begin page. Click Next.
  Step 5: In the Installation Type page, select Role-based or feature-based installation radio button and click Next.
 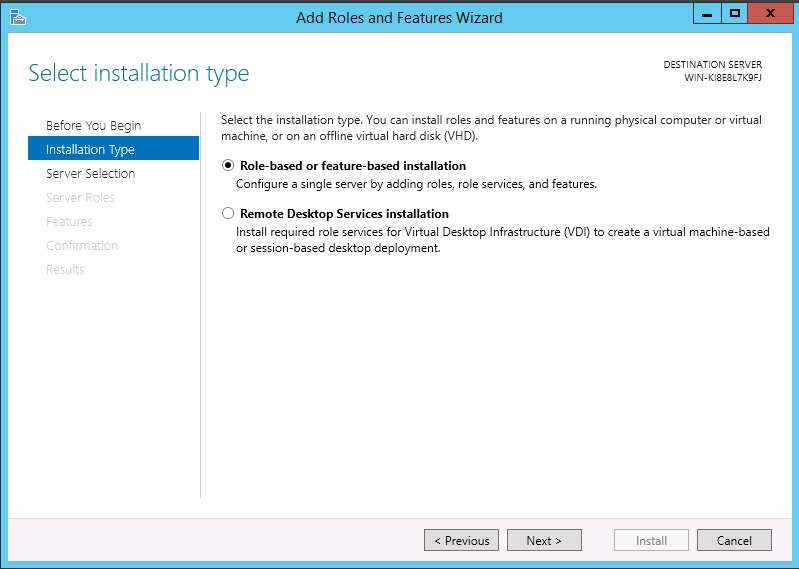 Step 6: Under Server Selection page, choose the radio button denoting Select a server from the server pool and choose the server name from the Server Pool list. Click Next.
  Step 7: On the Server Roles page, select Active Directory Domain Services and click Next.
  Step 8: Windows will prompt for the additional features that will be needed. Choose the Include management tools(if applicable) checkbox and click Add Features.
  The next window will prompt with a few additional notes regarding the best practices. Note that the Active Directory Domain Services Role will install the following in a new environment:
Step 9: The AD DS page will provide the information about the Active Directory setup. Have a glance over the information and click Next.  On the confirmation page, all components that are required to be installed are listed. Check the list box that denotes Restart the destination server automatically if required. Click Install and the Active Directory Domain Services role is installed.
  Note that on a new server, a reboot is not required to install the Active Directory Domain Services role.
  On completion of the installation process, the server can be promoted to a domain controller. TASK 2: PROMOTE THE SERVER AS THE DOMAIN CONTROLLER To promote the server with AD DS as the domain controller, the important process is to configure the DNS of the server. Step 1: In the Control Panel, select Network and Internet and choose Network and Sharing Center. Step 2: In the View your active networks column, click on the network connection, either Ethernet or the Wi-Fi connection. In this case, Wireless Network Connection(CloudThat-Airtel).
  Step 3: In the Wireless Network Connection Status windows, under the Activity section, click on Properties.
  Step 4: In the Ethernet Properties window, choose Internet Protocol Version4 (TCP/IPv4) and choose Properties. In the Internet Protocol Version4 (TCP/IPv4) Properties window, select Use the following DNS server address: and provide the Preferred DNS server: as 127.0.0.1 to point to the local server that acts as the Domain controller.
  Step 5: Click OK and close all the windows by saving the changes. After setting up the DNS server configuration, the server is ready to be promoted as the Domain Controller. In the Server Manager, click on the Notification on the left corner near the Manage option. Click on the Promote this server to a domain controller.
  Step 6: In the Active Directory Domain Services Configuration Wizard, mention the Deployment Configuration. The configuration depends on the following scenarios: If already a domain exists and if we need to promote this server as a part of the same domain, choose the first option as “Add a domain controller to an existing domain”. If a forest exists already and this is the new domain under the forest, choose the second option as “Add a new domain to an existing forest”. If this server is about to set up the initial part of a domain, add it as a new forest by choosing the third option as “Add a new forest”.
 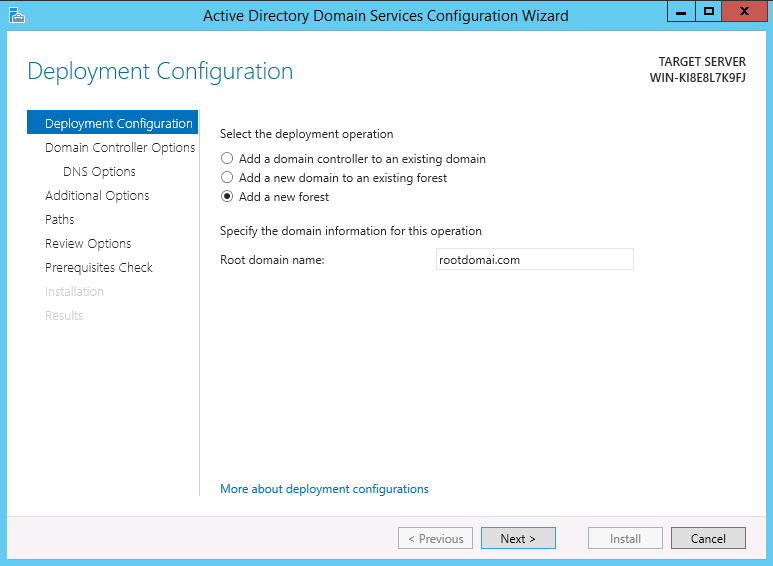 In this case, we have added the domain controller as a new forest. Mention name of the root domain (eg:rootdomai.com) and click Next. Step 7: In the Domain Controller Options, select the functional level of the new forest and root domain. Forest Functional Level denotes the minimum version of the servers that can be included in the Forest. Domain functional level denotes the minimum version of the servers that can be included under the domain. In this case, since the servers are updated above the Windows Server 2012, select both the options as Windows Server 2012 or Windows Server 2012 R2. Also mention the password for the Directory Services Restore Mode and click Next.
  Click Next in the DNS Options window. Step 8: In the Additional Options window, set the NETBIOS name as the domain name of the domain controller (eg: ROOTDOMAI) and click Next.
  Step 9: Keep the remaining attributes as default and click Next in the subsequent tabs. Finally, click Install and wait till the DNS installation to finish.
  This setup of DNS might require the server to be restarted. Save all the changes and restart the server. The Domain Controller is setup with the domain name (eg: rootdomai.com) TASK 3: MOVE THE OTHER WORKSTATIONS UNDER THE DOMAIN To add workstations under the domain, provide the IP address of workstation as the DNS address: Step 1: RDP into the new workstation with the local Username and password. To connect the workstation with the domain controller, the DNS setting of workstation has to be configured to direct to the domain controller. Select the Network and Sharing Centre from the Control Panel. Choose the Ethernet or the Wireless Connection option as performed in the domain controller Network Configuration.
  Choose Properties and select Internet Protocol Version4 (Ipv4) Properties. Use the private Ip address of the domain controller as the Preferred DNS Server under the Use the following DNS server address and click OK.
  Step 2: Change the Computer Name of the new server to be added under the domain controller. This step helps for easy identification of the server under the domain controller. Select System and Security from the Control Panel and choose System and click Change Settings in the Computer name, domain and workgroup settings section.
  Step 3: In the System Properties wizard, under the Computer Name tab, click on Change button.
  Step 4: Modify the computer name and Select the Domain option and enter the domain name in the text box (eg:rootdomai.com)
 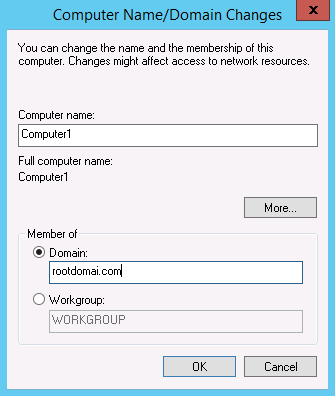 The Windows Security wizard requires the Username and Password of the Domain Controller Administrator.
 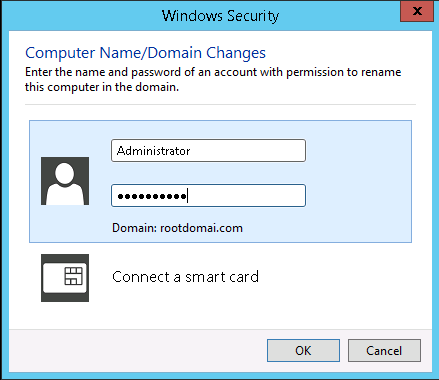 This will welcome to the new domain with a Welcome message. For the changes to take effect, save the changes and restart the system. Step 5: RDP into the server with the domain credential by including the domain name with the username (eg: ROOTDOMAI\Administrator) and provide the password of Domain Controller.
  Once the workstation is logged in, the System settings will display the modified computer name and the domain name (eg: Computer name: Computer, Domain: rootdomai.com).
  This concludes that the new server is now a part of the domain. The complete walk-through of promoting a Windows server as the domain controller by installing Active Directory Services and moving a Windows server under the domain controller is performed. The process of connecting a Linux machine with the Windows Active Directory is briefed in my next blog.
This is the method we used for moving Windows workstations under a Windows Active Directory for few of our clients. Kindly visit our consulting site here, to gather more information & guidance for the consulting projects.
|
Voiced by Amazon Polly |
CloudThat is a leading provider of cloud training and consulting services, empowering individuals and organizations to leverage the full potential of cloud computing. With a commitment to delivering cutting-edge expertise, CloudThat equips professionals with the skills needed to thrive in the digital era.
SHARE

Google Cloud (GCP)
By Laxmi Sharma
Mar 27, 2026


Agentic AI, AI, Gen AI
By Niti Aggarwal
Mar 25, 2026


Corporate Training
By Daliya V K
Mar 25, 2026


AWS
By Vijayanand K V
Mar 25, 2026

Our support doesn't end here. We have monthly newsletters, study guides, practice questions, and more to assist you in upgrading your cloud career. Subscribe to get them all!

Integrating Ubuntu workstation with a Windows Active Directory | CloudThat's Blog
Dec 8, 2015
[…] my previous blog, I have mentioned the process of promoting a windows server as the Domain Controller and the steps […]
Dr.S.Prakash
Nov 26, 2015
It is interesting