

 Login
Login

 February 8, 2023
|
Voiced by Amazon Polly |
Overview
Nowadays, in any discussion about continuous integration or continuous delivery tools, Jenkins will inevitably be brought up. This blog introduces you to Jenkins, how it improves your continuous integration environment, why it is the most famously used CI/CD tool, working of Jenkins, Jenkin Plugins, and Jobs, and provides a step-by-step guide to create your first freestyle project using Jenkins.
Start Learning In-Demand Tech Skills with Expert-Led Training
- Industry-Authorized Curriculum
- Expert-led Training
Before Jenkins
In a scenario where multiple developers working at different times and from different locations end up having irregular commits, Integration issues, and delays in testing which leads up to delays in the release of the software.
In the past developers had to wait till the entire software code was built and tested for errors and bugs. This led to the entire process of software delivering software being slow and there was no iterative improvement or testing of code.
This is where Jenkins comes into the picture to address the above issues.
What is Jenkins?
Jenkins is a product that comes out of continuous integration with a version control system that allows teams to submit their codes consistently into a source code repository.
Two ways to implement continuous delivery:
- Nightly build and integration: wherein changes are committed to the source code which is then pulled only at night and all the changes made to the code are built together.
- Continuous Integration: with this, we can go a step further wherein we can continuously commit changes to the source code and the code is pulled and continuously built whenever a commit is made to the source code. These are the capabilities Jenkins provides in continuous integration.
It is the most popularly used CI/CD DevOps tool in the market. It can be looked at as a script orchestrator where-in it looks for an event and then triggers a script and controls the built environment in which the script runs.
Nearly all combinations of source code repositories and languages can be set up in a CI/CD environment using Jenkins.
Advantages of using Jenkins:
- Easy Installation: Jenkins is a self-contained Java program, making it compatible with the majority of common operating systems.
- Easy Configuration: Jenkins can be easily set up using its web interface which has error checks and helps built into it.
- Plugins: Jenkins has several features that make it useful for developers and continuous integration teams, one of which is this. Plugins are used to increase the product’s fundamental functionality. The update center in Jenkins has hundreds of plugins.
- Extensibility: Because Jenkins is so extensible, the possibilities for customizing it to meet your environment are virtually limitless.
- Distributed: Jenkins allows the distribution of workload across multiple machines which results in faster build, tests, and deployment across various platforms.
Working of Jenkins
To guarantee that the commit did not “break the build,” Jenkins can be configured to run the first set of unit tests. The developer can be informed right away to take corrective action if the tests fail. As it is simple to identify which commit led to the build failure, the question of “Who broke to build?” is put to rest. If every unit test passes, the build process can go on to the next phase, which involves longer-running integration tests.
Jenkins offers the option to execute builds concurrently across many machines to cut down on the overall time needed to accomplish many of these tasks. Before releasing the build into production, Jenkins can finally deploy it to an environment that enables any necessary user acceptance testing (UAT). The principles of a continuous integration (CI) environment are embodied in these condensed steps.
If these UAT tests pass, the code can be merged into the master branch where a “golden” build can be built and pushed immediately into production without manual intervention, achieving the holy grail of continuous deployment (CD). These UAT tests can also be automated using a tool like Selenium.
Jenkins Plugins
The main way to make a Jenkins system more useful to meet user- or organization-specific requirements is through plugins. On a Jenkins controller, more than a thousand different plugins can be added to combine multiple build technologies, cloud providers, analysis tools, and much more.
The Update Center offers the option to automatically download plugins and all their dependencies. The Update Center is a service run by the Jenkins project that offers a list of open-source plugins created and maintained by various Jenkins community members.
Top Jenkins plugins for productive DevOps
Setup & Scaling
- Kubernetes
- Amazon ECS
Pipeline / Flow
- Job DSL
- Build Pipeline
Monitoring & Alerting
- Monitoring Disk-usage
- Mailer
Source Control Management (SCM)
- Git
- GitHub Integration
Tests & Analysis
- Test Results Analyzer
- Junit
Jenkins Jobs
Any automated task/process that is implemented in Jenkins is a Jenkins Job.
Examples of these automated tasks are: building the source code, downloading the source code from version control, compiling it, running unit tests, and merging source code from any source code management like git, SVN, etc.
A step-by-step guide to creating your first freestyle project on Jenkins with Git
Part 1: GitHub Configuration – Set up a webhook to pull code from GitHub using the Git plugin
Pre-requisite:
- Create a public GitHub repository containing your source code.


- Navigate to the settings for the repository
- Scroll down and select Webhooks – Add a Webhook, and fill in:
- Payload URL – Add your Jenkins environment URL and add /GitHub-webhook/ to the end of it. (If Jenkins is running on localhost, add your Public IP:8080//github-webhook/
- Content Type – select application/json
- Secret – Leave this field empty.

3. Scroll down to ‘Which events would you like to trigger this webhook?’
Select Let me select individual events.
Check Pull Requests’ and ‘Pushes’
Ensure that the ‘Active’ option is checked and click on ‘Add webhook.’


This concludes the GitHub configuration.
Part 2: Jenkins Configuration
Pre-Requisite:
- To build your first freestyle Jenkins project it’s necessary to have Jenkins installed on your system and to have Admin Authentication configured.
- For Jenkins to work the system must have JDK 8 or 11 installed.
- The JDK installation path must be added to the system environment variable
- Add an environment variable: JAVA_HOME which must point to the location where JDK is installed.
Once you have Jenkins up & ready,
- Login to your Jenkins Dashboard (http://localhost:8080)

- In case Jenkins is installed in another path, use the appropriate URL to log in to the Jenkins Dashboard.
- Select “New Item” on the top left corner of the Jenkins Dashboard.

- Enter the name of the item you want to create, on the next screen.
- Select “Free Style Project” among the given options for the new item to be created and click OK.

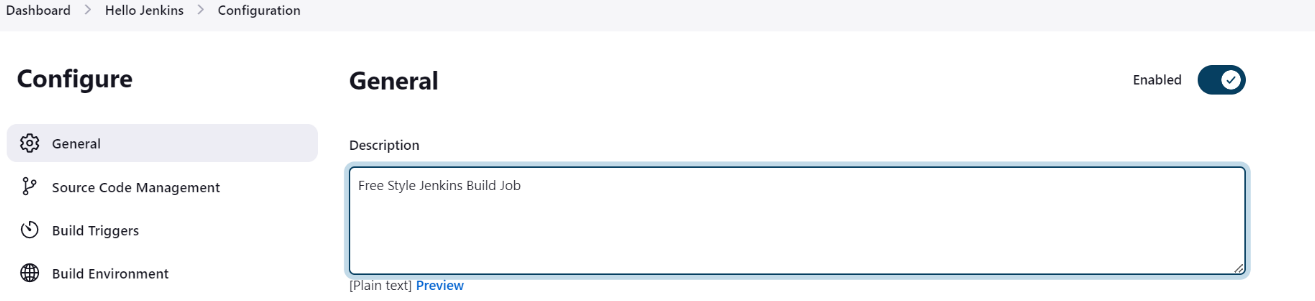
- Upon clicking OK, Jenkins redirects us to the project configuration view to fill in the details about our project.
- Fill in a description for the project in the General tab.
- The Source Code Management tab checks out the code from version control hosts, this is where you add your repository details (e.g., GitHub, etc.) Jenkins will then clone that repository.
- Under Source Code Management (SCM) tab,
- For the repository source, select Git and provide the Git Repository URL.
- You are permitted to use a local repository if you have one set up locally.
- If your GitHub repository is a private one. If so, Jenkins will check the login information against GitHub, and after a successful check, it will download the source code from your GitHub repository.


- The next step is to build the code after you have provided all the project and repository details. To compile the code at the time of your choosing, you can modify the options in the Build section. If necessary, you may even set the build to run regularly.
- Go to the Build Environment section, Under the Build Section,
- Click on Add Build Step.
- In the drop-down list, choose “Execute Windows batch command”
- Add the commands you want to execute during the build process.


- Once all the data is entered, Click Apply and Save the project.
- Click the Build Now button on the left side panel, to build the source code.
- Check the Build history to view the status of the build.

- By clicking the build number under the Build History, we can look up the history of the executed build. You should be able to see a success or failure message by selecting Build Number -> Console Output, depending on how the process is performed.

Conclusion
This blog introduces you to one of the popular continuous integration tools – Jenkins and provides a step-by-step demo to create your first freestyle Jenkins project and pull code using the git plugin.
Upskill Your Teams with Enterprise-Ready Tech Training Programs
- Team-wide Customizable Programs
- Measurable Business Outcomes
About CloudThat

WRITTEN BY Komal Singh


Comments