|
Voiced by Amazon Polly |
Introduction to Amazon EMR
Amazon Elastic Map Reduce (EMR) Serverless is the latest deployment option for Amazon EMR. It provides a serverless runtime environment that simplifies the operation of analytics applications that use the latest open-source frameworks, such as Apache Spark and Apache Hive. Using EMR Serverless eliminates the need to optimize, secure, configure, or operate clusters to run applications with these frameworks.
The benefits of EMR Serverless are open-source compatibility, concurrency, and optimized runtime performance for popular frameworks.
Freedom Month Sale — Upgrade Your Skills, Save Big!
- Up to 80% OFF AWS Courses
- Up to 30% OFF Microsoft Certs
- Ends August 31
Advantages of EMR
- It avoids over- or under-provisioning resources for your data processing jobs.
- It automatically determines the resources the application needs, gets them to process your jobs, and releases them when the jobs finish.
- For use cases where applications need a response within seconds, such as interactive data analysis, you can pre-initialize the necessary resources when you create the application.
Application Environment
EMR Serverless is mainly used to create one or more EMR Serverless applications that use open-source analytics frameworks. For that, some predefined attributes need to be specified:
- The Amazon EMR release version must be specified for the open-source framework version that you want to use.
- Need to specify the runtime, which is useful to the application, such as Apache Spark or Apache Hive.
Unlike other applications, the EMR Serverless application strictly runs on an Amazon VPC. Additionally, AWS IAM policies must be defined so that specified IAM users and roles can access the application. The usage costs incurred by the application can also be tracked.
EMR Serverless is a regional service that usually simplifies how workloads run across multiple Availability Zones in a Region.
Job Run
Job run plays a vital role in EMR Serverless. A job run is nothing but a request submitted to an EMR Serverless application specifies that the application executes asynchronously and usually tracks through completion. After submitting a job, you need to specify a runtime role in IAM so that the job can access AWS resources. Multiple job run requests can be submitted to an application, and each job run can use a different runtime role to access AWS resources. After that, an EMR Serverless application starts executing jobs once it receives them and runs multiple job requests concurrently.
Workers
For the execution of workloads, the EMR Serverless application internally uses workers. The default sizes of these workers are classified based on the type of application and the release version of Amazon EMR. The sizes can be overridden while scheduling a job run.
After submission of a job, EMR Serverless generally computes the resources based on application needs for the job and schedules workers. After that, EMR Serverless breaks down workloads into tasks; then, EMR downloads image provisions set up workers, and finally decommissions them when the job finishes.
The workers can be scaled up and down by EMR Serverless automatically based on the workload by enabling parallelism at every stage of the job. This automatic scaling is very helpful and gives us leverage without the need for any estimation of worker count that the application needs to run your workloads.
Getting Started
Amazon EMR Serverless- Simple Spark Application Demo
EMR Serverless Navigation:
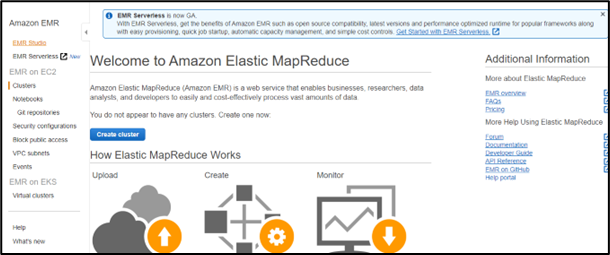
- Log in to Amazon Console and open EMR Console
- To the left side of the navigation page, click on the EMR Serverless to navigate to the EMR Serverless home page.

- On the home page, choose the Get Started option.

EMR Studio Creation:
- Then you need to create EMR Serverless applications. But EMR Studio is needed to create and manage EMR Serverless applications.
- If the EMR Studio option was not there in that AWS Region, where you’re creating an application, then the EMR Studio will get created automatically. Choose Create and launch Studio to proceed to navigate inside the Studio.

EMR Application Creation:
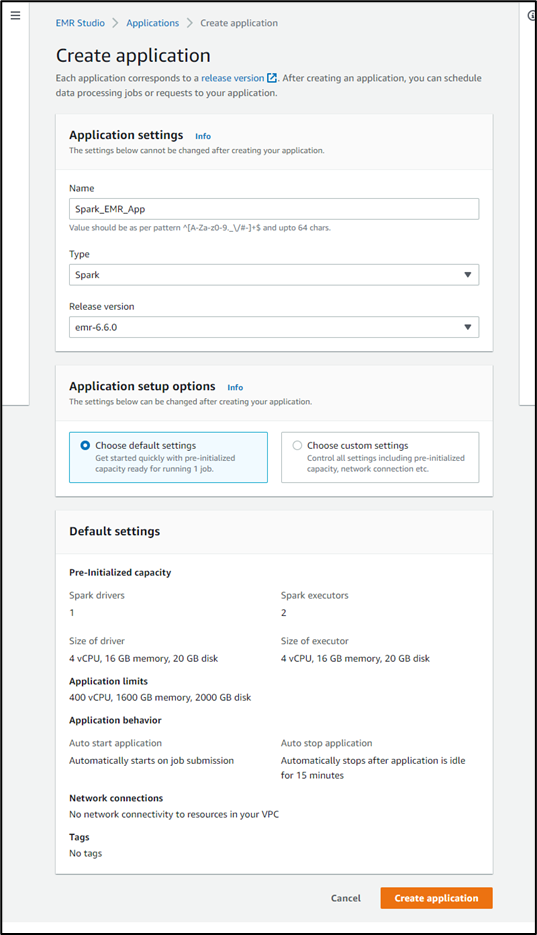
- Thereafter you’ll get navigated to the next page which consists of the details to enter the name, type, and release version of your application. Here the default settings have been chosen which can be modified later. With these settings, the application will get created with pre-initialized capacity that’s ready to run a single job, but the application can scale up as needed. After that click on Create application to create an application.

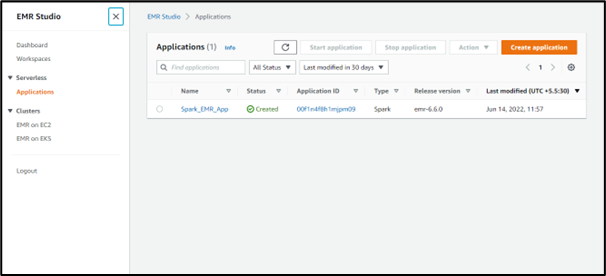
- The application will get created.

- Select the created application, in that page, you can find the Properties and Jobs Run tabs. Go to the Jobs Run tab and select the Submit Jobs button.

Job creation:
- As the application is mainly for PySpark the script is saved in S3 (test-emr-spark), which consists of a python file in the scripts folder with the name py and an output folder named emr-serverless-spark

Creation of IAM Role:
- As the job runs in EMR Serverless, creating a runtime role is necessary to provide granular permissions to specified AWS services and resources at runtime. Here as we have stored the scripts and need to keep the outputs in s3 named test-emr-spark need to give permissions to access that bucket with the help of the Runtime role.
- For creating a job runtime role, initially create a runtime role with a trust policy so that EMR Serverless can use the new role. Next, attach the required S3 access policy to that role. The steps mentioned below will help in the creation of a role.
- Open the IAM Console https://console.aws.amazon.com/iam/
- Choose Roles on the left navigation pane
- Choose the Create role.
- The role type should be Custom trust policy and paste the following trust policy. This is very much essential for jobs submitted to your Amazon EMR Serverless applications to access other AWS services on your behalf.
IAM Role Custom Policy
123456789101112{"Version": "2012-10-17","Statement": [{"Effect": "Allow","Principal": {"Service": "emr-serverless.amazonaws.com"},"Action": "sts:AssumeRole"}]}- Choose Next, navigate to Add permissions page, and click on Create policy.
- Create policy page opens on a new tab and the policy such a way to access the AWS resources.
1234567891011121314151617181920212223242526272829303132333435363738394041424344454647484950515253{"Version": "2012-10-17","Statement": [{"Sid": "ReadAccessForEMRSamples","Effect": "Allow","Action": ["s3:GetObject","s3:ListBucket"],"Resource": ["arn:aws:s3:::*.elasticmapreduce","arn:aws:s3:::*.elasticmapreduce/*"]},{"Sid": "FullAccessToOutputBucket","Effect": "Allow","Action": ["s3:PutObject","s3:GetObject","s3:ListBucket","s3:DeleteObject"],"Resource": ["arn:aws:s3:::test-emr-spark", #NEED TO REPLACE WITH YOUR"arn:aws:s3:::test-emr-spark/*" BUCKET NAME]},{"Sid": "GlueCreateAndReadDataCatalog","Effect": "Allow","Action": ["glue:GetDatabase","glue:CreateDatabase","glue:GetDataBases","glue:CreateTable","glue:GetTable","glue:UpdateTable","glue:DeleteTable","glue:GetTables","glue:GetPartition","glue:GetPartitions","glue:CreatePartition","glue:BatchCreatePartition","glue:GetUserDefinedFunctions"],"Resource": ["*"]}]} - On the Review Page, enter the name of your choice and click on create policy
- Refresh the Attach permissions policy page and choose the created policy.
- On the Name, review, and create page, enter a name of your choice for the Role name and then create the role.
- IN THIS, THE ROLE AND POLICY ARE CREATED IN THE NAME OF TEST_EMR_Spark_Role & First_EMR_Success_Policy RESPECTIVELY.
- As there are no jobs submitted need to create a job to run. To run jobs select the option submit job and you’ll get navigated to the Job creation page.
a. Select the job runtime role as created earlier TEST_EMR_Spark_Role
b. The script location is s3://test-emr-spark/scripts/wordcount.py
c. Scripts arguments are nothing but the s3 outputs which is [“s3://test-emr-spark/emr-serverless-spark”]
d. The Spark Properties–conf spark.executor.cores=1 –conf spark.executor.memory=4g –conf spark.driver.cores=1 –conf spark.driver.memory=4g –conf spark.executor.instances=1

- Finally, to start the job run, click on Submit job
- You should see your new job run with a Running status in the job runs tab.
Application UI and logs
- To view the application, select the running job, and there you can find SparkUI, which is available in the first row of options for the created job run.
- Then, you will get navigated to another window upon clicking the SparkUI option. To view the driver and executors logs in the Spark UI, you must select the Spark job run and the Executors tab.
- After the job run status becomes Success, the output logs of the job can be viewed in S3 bucket s3://test-emr-spark/emr-serverless-spark.
Clean up
- The application which was created should auto-stop after 15 minutes of inactivity, even though there is such a feature it’s better to clean up the things.
- For deleting the application, go to the List applications page. Select the application that you created and select Actions and select Stop to stop the application. Once the application got into the STOPPED state, select the same application, choose Actions, and then click on Delete.
Conclusion
EMR Serverless is very helpful for running analytics workloads at any scale and enables applications to run with automatic scaling that resizes resources within a short time to meet changing data volumes and processing requirements. EMR Serverless has a feature of automatically scaling the resources up and down to provide the required amount of capacity to run the application and make it cost-effective.
With this, I hope you have learned how to launch an application using EMR Serverless, the type of roles, and the necessary prerequisites. If you have any questions regarding this, I will be happy to help you out. Drop your query in the comments section, and I will get back to you quickly.
Freedom Month Sale — Discounts That Set You Free!
- Up to 80% OFF AWS Courses
- Up to 30% OFF Microsoft Certs
- Ends August 31
About CloudThat
CloudThat is an award-winning company and the first in India to offer cloud training and consulting services worldwide. As a Microsoft Solutions Partner, AWS Advanced Tier Training Partner, and Google Cloud Platform Partner, CloudThat has empowered over 850,000 professionals through 600+ cloud certifications winning global recognition for its training excellence including 20 MCT Trainers in Microsoft’s Global Top 100 and an impressive 12 awards in the last 8 years. CloudThat specializes in Cloud Migration, Data Platforms, DevOps, IoT, and cutting-edge technologies like Gen AI & AI/ML. It has delivered over 500 consulting projects for 250+ organizations in 30+ countries as it continues to empower professionals and enterprises to thrive in the digital-first world.
FAQs
1. What is different between EMR and EMR Serverless?
ANS: – Amazon EMR generally distributes your data across Amazon EC2 instances and processes data using Hadoop. Amazon EMR is used in various applications, including log analysis, web indexing, data warehousing, machine learning, financial analysis, scientific simulation, and bioinformatics. EMR Serverless is a toolkit for building and running serverless applications. It usually makes applications classified as microservices that run in response to events that usually occur with the to-scale feature enabled. There is a feature to get charged of what it will get utilized. It lowers the cost of maintaining your apps, allowing you to build more logic faster. The Framework uses new event-driven compute services, like AWS Lambda, Google CloudFunctions, and more.
2. How is EMR Serverless classified?
ANS: – EMR Serverless is classified as a “Serverless / Task Processing” tool.
3. How to use EMR Serverless?
ANS: – To start an EMR Serverless job, customers select the open source framework they want to use and then trigger their application to run using either APIs, CLIs, the AWS Management Console, or from EMR Studio.

WRITTEN BY Bhanu Prakash K
K Bhanu Prakash is working as a Subject Matter Expert in CloudThat. He is proficient in Managing and configuring AWS Infrastructure as well as on Kubernetes and DevOps tools like Terraform, ansible, Jenkins, and Git. He is very keen on learning new technologies and publishing blogs for the tech community.


 Login
Login


 August 30, 2022
 PREV
PREV


Comments