

 Login
Login

 February 17, 2023
|
Voiced by Amazon Polly |
Introduction
Duplicating data is backing up data, which enables recovery of the duplicate set in the case of a data loss event. Today, many kinds of data backup tools help enterprises and organizations ensure that data is secure and critical information is not lost in a natural disaster, theft situation, or other emergencies. Cloudberry tool is one type of backup tool used to help manage multiple backups to cloud providers like Amazon S3, GCP, and Azure.
Start Learning In-Demand Tech Skills with Expert-Led Training
- Industry-Authorized Curriculum
- Expert-led Training
What is an ISV?
ISV stands for Independent Software Vendor. This is a firm whose product or service is built in the Cloud but is not a Cloud product. Cloud partners are classified into two types: Consulting Partners and Technical Partners. Consulting Partners offer professional services (consulting, custom application development, system integration, and managed services), whereas Technical Partners, often known as ISVs, offer their services on a subscription or pay-as-you-go basis.
Features of CloudBerry
- CloudBerry supports all popular cloud storage providers and classes, including Amazon S3, Amazon S3 Glacier, Microsoft Azure, Google Cloud, Backblaze B2, Wasabi, various S3-compatible storage
- Cloud backups (cloud-to-cloud and cloud-to-local)
- Restoring image-based backups as instances on Google Compute Engine, Amazon EC2, and Microsoft Azure
- Backup and restore schedule
- Two-step hybrid backup (applies to the legacy format only)
- Data compression and encryption (local and cloud)
- Data movement between backup sources and cloud destinations is fast, speedy, and safe thanks to advanced features like compression, encryption, and retention policy.
- Pay-as-you-go, subscription-base
CloudBerry Backup Application
CloudBerry is an MSP360 ISV (Independent software vendor) product that is used to help manage multiple backups to cloud providers like AWS. CloudBerry Backup provides SMB with a secure backup and affordable solution that works on all major platforms, including Windows, Mac, Linux, Hyper-V, and VMware.
Cloudberry Installation Process
- To install MSP360 (CloudBerry), get the installation file from the website.
- Navigate to a folder containing the installation packages, then run it.
- When you download Cloudberry Backup, you may use it for free for personal use, but with a backup storage restriction of 200 GB and without encryption or compression. You may also try encryption and compression for 15 days as a trial.

Demo of CloudBerry with AWS
- Configure a backup plan
- To create a backup plan in Cloudberry Backup, you must go to Cloudberry Backup Application > Home > Local to the cloud.

- After clicking on ‘Local to Cloud’, you can see the Create Backup Plan Wizard

2. Configure backup destination
- Next, you click on the Next icon. There is an option to add storage to a new account, so select that.

- There are many cloud options. The cloud options include the most popular cloud storage providers, such as AWS S3, Google Cloud, Oracle Cloud, etc. Here you need to choose AWS S3/Glacier.

- Here we can see how to use cloud backup with AWS as an example. So, we need to create AWS IAM Programmatic User with S3 Full Access for CloudBerrry.
- Now you need to configure your AWS account through the access key secret key, give your specific bucket name, Display name, and account type.

- Click on OK here, you can see Selected Backup Cloud Storage.

- Click on next, and now, you can create a backup plan. Give your Backup plan name, or leave it as a default name.

- Click on Next, and now you will see the Advanced Options here, leave it as default and click on Next

3. Configure backup source
- You choose the data you wish to back up in the backup source. Only the most crucial data in my Cloudberry backup folder are backed up to Amazon S3.

- You can filter what you want to back up, but here, I’m choosing Back up all files in selected folders.

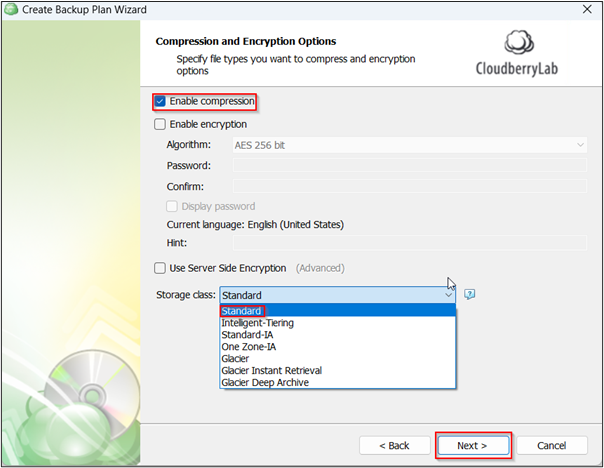
4. Compression and encryption
- I use the free version, but if you purchase a Cloudberry subscription, you can also enable backup data compression to save bandwidth use. A license would also allow you to encrypt your data before it is backed up, and you can specify the S3 storage class for backup data. Click on Next.
- Click on Next, and here you can see Backup Consistency Check. Leave it as a default.

5. Schedule
- Click on Next. Now it’s time to run schedule a backup plan. You can see there are two options No schedule (run manually for one-time backup) and recurring (incremental). Here I’m choosing No schedule for a one-time backup.

6. Retention policies
- You can change these default settings, and you can also decide how to handle files that have been deleted locally, but here, I’ve selected “do not purge,” which means that backups will be kept in AWS S3 buckets indefinitely.

7. Email notification
- The next option is to allow email notifications of successfully completed backup plans. I usually enable notifications only when a backup fails or a backup is completed.

8. Backup plan summary
- Check the summary of your backup plan. If everything is correct, you can save it by clicking on Next.

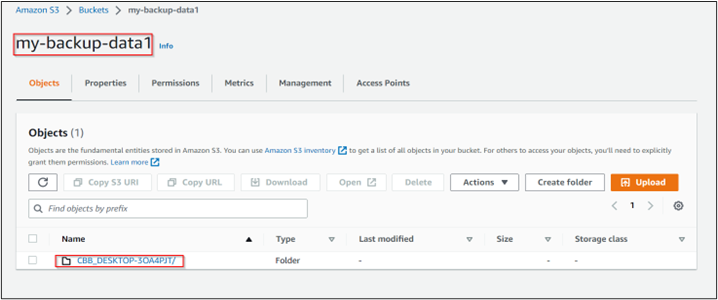
- After creating your backup plan, you may read a summary of each plan in the main window. When I click on the plan we just made, I can see some summary data, including the schedule, source, and destination. More importantly, I can see when it was run and whether or not the backup was successful.

- When the backup is executed successfully, the files backed up to my backup bucket may be seen if I visit my Amazon S3 bucket. I will see these files:

9. Restore a backup
- With the CloudBerry Backup Application, your file or folder can quickly be restored from the backup using the Cloudberry dashboard. You need to right-click on your backup plan and select restore Data.

Conclusion
The CloudBerry Backup application is a great application for backing up data. With support for different cloud storage services and advanced backup features, it’s a great choice for both basic and advanced users. Data on your Windows Desktop, Windows Server, MS SQL Server, and MS Exchange accounts may be backed up using CloudBerry. This is a well-integrated solution.
Upskill Your Teams with Enterprise-Ready Tech Training Programs
- Team-wide Customizable Programs
- Measurable Business Outcomes
About CloudThat
FAQs
1. How secure is CloudBerry backup?
ANS: – To store files, you must create an account with a storage provider. In particular, CloudBerry Backup excels in backing up servers and networking equipment. To protect your data, it also supports a variety of security techniques.
2. How much does CloudBerry Backup cost?
ANS: – CloudBerry Backup is a one-time fee product. For example, Desktop Edition costs $49.99 (US), and Windows Server Edition license is $119.99. You can find all the licenses on the MSP360 website. Additionally, you must pay extra costs for cloud storage and transfers.
3. Can I activate CloudBerry Backup on two machines with a single license that I purchase?
ANS: – CloudBerry Backup is licensed per computer. Two licenses must be purchased if you wish to operate it on two computers.

WRITTEN BY Shaikh Mohammed Fariyaj Najam
Mohammed Fariyaj Shakh is a Sr. Research Associate – Cloud Engineer at CloudThat with a strong background in AWS and Azure infrastructure management, security, optimization, and automation. Certified in both AWS and Azure, he has hands-on experience in designing, implementing, and managing highly reliable, secure, and scalable cloud solutions. Well-versed in DevOps practices and tools such as Git, GitHub, AWS CI/CD, Jenkins, Docker, Kubernetes, and Terraform, Fariyaj leverages his expertise in automation, Infrastructure as Code (IaC), and container orchestration to build and manage robust deployment pipelines. Known for his strong troubleshooting skills, he delivers effective and scalable solutions to complex cloud challenges.


Comments