

 Login
Login

 November 12, 2025
|
Voiced by Amazon Polly |
Introduction
Full-stack application development and deployment can be streamlined with the right approach. cPanel emerged as the hosting platform of choice due to its user-friendly interface and reliable performance. The development strategy focused on four key phases: building a solid Python/Flask backend, designing a responsive Next.js frontend, conducting thorough local testing, and executing a smooth cPanel deployment with complete domain and SSL configuration. This guide provides a step-by-step walkthrough of the entire process, featuring actionable insights, practical code examples, and essential resources to help you successfully deploy your own full-stack application.
Pioneers in Cloud Consulting & Migration Services
- Reduced infrastructural costs
- Accelerated application deployment
Step-by-Step process
Step 1 – Backend Development (Python + Flask)
The development process begins with the Flask backend, establishing a reliable API foundation. Key steps include:
- Set up a Python project and created a virtual environment.
- Installed Flask (and any other libraries) via pip install.
- Built RESTful API routes for CRUD operations and data fetching.
- Tested endpoints locally using tools like Postman or even a browser.
For example, my app.py looked like this:
|
1 2 3 4 5 6 7 8 9 10 11 12 13 14 15 16 |
from flask import Flask, jsonify, request app = Flask(__name__) @app.route('/') def index(): return 'Hello, World!' # Example API route @app.route('/api/items', methods=['GET']) def get_items(): items = [{"id": 1, "name": "Item A"}, {"id": 2, "name": "Item B"}] return jsonify(items) if __name__ == '__main__': app.run(debug=True) |
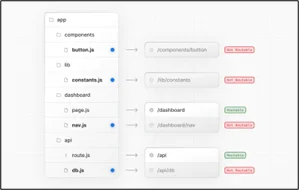
Here’s how the codebase is structured:
|
1 2 3 4 5 |
/app.py /routes/ (Flask Blueprint routes) /models/ (database models) /static/ (any static files) /templates/ (HTML templates, if needed) |
This mirrors recommended Flask structures. For instance, cPanel’s Python app manager automatically creates similar folders (including a public/ for static files and a passenger_wsgi.py for the WSGI entry point). Once the Flask routes worked perfectly, I moved on to the frontend.
Step 2 – Frontend Development (Next.js)
Once the API was complete, Next.js was chosen for the frontend to capitalize on its SEO optimization and performance advantages. The implementation involved:
- Initialized a Next.js project and created pages/components for each view.
- Integrated the backend APIs by fetching data (using fetch or axios) from endpoints like /api/items.
- Managed state and forms (using React hooks) and added client-side validation and error handling.
- Tested the UI against the backend by running Next.js locally and confirming API responses showed up in the interface.
Since cPanel doesn’t support Node.js servers, Next.js’s static export mode was essential. Next.js typically requires a Node.js server for page rendering, but static export allows the application to run on cPanel’s hosting environment. This required configuring next.config.js:
|
1 2 3 4 5 |
// next.config.js module.exports = { output: 'export', trailingSlash: true, }; |
This configuration allows npm run build to create a static out/ folder containing HTML, CSS, and JavaScript files. (Previous Next.js versions required running npm run export separately after the build process.) Following UI implementation and styling, local testing confirmed seamless communication between the frontend and backend on localhost.
Step 3 – Local Testing
Before deploying to the production environment, thorough local validation included:
- CORS and configuration: CORS configuration was properly implemented to enable frontend-API communication, utilizing Flask-CORS for handling cross-domain requests.
- API endpoint checks: Every route was tested (200 responses, error handling, etc.).
- SSL and build: A local production build was generated using npm run build to identify and resolve any build-time errors.
- Logs and debugging: Detailed logging was configured across Flask and Next.js components to track system behavior and identify issues.
Catching issues now saves a lot of pain later. For example, fixing CORS and addressing local bugs meant the live site went up without the common deployment headaches.
Step 4 – Deploying the Backend on cPanel
Flask deployment on cPanel presented significant learning opportunities. The deployment process involved:
- Compress and upload: The complete Python project was compressed and uploaded to cPanel’s File Manager into a designated directory (e.g., ~/myapp).
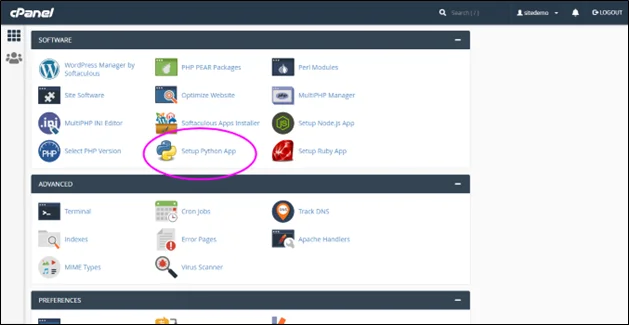
- Create Python App in cPanel: Through cPanel’s Software → Setup Python App section, a new application was created by selecting Create Application and completing the configuration form:
- Python version: Selected (e.g., Python 3.10).
- Application root: The directory of my app (e.g., myapp).
- Application URL: The domain or subdomain to serve (e.g., mydomain.com).
- Application startup file: The name of my main file (e.g., app.py).
- Entry point: Usually left blank unless needed.
These steps are documented in cPanel guides (and in ChemiCloud’s tutorial).
- Extract and configure: The zip file was extracted into the application folder using File Manager, then the original zip was removed, leaving all project files properly positioned.
- Install dependencies: Dependencies were installed by selecting ‘Run Pip Install’ in the Python App manager (alternatively, through cPanel Terminal) to process all packages listed in requirements.txt.
- Modify the WSGI entry-point: The default passenger_wsgi.py file generated by cPanel was modified to expose the Flask application, as shown below:
# passenger_wsgi.py
from app import app as application
This matches cPanel’s instructions. It ensures Apache’s Passenger serves my Flask app.
- Restart and test: The Python application was restarted through cPanel, followed by testing the Flask routes at https://mydomain.com/api (or root /). Any errors were diagnosed using cPanel’s stderr.log file for the application.
After these steps, the backend was live at https://mydomain.com/api and fully functional.
Step 5 – Deploying the Frontend on cPanel
The Next.js frontend deployment followed, with the static export approach simplifying the process:
- Generate static build: The build process executed npm run build (with npm run export required for older Next.js versions), generating an out/ directory containing static assets. This out/ folder held all necessary HTML, CSS, and JavaScript files ready for upload.
- Upload to public_html: The contents of the out/ directory were uploaded to public_html/ (or the relevant domain folder) using cPanel’s File Manager, allowing Apache to serve index.html and all associated assets.
- Update API URLs: The API endpoints in the frontend code (or through environment variables) were updated from localhost URLs to the production domain (https://mydomain.com/api), allowing the frontend to communicate with the deployed Flask API.
- DNS and SSL check: DNS configuration was verified to ensure the domain was pointed to the hosting server, and SSL certificate activation was confirmed (typically managed automatically by cPanel’s AutoSSL feature).
- Test the live site: After clearing the browser cache, the site was tested and functioned completely, with pages loading, assets rendering, and API calls executing successfully. Next.js static export documentation confirms compatibility with any web server (including cPanel/Apache) for hosting these files. The result was a fully operational site with seamless backend API integration.

Conclusion
This project provided valuable hands-on experience in full-stack development and deployment workflows. Key learnings included the benefits of organized code architecture and frontend-backend separation for streamlined debugging. Early API testing and CORS configuration proved crucial for avoiding later complications. cPanel deployment revealed important distinctions from local development environments, particularly regarding Passenger configuration, virtual environments, and the setup of passenger_wsgi.py. Next.js static export became essential due to cPanel’s lack of Node.js server support.
Drop a query if you have any questions regarding cPanel and we will get back to you quickly.
Empowering organizations to become ‘data driven’ enterprises with our Cloud experts.
- Reduced infrastructure costs
- Timely data-driven decisions
About CloudThat
FAQs
1. Getting "Internal Server Error" — What debugging steps should be taken?
ANS: – Check this file: /home/USERNAME/backend/logs/error.log Most common issues:
- Wrong import in passenger_wsgi.py
- Missing requirements.txt packages
- Syntax errors are not caught locally
2. Where do Flask backend files belong in the cPanel directory structure?
ANS: –
- To the folder you assign in:
Example: /home/username/backend cPanel will run the backend from this location
3. Does AutoSSL cover both frontend & backend?
ANS: – Yes, As long as:
- You deploy both on the same primary domain
- DNS and hosting are correctly pointed

WRITTEN BY Shantanu Singh
Shantanu Singh is a Research Associate at CloudThat with expertise in Data Analytics and Generative AI applications. Driven by a passion for technology, he has chosen data science as his career path and is committed to continuous learning. Shantanu enjoys exploring emerging technologies to enhance both his technical knowledge and interpersonal skills. His dedication to work, eagerness to embrace new advancements, and love for innovation make him a valuable asset to any team.


Comments