

 Login
Login

 June 20, 2023
|
Voiced by Amazon Polly |
Introduction
Docker has revolutionized how we package and deploy applications, allowing developers to create lightweight, portable containers. One powerful feature of Docker is multi-stage builds, which enables developers to optimize image sizes and improve build performance.
In this blog post, we will explore the concept of multi-stage Docker image builds and how to leverage them effectively.
Pioneers in Cloud Consulting & Migration Services
- Reduced infrastructural costs
- Accelerated application deployment
What are Multi-Stage Docker Image Builds?
This approach is particularly useful when you need to compile code, build dependencies, and package an application within the same Dockerfile.
Advantages of Multi-Stage Builds
- Smaller Image Sizes: By using multi-stage builds, you can significantly reduce the size of your final Docker image. This is achieved by discarding unnecessary build dependencies and only including essential artifacts in the final stage. It helps minimize the attack surface and reduces the time required to pull and deploy images.
- Improved Build Performance: Multi-stage builds enable parallelism by separating the build process into distinct stages. This allows Docker to cache intermediate layers, ensuring that subsequent builds only re-execute the necessary steps. Consequently, it speeds up the build process and enhances developer productivity.
- Simplified Dependency Management: You can separate the build-time and runtime dependencies with multi-stage builds. This separation ensures that only the required dependencies are bundled in the final image, resulting in cleaner and more efficient containerized applications.
- Enhanced Security: By discarding unnecessary build dependencies and excluding sensitive information, multi-stage builds offer an additional layer of security. This practice reduces the chances of accidentally shipping sensitive data or exposing vulnerabilities in production.
Steps To Build Sample Java Application using Maven
Pre-Requisites
- AWS EC2 instance with Docker installed.
- Pull a sample Java application using the GitHub link below https://github.com/jabedhasan21/java-hello-world-with-maven.git
Step 1: Go to the Project folder and create a Dockerfile

Step 2: Open Dockerfile, Copy the code below inside the file and save it.

Step 3: Run the Docker command to build the Docker file.
|
1 |
Docker build –t helloworld:v1 . |
After build type
|
1 |
Docker image ls |
Run
|
1 |
Docker run <image id > |

You can be able to see the size of the image as 462 MB.
You can able decrease the image size using the Multistage image.
Step 4: Edit the Docker file as the below image and save.
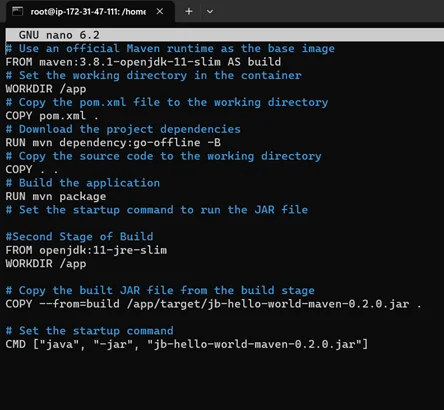
The Above Dockerfile copies the jar file from the Build Image to openjdk image using
|
1 |
“COPY --from=build /src /destination” |
Due to this, only the jar file will be executed.
Step 5: Build the Dockerfile again with another name like the one below.
|
1 |
Docker build –t helloworldmultistage:v1 . |
After Build Run
|
1 2 |
Docker image ls Docketr run <imageid> |

You can see the new image with lesser size.
You can reduce the size of your final Docker image significantly.
Best Practices for Multi-Stage Docker Image Builds
- Identify Build Stages: Start by analyzing your application’s build process and identify the different stages required, such as compilation, testing, and packaging. Each stage should have a specific purpose and contribute to the final image.
- 2. Leverage Build Caching: To optimize build performance, leverage Docker’s build caching mechanism. Ensure that you structure your Dockerfile to maximize caching benefits by placing frequently changing instructions at the end of the file.
- Minimize Build Dependencies: Remove unnecessary tools and dependencies from the final image to reduce its size and attack surface. Be mindful of including only what is required for runtime execution.
- Copy Artefacts between Stages: Use the
COPY –from=<stage>instruction to selectively copy artifacts, dependencies, or binaries from one build stage to another. This helps avoid duplication and keeps the final image lean. - Test Intermediate Stages: It’s good practice to independently test each intermediate stage of your multi-stage build process. This ensures that each stage functions as expected and reduces debugging efforts during development.
Conclusion
Multi-stage Docker image builds offer a powerful approach to optimizing the size and performance of containerized applications. By separating the build process into distinct stages, developers can minimize image sizes, improve build times, simplify dependency management, and enhance security. Understanding the concept and following best practices will empower you to harness the full potential of multi-stage builds and create efficient Docker images for your applications.
Making IT Networks Enterprise-ready – Cloud Management Services
- Accelerated cloud migration
- End-to-end view of the cloud environment
About CloudThat
FAQs
1. How is Docker different from virtualization?
ANS: – Docker uses containerization, while virtualization relies on full virtual machines. Containers share the host operating system’s kernel, making them more lightweight and faster to start than virtual machines. Docker provides better resource utilization and allows for more efficient scaling of applications.
2. What is the difference between an image and a container in Docker?
ANS: – An image is a read-only template containing the application, its dependencies, and the instructions to run it. It serves as the basis for creating containers. A container is a running instance of an image that includes the application and an isolated runtime environment.
3. How do you share data between containers in Docker?
ANS: – Docker provides different mechanisms to share data between containers. Some common methods include sharing volumes, bind mounts, or network-based communication using exposed ports or container linking.

WRITTEN BY Karthik Kumar P V
Karthik Kumar Patro Voona is a Research Associate (Kubernetes) at CloudThat Technologies. He Holds Bachelor's degree in Information and Technology and has good programming knowledge of Python. He has experience in both AWS and Azure. He has a passion for Cloud-computing and DevOps. He has good working experience in Kubernetes and DevOps Tools like Terraform, Ansible, and Jenkins. He is a very good Team player, Adaptive and interested in exploring new technologies.


Comments