

 Login
Login

 June 17, 2025
|
Voiced by Amazon Polly |
Introduction
In today’s cloud-driven landscape, organizations often use a mix of cloud providers and identity management systems. One common setup is using Azure Active Directory (Azure AD) as the central identity provider while managing AWS access via AWS IAM Identity Center (formerly AWS SSO). To streamline user and group management, integrating these systems with SCIM (System for Cross-domain Identity Management) is highly recommended.
This blog post walks you through integrating AWS IAM Identity Center with Azure AD using SCIM provisioning to automate user lifecycle management.
Pioneers in Cloud Consulting & Migration Services
- Reduced infrastructural costs
- Accelerated application deployment
What is SCIM?
SCIM is an open standard designed to automate the exchange of user identity information between identity providers (like Azure AD) and service providers (like AWS IAM Identity Center). SCIM helps automatically create, update, and deactivate user accounts based on changes in your IdP.
Benefits of Using SCIM with AWS IAM Identity Center
- Automated user provisioning: No more manual creation of users in AWS
- Group synchronization: Sync Azure AD groups to AWS
- Automatic deprovisioning: Users who leave the organization lose AWS access immediately
- Reduced admin overhead and human error
Pre-requisites
- Azure EntraID
- Admin access to Azure Portal
- Admin access to AWS IAM Identity Center
- AWS IAM Identity Center set to use “External Identity Provider”
Step-by-Step Integration Guide
Step 1: Set up IAM Identity Center in AWS
- Sign in to AWS Console
- Go to IAM Identity Center: https://console.aws.amazon.com/singlesignon/
- Enable IAM Identity Center (if not already enabled).
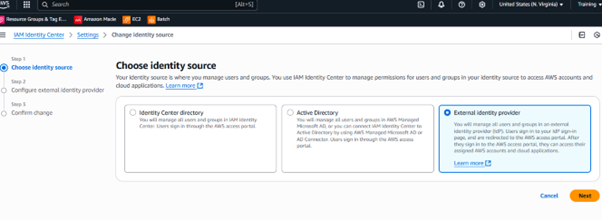
- Select “External identity provider”
- Under Settings > Identity Source, click Change.
- Choose External identity provider.
- Click Download metadata file — you’ll need this in Azure.

Step 2: Register AWS IAM Identity Center as an Enterprise App in Azure Entra ID
- Go to Azure Portal → Azure Entra ID.
- Navigate to Enterprise Applications → Click + New Application.

- Select “Create your own application”, give it a name (e.g., “AWS SSO”), and choose Integrate any other application you don’t find in the gallery.

- Once created, go to:
- Single Sign-On → Choose SAML.


-
- Upload the AWS SSO metadata file you downloaded earlier.

- Azure will fill in SAML configuration fields automatically.
Step 3: Configure SAML Attributes and Claims in Azure
Under Attributes & Claims:
Ensure the following claim exists (or add it manually):
| Name | Value |
| https://aws.amazon.com/SAML/Attributes/RoleSessionName | user.mail |
| https://aws.amazon.com/SAML/Attributes/Role | Leave this blank for now (will be filled later) |
| https://aws.amazon.com/SAML/Attributes/PrincipalTag:Email | user.mail |
These claims are used by AWS to identify and authorize users.
Step 4: Download Azure Federation Metadata XML
- From the Single Sign-On > SAML page in Azure, click Download Federation Metadata XML.
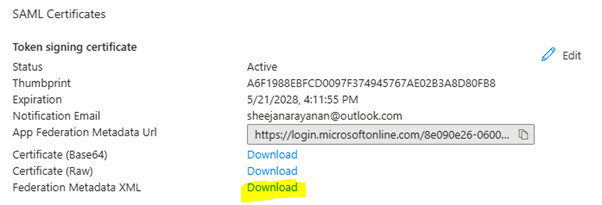
- You’ll need to upload this in AWS.
Step 5: Upload Azure Metadata in AWS IAM Identity Center
- Go back to AWS IAM Identity Center → Settings > Identity Source.
- Upload the Azure federation metadata XML.

- Confirm and complete the identity source switch.
Step 6: Assign Users or Groups in Azure to the AWS App
- In Azure Entra ID → Enterprise Applications → Your AWS SSO app.
- Under Users and groups, click + Add user/group.

- Add the users or groups who should have access to AWS.
Step 7: Assign Permission Sets and AWS Account Access in AWS (With out SCIM)
Manually Create Users and Groups in AWS IAM Identity Center
- Go to AWS IAM Identity Center > Users.
- Click Add User.
- Enter same email or username as in Azure AD.
- In AWS IAM Identity Center, go to AWS Accounts.
- Choose an account → Assign users or groups.
- Add users from Azure and assign appropriate Permission Sets (e.g., Administrator, ReadOnly).
Step 8: Test the Login Flow
- Go to the user portal URL from AWS IAM Identity Center (e.g., https://<your-tenant>.awsapps.com/start).
- Try signing in with an Azure Entra ID user.
- You should be redirected to the Azure login screen and then back to AWS.

.
SCIM Provisioning from Azure to AWS IAM Identity Center
Enable SCIM Provisioning in AWS IAM Identity Center
- Go to AWS Console → IAM Identity Center.
- Click Settings > Automatic provisioning.
- Enable provisioning and copy the following:
- SCIM endpoint URL
- Bearer token (for authentication)
Important: Copy the bearer token and save it securely — it’s only shown once!

Configure Provisioning in Azure Entra ID
- Go to Azure Portal → Azure Entra ID → Enterprise Applications.
- Select your AWS IAM Identity Center (SSO) app.
- Click Provisioning in the left menu.
- Set Provisioning Mode = Automatic.


Enter SCIM Endpoint and Token
Fill in the SCIM connection settings:
| Setting | Value from AWS |
| Tenant URL | SCIM endpoint from AWS |
| Secret Token | SCIM bearer token from AWS |
- Click Test Connection.
- You should see a success message.
Map Attribute Mappings (Optional)
Azure provides default attribute mappings. Make sure these are in place:
| Azure Attribute | AWS SCIM Attribute |
| userPrincipalName or mail | userName |
| givenName | name.givenName |
| surname | name.familyName |
| emails[type eq “work”].value |
You can also enable group provisioning by mapping group attributes.
Assign Users and Groups to the App
- In the Enterprise Application > Users and groups, add the Azure AD users or groups to be provisioned.
- These will now sync to AWS automatically via SCIM.
Start Provisioning
- Go back to Provisioning in Azure.
- Click Start Provisioning.

Verify in AWS
- In AWS IAM Identity Center > Users & Groups, you’ll start seeing users and groups show up as they’re synced from Azure.

- Provisioning can take a few minutes.
Ongoing Sync Behavior
- Azure runs provisioning every 40 minutes by default.
- You can force sync manually under Provisioning > Restart Provisioning.
- Changes in Azure (e.g., user name, group membership) automatically reflect in AWS.
Conclusion
By enabling SCIM provisioning between Azure AD and AWS IAM Identity Center, you automate and secure the identity lifecycle. This reduces operational overhead and ensures consistent access management across your cloud environments. It’s a best practice for any organization leveraging multi-cloud identity strategies.
Train your workforce to leverage the cloud
- Contemplating Migrating Workload to Cloud?
- Here is a Hassle Free Solution
About CloudThat

WRITTEN BY Sheeja Narayanan
Sheeja Narayanan is Champion Amazon Authorized Instructor, Microsoft Certified trainer and Senior Subject Matter Expert at CloudThat, specializing in AWS infra and Migration. With 19 years of experience in Training and consulting, she has trained over 2500 professionals/students to upskill in Networking, Windows and Linux administration, AWS, Azure and Vmware. Known for simplifying complex concepts and delivering highly hands-on sessions, she brings deep technical knowledge and practical expertise into every learning experience. Sheeja's passion for training delivery reflects in her unique approach to learning and development.


Anush G R
Jun 18, 2025
It is a very useful information, helps us who are working on these Scenarios.. Excellent work to bring them all together and show how it can be done. Thanks for your efforts Sheeja, which helps us to save a lot of time