

 Login
Login

 June 8, 2023
|
Voiced by Amazon Polly |
Introduction
Transferring DNS from a third-party DNS provider to Amazon Web Services (AWS) Route 53 is a straightforward process that can help you manage your DNS records more efficiently. Route 53 is a highly available and scalable DNS service that can help you ensure the availability and reliability of your website. In this blog, we will go through the steps to transfer your DNS from GoDaddy to AWS Route 53.
Pioneers in Cloud Consulting & Migration Services
- Reduced infrastructural costs
- Accelerated application deployment
Features and Benefits
Transferring your DNS from a third-party provider to AWS Route 53 can provide you with several benefits and features, including:
- Scalability: AWS Route 53 is designed to be highly scalable, allowing you to handle large volumes of traffic and queries easily. This makes it an excellent choice for businesses and organizations that need to handle high traffic levels.
- High availability: AWS Route 53 offers high availability and reliability, with multiple redundant servers located in different geographic regions. This means that your DNS will still be available even if one server goes down.
- Improved performance: AWS Route 53 uses a global network of DNS servers to provide fast and efficient DNS resolution, which can help improve the performance of your website or application.
- Advanced features: AWS Route 53 offers advanced features such as health checks, which allow you to monitor the health and availability of your resources and automatically route traffic to healthy endpoints.
- Cost-effective: AWS Route 53 is priced competitively, with pay-as-you-go pricing allowing you to only pay for your use. This can help you save money on your DNS hosting costs.
- Integration with other AWS services: If you already use other AWS services, such as Amazon S3 or Amazon EC2, integrating with AWS Route 53 can be seamless and provide additional benefits, such as automatic routing to healthy endpoints.
Prerequisites
- AWS Account with appropriate permission.
- Existing domain names in some third-party provider
Step-by-Step Guide
Step 1: Create a Hosted Zone. A hosted zone is a container for all of your DNS records. To create a new hosted zone, follow these steps:
- Open the Amazon Route 53 console (https://console.aws.amazon.com/route53/).
- Go to the hosted zone and click the “Create Hosted Zone” button.

3. Enter your domain name in the “Domain Name” field, and the domain name should be the same which you want to transfer. Choose the type of routing policy you want to use. This will determine how Amazon Route 53 responds to DNS queries for your domain. Click on create hosted zone button.

Once you have created a hosted zone, Amazon Route 53 will provide four name servers. You must update your domain’s DNS settings with these name servers.

Step 2: Importing DNS Records in Amazon Route53
Export DNS Records from your third-party DNS provider before transferring your DNS to Route 53. Once you have exported the records, we must Import DNS Records into Amazon Route 53. Here’s how to do it:
- Open the Amazon Route 53 console. Click on your hosted zone.
- Click on the “Import Zone File” button.

3. Select the file you exported from a third-party DNS provider.
4. Click on the “Import” button.
By importing the records, Amazon Route 53 will import your DNS records and create the necessary records in your hosted zone.
Step 3: Updating Name Server
Update Your Domain’s DNS Settings To use Amazon Route 53 as your DNS provider, and you need to update your domain’s DNS settings with the name servers provided by Amazon Route 53. The steps to do this will vary depending on your domain registrar. Here are the general steps:
- Log in to your domain registrar’s website.
- Locate the DNS settings for your domain. It might be called “DNS Management”, “Name Servers”, or something similar.
- Replace the existing name servers with the four name servers provided by Amazon Route 53.
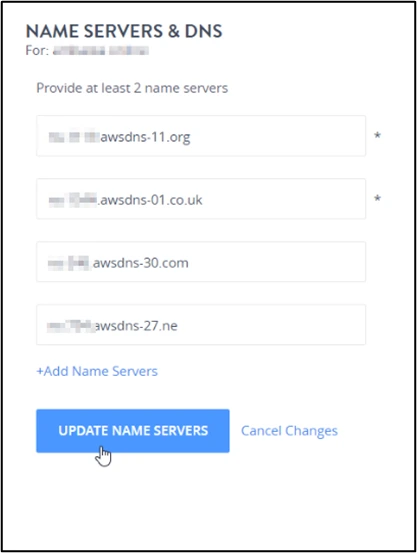
4. Save your changes.
Your DNS changes may take some time to propagate across the internet. The duration can vary from a few minutes to several hours.
Step 4: Verify Your DNS Configuration Once you have updated your domain’s DNS settings, verifying your configuration is important to ensure everything is working correctly. Many tools are available for testing DNS, but one simple way to test is to use the “dig” command in a terminal or command prompt. Here’s an example:
- Open a terminal or command prompt.
- Use this command “dig ns yourdomain.com”
- Replace “yourdomain.com” with your domain name and look for the “ANSWER SECTION” in the output. This should show the new name server records for your domain.

4. If everything looks correct, your DNS transfer is complete!
Conclusion
By using Amazon Route 53, you can take advantage of its many features, such as latency-based routing, DNS failover, and health checks, to ensure the reliability and availability of your website. If you have any questions or encounter any issues during the transfer process, AWS provides comprehensive documentation and support to help you every step of the way.
Making IT Networks Enterprise-ready – Cloud Management Services
- Accelerated cloud migration
- End-to-end view of the cloud environment
About CloudThat
FAQs
1. Will transferring my DNS from GoDaddy to AWS affect my website's uptime?
ANS: – There is a possibility of some downtime during the transfer process, but this should be minimal if you follow the steps outlined in the blog post carefully. Additionally, once the transfer is complete, your website’s uptime should not be affected.
2. How long does it take for the changes to propagate after transferring my DNS from GoDaddy to AWS?
ANS: – DNS changes can take up to 48 hours to propagate fully across the internet. However, most changes are usually reflected within a few hours. You can use online tools to check the status of your DNS propagation.
3. What are some best practices for managing my DNS configuration in AWS Route 53?
ANS: – Some best practices for managing your DNS configuration in AWS Route 53 include using aliases instead of IP addresses, setting up health checks to monitor the availability of your resources, and using Amazon CloudFront to improve the performance and security of your website.

WRITTEN BY Aniket Kumar Ambasta
Aniket Ambasta works as a Subject Matter Expert at CloudThat. He is an AWS Solutions Architect – Associate certified professional, skilled in cloud migration, infrastructure, security, and cloud FinOps. Apart from his professional interests, he loves exploring and learning new technologies.


Comments