

 Login
Login

 February 8, 2023
|
Voiced by Amazon Polly |
Introduction
An online service called Amazon Relational Database Service (Amazon RDS) makes it simpler to set up, run, and scale a relational database in the AWS Cloud. It performs typical database administration activities and offers affordable, resizable capacity for a relational database that is industry-standard.
Start Learning In-Demand Tech Skills with Expert-Led Training
- Industry-Authorized Curriculum
- Expert-led Training
What is Moodle?
Moodle is a PHP-based, open-source learning management system that is released under the terms of the GNU General Public License. Moodle is utilized in schools, universities, companies, and other sectors for blended learning, distant learning, flipped classrooms, and other online learning initiatives. It enables community-sourced plugins and can be used to build customized websites with online courses.
Steps to Create a Database with RDS
- To begin, go to Amazon RDS in the AWS console. Click the orange Create database button to get started.

2. We have selected MYSQL as a database.

3. In the templates section of create wizard, select the Free Tier.

4. Put “Moodle” in the “DB instance identification” field in the Settings section. Once that is done, enter the database’s master username and password. To assist in protecting your database, pick a strong password. Because you’ll need them in a later module, keep the username and password safe.

5. Configuring connectivity and network configuration comes next. An Amazon VPC, which is a conceptually distinct network where your provided resources will reside, is where Amazon RDS instances must be built.
VPCs are a complex subject that is outside the purview of this lab. Fortunately, each region in your account has a default VPC that AWS has constructed.
Therefore, we have decided to run the RDS using the default VPC.
Moodle should be the default database name. By doing this, you can make sure that RDS initially builds the database in your MySQL instance. When connecting to your database, you will use this database name. after which select CREATE DATABASE.

Steps to Create an EC2 Instance
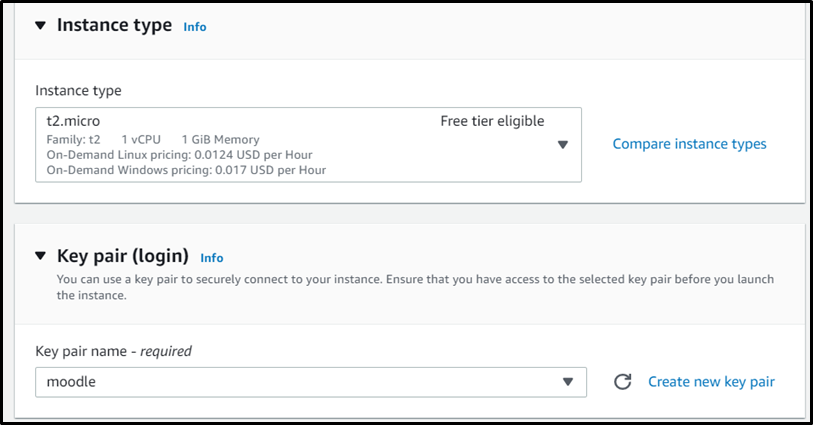
- Select the AMI as the Ubuntu Server of version 18.04

- Select the t2.micro instance type, and We have selected key-pair which was the default, you can also create the key-pair.
- Configure the security groups, and add the following type and Source type for the ec2 security group.

And then click launch instance.
Steps to SSH into the EC2 Instance
Open the cmd (command line) and run the following commands for ssh.
- cd (folder name) where you have saved your pem file.
- Paste the following command in cmd. (Copy the command from the ssh client)
![]()
- Now you have successfully ssh in your EC2.
Configuring Moodle on EC2
After the ssh run the following commands.
- Install the programs that are needed.
|
1 2 |
apt-get update apt-get install graphviz aspell ghostscript clamav git |
- Install the MySQL database service.
|
1 2 |
apt-get update apt-get install mysql-server mysql-client |
-
1mysql -h (RDS END POINT) -u admin(give the master user name ) -p

4. Write the password which you have given in rds.
5. Install the Apache webserver with PHP support.
|
1 2 3 |
apt-get update apt-get install apache2 php libapache2-mod-php php-cli php-mysql php-mbstring php-xmlrpc php-zip apt-get install php-gd php-xml php-bcmath php-ldap php-pspell php-curl php-intl php-soap |
6. Restart the Apache service.
|
1 |
service apache2 restart |
7. Download and install the Moodle application.
|
1 2 3 4 5 6 7 |
mkdir /downloads cd /downloads wget https://download.moodle.org/stable38/moodle-latest-38.tgz tar -zxvf moodle-latest-38.tgz cp /downloads/moodle /var/www/html/ -R chown www-data.www-data /var/www/html/moodle -R chmod 0755 /var/www/html/moodle -R |
8. Create a required directory named moodledata.
|
1 2 3 |
mkdir /var/www/moodledata chown www-data /var/www/moodledata -R chmod 0770 /var/www/moodledata -R |
9. Open your browser and enter the IP address of your web server plus /moodle
In our example, the following URL was entered into the Browser:
http:// 13.126.49.182/moodle

10. The web installation interface for Moodle should be displayed, Click the Next button after choosing the desired language.

11. Select the Improved MySQL (native/mysqli) and click on the Next button.
12. Enter the Database information required to connect to the Moodle database.
- Database host: localhost
- Database name: Moodle
- Database user name: admin (Master name of rds)
- Database password: huda82141 (Password as rds password)
- Tables prefix: mdl_
- Database port: (RDS Endpoint).

13. On the next screen, read the license agreement and click on the Next button.

Make sure all PHP requirements are met and click on the Continue button.

14. Wait for the moodle installation to finish and click on the Continue button.

- On the next screen, perform the following configuration:
- Username – Enter the administrative user account name desired
- Choose an authentication method – default
- New password – Enter the administrative user password
- First name – The administrator’s Name
- Surname – The administrator’s Surname
- email address – The administrator’s email address
- Select a Country – The administrator’s country
- Timezone – Select the desired timezone
Click on the Update Profile button.

Select the correct timezone, disable the self registration feature, and set an outgoing email address.

Click on the Save changes button to access the Moodle dashboard.

Congratulations! The Moodle installation was finished successfully.
Conclusion
There are numerous potentials for scale, file access, flexibility, and cost management while using Moodle in the cloud. Despite how helpful they may be, there will still be some difficulties to overcome.
Upskill Your Teams with Enterprise-Ready Tech Training Programs
- Team-wide Customizable Programs
- Measurable Business Outcomes
About CloudThat
FAQs
1. What database is used in Amazon RDS?
ANS: – There are roughly 200 tables in the Moodle database. Although Microsoft SQL Server or Oracle can also be used, MySQL or Postgres is the most common databases used by Moodle. For this reference architecture, the most widely used open-source relational database in the world, MySQL, was used. Scalable MySQL servers are deployed using Amazon RDS.
2. Which RDS database engines support multi-AZ deployment?
ANS: – To provide high availability and dependability, AWS RDS supports multi-AZ deployment. The following RDS database engine supports multi-AZ deployments:
- MariaDB
- MySQL
- Oracle
- PostgreSQL

WRITTEN BY Huda Khan
Huda works as a Frontend Software Developer at CloudThat. She is an accomplished front-end developer passionate about creating user-friendly and aesthetically pleasing websites. Proficient in frameworks like ReactJS and technologies such as HTML, CSS, and JavaScript, Huda specializes in producing responsive and intuitive designs with a thorough understanding of web development fundamentals. In her spare time, she enjoys experimenting with new technologies and staying up to date with the latest advancements in the field.


Comments