

 Login
Login

 May 9, 2023
|
Voiced by Amazon Polly |
Introduction
HashiCorp’s Terraform is an Infrastructure as Code (IaC) tool that is open source. Terraform is a resource provisioning tool similar to CloudFormation (AWS’s proprietary IaC tool).
In what is referred to as a configuration file, you can declare all of your resources. You’ll use JSON or HashiCorp Configuration Language (HCL) when declaring your resources.
These four commands are the ones you’ll use the most throughout your Terraform trip. Fear not; we shall go into detail about each command.

Pioneers in Cloud Consulting & Migration Services
- Reduced infrastructural costs
- Accelerated application deployment
Why should you use it?
Terraform can use code to manage your infrastructure’s complete lifecycle. You can version control your configuration files using your preferred version control system, such as GitHub or CodeCommit.
Prerequisites
You’ll need:
- Terraform CLI (0.14.9+) installed.
- The AWS CLI is installed.
- VS Code IDE
- AWS account
- Your AWS credentials
Step-by-Step Guide
- Configure Terraform on your computer
- Terraform must first be installed on your system, unlike CloudFormation, before you can use it to deploy a resource on AWS.
- Use the official installation page to install it in your system.
2. Make an IAM User for Terraform
However, you can log in to AWS using your credentials (AWS access keys/secret keys). I prefer to retain a separate user with only programming access for Terraform.
Go to the AWS IAM service and select Users -> Add users.
Please provide your user name, which can be anything.

Then select Next: Permissions.
Add the Administrator policy or any other policy to your user as needed, then click the next button.
When requested, download the Access Key/Secret Key. Keep it close by because this blog will require it.
3. Utilize AWS for authentication
Both Terraform and an IAM user for Terraform have been installed. As a result, we will be prepared with an Access Key and Secret Key that we may use to log into AWS. There are several ways to log in with AWS so Terraform can communicate with its APIs and build resources on your behalf.
The simplest method appears to be using your template’s access and secret key like follows:

3.1 Set up AWS CLI
To configure CLI on your local system, use the aws configure command.
|
1 |
aws configure |
CLI will ask you for each of the following details when you press enter:
- Access Key ID
- Secret Access Key
- Default region name
- Default output format
Once you have entered each piece of information, you are finished. You may verify it using a straightforward AWS command like
|
1 |
aws s3 ls |
4. Install and set up the VS Code IDE
To download it to your computer, go to the VS Code official page and click the appropriate download link.

Install it on your machine after downloading.
Once the installation is complete, launch VS Code and select the Extensions icon.
Install the addon by performing a search for HashiCorp Terraform. Here is the extension’s link in case you want to validate: https://marketplace.visualstudio.com/items?itemName=HashiCorp.terraform
- Make a New Project or Folder and Import It into Visual Studio Code
There must be a folder for each Terraform configuration file.
Make a folder called “Terraform-getting-started” on your computer.
Start VS Code. To open a folder, select File.
Choose the terraform-getting-started folder you established on your computer and launch Visual Studio Code. Currently, we are prepared to use VS Code for our Terraform project because we have the project loaded into it.
- Make a Simple Terraform Configuration File
When using Terraform, you can declare your infrastructure as code that humans can read. It is simple to understand and written in HashiCorp Configuration Language (HCL).
Terraform files have .tf extensions or end with .tf. Let’s attempt to generate the basic Terraform file main.tf using a single resource Amazon S3 bucket.
Please take note that the most recent method for stating that we are utilizing an AWS provider is as follows:

Before configuring that provider with region and profile information, we first add the required providers section.
Here, it states that we are using an AWS provider.
Additionally, you can use any named profile you have if you have one in the provider aws area, where I have set the profile as the default, as you can see.
Give the location where you want Terraform to construct your resource in the region field.
It all has to do with declaring an AWS provider. Learn how to declare an AWS resource now.
AWS resources appear as follows:
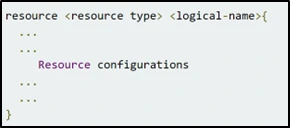
Let’s try making a straightforward Amazon S3 bucket with the name ck-demo-bucket and a tag. The finished configuration file appears as follows:

7. Terraform Init
Although the configuration file is ready, we can’t yet launch them. Our working directory has to be initialized with the AWS provider.
Previously, the Terraform binary included provider code from HashiCorp as well. However, that used to make the deployment process take longer. Later, the provider code was removed from the binary and made accessible as a software package for download.
Therefore, we must start our working directory with the necessary cloud provider, such as Amazon Web Services (AWS). Initializing will look at the required provider section and download the necessary code for the AWS provider.
Let’s investigate our options.
Once the folder has been opened in VS Code, use the terminal to navigate within the folder and launch Terraform.
|
1 |
terraform init |
When you press enter, Terraform installs the aws plugin and begins interacting with the AWS API to create resources for you.

You will notice that the a.terraform folder is created and that it has all the necessary items after the initialization is successful.
8. Terraform Plan
Our working directory has been set up. Let’s execute the Terraform plan to see what is being built.
|
1 |
terraform plan |

Plan command displays a detailed view of what is being created, updated, or destroyed when you press enter. Resources that will be added, changed, or removed are denoted by (+,-, or ) signs.
What these signs are saying is this:
- + : Created
- – : Deleted
- ~: Modified
9. Terraform Apply
You are prepared to construct something once you have seen the plan command’s result and are certain it is what you intended to make.
To implement the proposed modifications in Terraform, run the command:
|
1 |
terraform apply |
When you press enter, apply command launches the plan command once more and displays what is being added, changed, or removed by (+, and -) in that order.

At the end of this section, you’ll see that Terraform will ask you if you want to carry out these actions.
Type yes, as displayed in the screenshot below.

Terraform will begin constructing your resource as soon as you enter yes.
10. Terraform Destroy
Our Amazon S3 bucket resource has been established successfully. Sometimes, you don’t want to be charged while developing a resource for educational purposes.
As a result, you are free to erase the prepared resources after your learning session is over.
|
1 |
terraform destroy |

Once you press enter, it will once more display the resources that will be destroyed.
If you scroll down, you’ll notice that Terraform prompts you to consider if you truly want to destroy all the resources.
Enter the word yes as it appears below.

Terraform begins destroying the resource as soon as you press enter. You receive the message “destroyer complete” if you’ve been successful, as illustrated below.

11. Updating the Created Resource
You might have figured out how to update an existing resource now.
And you are 100 percent correct.
Update your configuration file, then launch Terraform Apply.
Conclusion
We talked about the lifespan of a resource using Terraform in this blog post on “Terraform on AWS.” We learned how to set up Terraform with the AWS CLI to communicate with the AWS API on our behalf to build resources.
Additionally, we observed that the following 4 instructions essentially focus on resource deployment using Terraform:

In addition, we learned that even though we may use any straightforward editor, like Notepad, to construct a resource on AWS using Terraform. However, it is sense to utilize VS Code with the Terraform plugin for autocomplete and increased productivity. This advice will undoubtedly make your life as a Terraform developer much simpler.
Making IT Networks Enterprise-ready – Cloud Management Services
- Accelerated cloud migration
- End-to-end view of the cloud environment
About CloudThat
FAQs
1. What is Terraform, and how does it relate to AWS?
ANS: – Terraform is an open-source infrastructure as code (IaC) tool that allows you to define and manage your infrastructure as code. It is platform-agnostic and can be used to manage infrastructure across different cloud providers, including AWS.
2. How do I install Terraform on my machine?
ANS: – You can install Terraform by downloading the binary for your operating system from the Terraform website and adding it to your PATH environment variable.
3. How do I authenticate with AWS when using Terraform?
ANS: – You can authenticate with AWS by creating an IAM user and assigning it the necessary permissions to manage your AWS resources. You must also configure your AWS access key and secret key in your Terraform configuration file.

WRITTEN BY Huda Khan
Huda works as a Frontend Software Developer at CloudThat. She is an accomplished front-end developer passionate about creating user-friendly and aesthetically pleasing websites. Proficient in frameworks like ReactJS and technologies such as HTML, CSS, and JavaScript, Huda specializes in producing responsive and intuitive designs with a thorough understanding of web development fundamentals. In her spare time, she enjoys experimenting with new technologies and staying up to date with the latest advancements in the field.


Comments