

 Login
Login

 May 31, 2023
|
Voiced by Amazon Polly |
1.Connect to the ESXi host
Use the vSphere Client to connect to the ESXi host using your credentials.
Revolutionize Your Data Center with VMware
- Understand new features
- Best practices available
- Instructor led courses
2. Navigate to the host configuration
In the vSphere Client, select the ESXi host from the inventory. Then, click on the “Configure” tab. Access the time configuration: Under the “System” section, click on “Time Configuration” to access the time settings.

3. Configure Time Synchronization
By clicking on “Add Service”, you can see two options to configure time synchronization
- Network Time Protocol (NTP):
NTP is an older and widely adopted protocol used for clock synchronization in computer networks. It operates over the Internet Protocol (IP) and is designed for general timekeeping accuracy. NTP can synchronize clocks with an accuracy of milliseconds to a few tens of milliseconds. It is commonly used for applications that require relatively loose time synchronization, such as network infrastructure, servers, and workstations.
- Precision Time Protocol (PTP):
PTP is a more advanced and precise protocol designed for high-accuracy time synchronization. It operates at the data link layer of the network stack and can achieve much higher precision than NTP. PTP can synchronize clocks with sub-microsecond or even nanosecond-level accuracy. It is commonly used in applications that require extremely precise time synchronization, such as industrial automation, telecommunications, and financial trading systems.
For configuring NTP, click on “Network Time Protocol”.
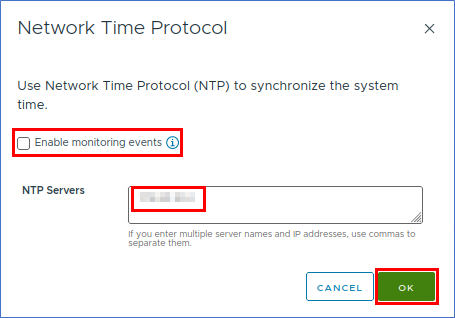
4. Configure the NTP Servers
In the Network Time Protocol (NTP) dialog box, you can enter the IP addresses or fully qualified domain names (FQDNs) of the NTP servers you want to use. Separate multiple NTP servers with commas. Also, you can enable monitoring services should the need arise.
5. Test NTP configuration (optional)
To ensure the NTP configuration is working correctly, you can click on the “Test services” button. This will check the connectivity to the specified NTP servers.

6.Enabling NTP Service
To enable the NTP service at start-up of the host, under “Configure”, click on “Services” to see the list of services running. Click on “NTP Daemon” service in the list and click on “Edit Startup Policy.”

7.Setup the Behavior of NTP Daemon startup
In the “Edit Startup Policy” dialog box, you have three choices which dictates the behavior of the NTP Daemon startup. Click on “OK” when done.


After completing these steps, the ESXi host will function as an NTP client and synchronize its time with the specified NTP servers. It’s important to ensure the ESXi host has network connectivity to the NTP servers and that the NTP servers are reachable and providing accurate time information.
Upskill Your Teams with Enterprise-Ready Tech Training Programs
- Team-wide Customizable Programs
- Measurable Business Outcomes
About CloudThat

WRITTEN BY Rajiv Gopal


Comments