

 Login
Login


 September 24, 2026
A practical look at building an inbox-reading agent — and how to ship one on Microsoft Azure.
|
Voiced by Amazon Polly |
Introduction
Every business runs on email. Requests, applications, invoices, and enquiries arrive in the same crowded inbox as newsletters and alerts. Someone has to read each message, determine what it is, and enter the details into another system. It is slow, repetitive, and easy to get wrong.
An AI email intake agent removes that manual step. It monitors an inbox, reads each message as a person would, determines the type of request, extracts the key information, and pushes clean, structured data straight into the systems that need it.
Ready to lead the future? Start your AI/ML journey today!
- In- depth knowledge and skill training
- Hands on labs
- Industry use cases
The Problem
A shared inbox receiving hundreds of messages a day has three consistent weaknesses: it is slow, since important requests can sit unread for hours; it is inconsistent, since different people capture details differently; and it does not scale, since twice the volume means twice the effort.
The Solution
An intake agent is a small automated service that connects to a mailbox and processes messages on its own. At a high level, it does five things: reads every new message, including attachments; classifies it as a real request or noise; extracts the important fields; stores the result as clean, structured data; and avoids duplicates, so the same message is never processed twice.
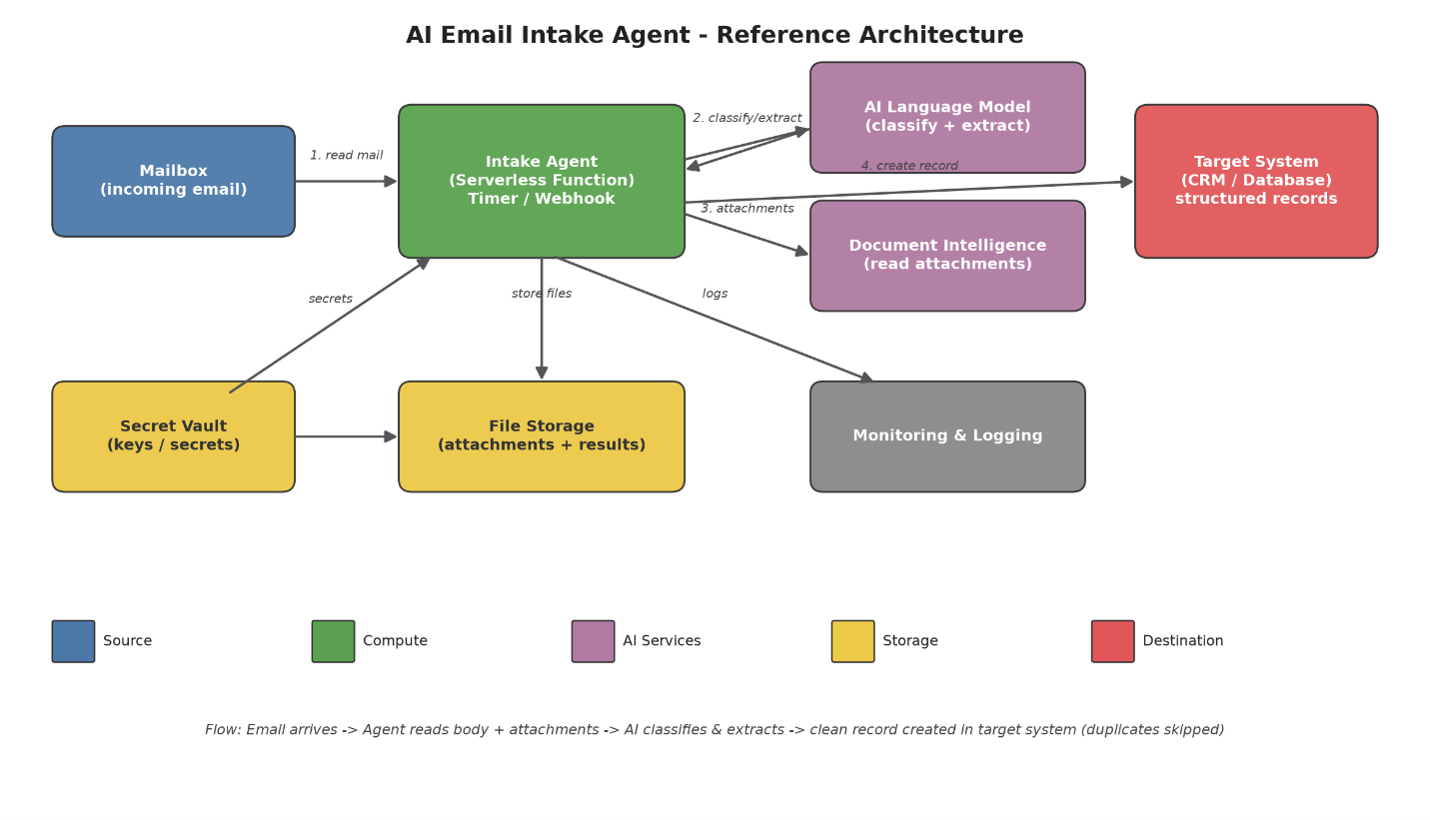
How to Build One on Microsoft Azure: A Practical Walkthrough
Below is a hands-on outline using specific Azure services. Together, they form a complete, production-ready intake pipeline.
Step 1: Deploy the AI Model with Azure OpenAI
Create an Azure OpenAI resource and deploy a model such as GPT-4o mini or GPT-5 mini. This model does the reasoning — it classifies each message and extracts structured fields. Note the endpoint, API key, and deployment name; the agent calls this deployment for every message. Request the output as JSON so the code can use it directly.
Step 2: Host the Agent on Azure Functions
Create an Azure Functions app (Python) on a Flex Consumption or Premium plan. This is the serverless compute that runs the pipeline code. It supports a timer trigger for scheduled checks and an HTTP trigger for on-demand runs, and it only incurs costs while it runs.
Step 3: Read the Mailbox with Microsoft Graph
Register an application in Microsoft Entra ID (Azure AD) and grant it the Microsoft Graph Mail. Read permission as an Application permission, with admin consent. Using application permission lets the Function read the mailbox on its own with a client ID and secret, without any user signing in. For security, scope it to a single mailbox with an Application Access Policy in Exchange.
Step 4: Read Attachments with Azure AI Document Intelligence
Create an Azure AI Document Intelligence resource. The agent sends each attachment — PDF, Word, Excel, or a scanned image — to the prebuilt read model and receives clean text, including OCR for scans. This text is combined with the email body before analysis.
Step 5: Store Files in Blob Storage and Secrets in Key Vault
Create an Azure Storage account for attachments and results, and an Azure Key Vault to hold the OpenAI key, Graph secret, and other credentials. The Function reads secrets from Key Vault (via Key Vault references or Managed Identity) instead of hard-coding them. Enable Application Insights on the Function to log and monitor.
Step 6: Write the Processing Logic in the Function
Inside the Azure Function, the core flow is:
- Acquire a token from Microsoft Entra ID using client credentials.
- Call Microsoft Graph to read new messages (paging through all of them).
- Read the full body and send attachments to Document Intelligence for text.
- Send the combined text to the Azure OpenAI deployment with a structured prompt.
- Receive JSON back — a category plus the extracted fields.
- Query the target system to check for an existing record (avoid duplicates).
- Create the record and upload any files to Blob Storage.
Step 7: Write a Strong Prompt for the Model
The system prompt instructs Azure OpenAI to classify the message into fixed categories, extract only stated facts, never invent data, and return a fixed JSON structure. A clear, strict prompt is what makes the output reliable enough to feed straight into a system.
Step 8: Push Data into the Destination System
Authenticate to the destination system’s API (for example, a Dynamics 365 / Dataverse Web API using an OAuth token), map each extracted field to the correct field, convert values where needed, and create the record. Add duplicate detection so re-runs never create the same record twice.
Step 9: Choose How the Function Is Triggered
- A Timer trigger that checks the mailbox on a schedule (for example, every 15 minutes).
- A Microsoft Graph change-notification (webhook) that fires the instant mail arrives.
A timer is simple and reliable to start with; a Graph webhook adds real-time processing and needs a subscription that is renewed periodically.
Step 10: Test, Monitor, and Improve
Test first with sample files dropped into Blob Storage, then with real emails. Use Application Insights to watch each run and catch errors. Review the extractions, correct any mistakes, and refine the prompt with real examples to keep accuracy improving.
The Azure Services at a Glance
| Azure OpenAI | Classification and extraction — the AI brain. |
| Azure Functions | Serverless compute that runs the pipeline. |
| Entra ID + Graph | Secure mailbox access. |
| Document Intelligence | Reads text from attachments. |
| Blob Storage | Stores attachments and results. |
| Key Vault | Keeps secrets safe. |
| Application Insights | Monitoring and logging. |
Conclusion
An AI intake agent is not about replacing people — it is about removing the tedious reading and typing that stands between a message arriving and something useful happening. It reads the whole message, understands the intent, extracts the facts, stores them cleanly, and avoids duplicates.
Empowering organizations to become ‘data driven’ enterprises with our Cloud experts.
- Reduced infrastructure costs
- Timely data-driven decisions
About CloudThat
FAQs
1. How does the AI agent understand the intent of an email?
ANS: – It uses Azure OpenAI to analyse email content, classify it into predefined categories, and extract the required information.
2. How does the agent securely access emails and attachments?
ANS: – It uses Microsoft Entra ID and Microsoft Graph for secure mailbox access, while Azure Key Vault protects credentials and secrets.
3. Q3. How does the agent ensure accuracy and prevent duplicate records?
ANS: – A structured prompt ensures consistent extraction, while the agent checks the destination system for existing records before creating new ones.

- Agentic AI
- AI Agent
- AI Integration
- AI Workflow
- Amazon Bedrock
- Business Process Automation
- CRM Automation
- Email Automation
- Email Intelligence
- Email Processing
- Enterprise AI
- Generative AI
- Intelligent Automation.
- Intent Recognition
- LLM
- Multi-Agent Systems
- natural language processing
- NLP
- System Integration
- Workflow Automation

WRITTEN BY Shubham .
Shubham Roy is a Cloud Engineer in Managed Services with expertise in AWS architecture and security. Holding AWS Solutions Architect – Associate and AWS Security – Specialty certifications, he focuses on delivering secure, scalable, and cost-efficient cloud environments for clients. Passionate about technology, Shubham enjoys solving real-world challenges and keeping up with the latest AWS innovations. Outside of work, he spends his time reading books and playing cricket.


 PREV
PREV






Comments