

 Login
Login- Consulting
- Training
- Partners
- About Us
x
Azure, Cloud Computing
 4 Mins Read

 May 20, 2016
 Recently, I designed an architecture for client application where we used Azure’s VNet-to-VNet connectivity for geo-redundancy. The requirement was such that they wanted to continue with their on-premises infrastructure, so we thought of it as DR (disaster recovery) solution. In the design we proposed Multi-Site connectivity as well, with VNet-to-VNet connectivity in Azure, you can connect two different VNets with each other. You can use this connectivity to connect two VNets across different regions or across different subscriptions.
The question that comes to mind is “Why connect VNets?”
So, connecting VNet is especially useful when you want to setup multi-tier applications with multiple virtual networks connected together with a strong isolation boundary and secure inter-tier communication within same region. This can also help you set up geo-replication or synchronization over a secure connection without going out over the internet. Connecting one Virtual Network with another is almost similar to connecting an on-premises network to Azure’s Virtual Network as both the connection uses a VPN gateway to provide a secure IPSec tunnel for data transfer.
Are you new to VNet-to-VNet connectivity?
If yes, click here to get more insight on VNet-to-VNet connectivity in Azure.
Now, where can we include VNet connectivity?
Let’s assume you want to deploy two Cloud Services in different regions across different Azure Data centres. As the service is geographically dispersed, I would suggest to use Traffic Manager with “Performance” load-balancing method to make sure that clients connect to specific Cloud Service that performs best for their locations. Also, best practices includes database to be present in the same region as the cloud services to avoid latency and performance issues.
One day, my “non-technical” friend called up with a very strange scenario, totally different from the above one. So, the situation goes like this: He was having two frontend servers in two different regions both talking to a single database server (SQL Server on VM) hosted in the third region. He was stuck in establishing multi-site connectivity (multi-site VPN) between those three regions.
Now, let’s work around with some basic pieces of information that are required to understand the scenario:
Let’s assume the three regions are: Southeast Asia, East Asia and Central US. Mapping regions with my friend’s scenario; two frontend servers in Southeast Asia and East Asia and database server in Central US (which practically will give you latency and database performance issues).
Nomenclature and address spaces of VNets and Local Networks chosen by me are as follows:
| VNet Name Address | Address Space | Local Network Name | Address Space |
| Default_SEAsia_VNet | 10.1.0.0/16 | SEAsia_Local | 10.1.0.0/16 |
| Default_EAsia_VNet | 10.2.0.0/16 | EAsia_Local | 10.2.0.0/16 |
| Default_CentralUS_VNet | 10.3.0.0/16 | CentralUS_Local | 10.3.0.0/16 |
The database server has to be connected with both the frontend servers in Southeast Asia and East Asia. Avoid creating unnecessary number of gateways as it will create a hole in your pocket.
Let’s start using Multi-site VPN:
Open your “Network Configuration.xml” file and search for <ConnectionsToLocalNetwork> inside <VirtualNetworkSites>.
For Default_CentralUS_VNet by default you will only see a connection with SEAsia_Local inside.

As we need connection to EAsia_Local, we will add that part inside. After adding, it should look like this:

Save the file and import the configuration file from management portal.
After import is successful, we are required to run the series of PowerShell cmdlets to set up shared key for VPN tunnel. Now, import your subscription into PowerShell by either using “Add-AzureAccount” or “Import-PublishSetiingsFile” cmdlet.
Execute the following cmdlets:
After executing the above mentioned cmdlets, you can browse to Virtual Networks in the management portal and can verify the connection of all three VNets.
For Default_CentralUS_VNet, the Dashboard will look similar as shown below.
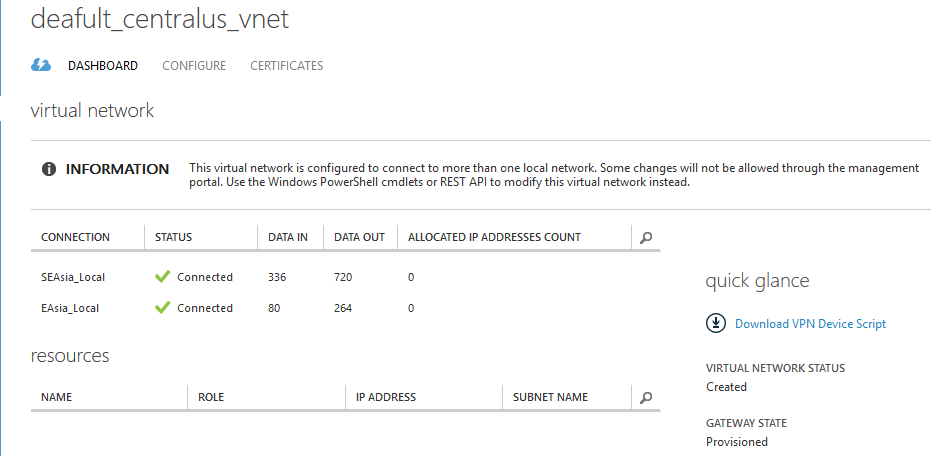
Multi-site VPN in Azure is especially useful for geo distribution or fault tolerance by deploying our service in more than two regions. It also helps the businesses that have multiple on-premises sites and would like to connect to same VNet on Azure.
One fine case where you can make an effective use of multi-site connectivity is – DR solution. Suppose, you have a DR solution with on-premises network for AD replication, an Azure VNet for failing over machines using Azure Site Recovery and another VNet for RemoteApp. In this case, you require to connect three sites together i.e. establishing multi-site connectivity. Maximum 10 sites can be connected using multi-site connectivity in Azure.
We also do professional consulting on strategizing multi-site or multi-cloud deployments. For more details kindly check our Cloud Strategy Services. We also have Managed Services for premium support on multi-cloud DR plans.
Feel free to post your queries and stay tuned for more updates on Azure.
|
Voiced by Amazon Polly |
CloudThat is a leading provider of cloud training and consulting services, empowering individuals and organizations to leverage the full potential of cloud computing. With a commitment to delivering cutting-edge expertise, CloudThat equips professionals with the skills needed to thrive in the digital era.
SHARE


AI/ML, Cloud Computing
By Livi Johari
Jul 20, 2026

AI/ML, Cloud Computing
By Livi Johari
Jul 20, 2026

AWS, Cloud Training
By Himisha Raval
Jul 14, 2026

AWS, DevOps
By Himisha Raval
Jul 14, 2026


Artificial Intelligence, Data science
By Himisha Raval
Jul 14, 2026
Our support doesn't end here. We have monthly newsletters, study guides, practice questions, and more to assist you in upgrading your cloud career. Subscribe to get them all!

Comments