

 Login
Login

 December 8, 2025
|
Voiced by Amazon Polly |
Introduction
In Part 1 of our Backstage DevOps toolkit series, we explored how integrating AWS services like AWS CodeBuild, AWS CodePipeline, Amazon Elastic Container Registry, and Amazon Elastic Container Service transforms your developer portal into a centralized command centre for AWS resources. These integrations streamlined workflows and eliminated constant context switching between platforms.
Now, let’s expand our toolkit beyond AWS-native services. Open-source DevOps tools represent the backbone of modern software delivery pipelines, offering flexibility, community-driven innovation, and vendor-agnostic approaches. By incorporating ArgoCD, Jenkins, Grafana, and Kubernetes plugins into Backstage, we create a truly comprehensive ecosystem.
What makes this combination particularly powerful is how these open-source tools complement AWS services. While AWS provides robust managed infrastructure, these tools enhance it with GitOps workflows, extended CI/CD capabilities, advanced observability, and container orchestration. Together, they create a seamless experience where cloud infrastructure and DevOps practices converge within your Backstage portal, giving teams the best of both worlds.
Pioneers in Cloud Consulting & Migration Services
- Reduced infrastructural costs
- Accelerated application deployment
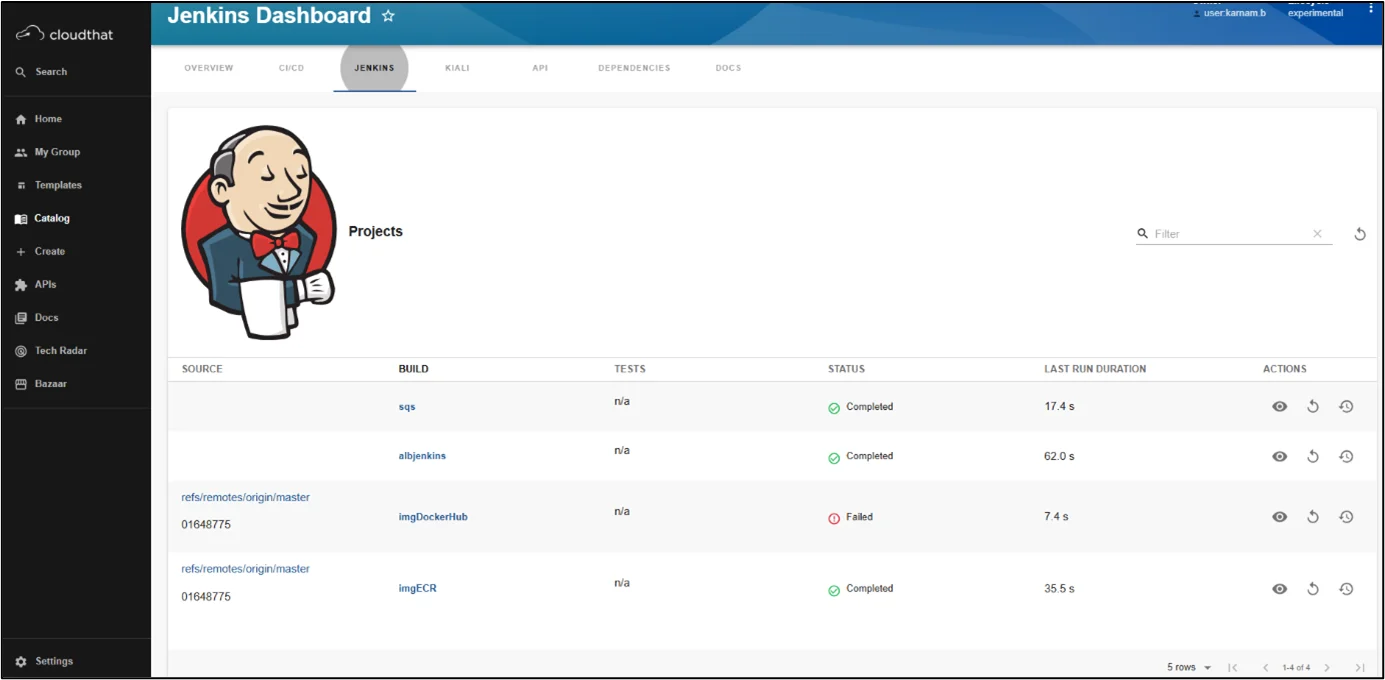
Jenkins Plugin
Jenkins plugin provides:
- View all runs inside a folder
- Last build status for the specified branch
- View the summary of a build
Installation Steps
- Frontend package:
Install the frontend package in your Backstage app:
|
1 |
yarn --cwd packages/app add @backstage-community/plugin-jenkins |
In packages/app/src/components/catalog/EntityPage.tsx add:
|
1 2 3 4 5 6 7 8 9 10 11 12 13 14 15 16 17 18 19 20 21 22 23 24 25 26 27 28 29 |
import { EntityJenkinsContent, EntityLatestJenkinsRunCard, isJenkinsAvailable, } from '@backstage-community/plugin-jenkins'; // example here const serviceEntityPage = ( <EntityLayout> <EntityLayout.Route path="/" title="Overview"> <EntitySwitch> <EntitySwitch.Case if={isJenkinsAvailable}> <Grid item sm={6}> <EntityLatestJenkinsRunCard branch="main,master" variant="gridItem" /> </Grid> </EntitySwitch.Case> </EntitySwitch> </EntityLayout.Route> <EntityLayout.Route path="/ci-cd" title="CI/CD"> <EntitySwitch> <EntitySwitch.Case if={isJenkinsAvailable}> <EntityJenkinsContent /> </EntitySwitch.Case> </EntitySwitch> </EntityLayout.Route> </EntityLayout> ); |
2. Backend package:
Install the backend package in your Backstage app:
|
1 |
yarn --cwd packages/backend add @backstage-community/plugin-jenkins-backend |
In your packages/backend/src/index.ts make the following changes:
|
1 2 3 4 5 |
import { createBackend } from '@backstage/backend-defaults'; const backend = createBackend(); // ... other feature additions backend.add(import('@backstage-community/plugin-jenkins-backend')); backend.start(); |
3. Configuration:
In your app-config.yaml or app-config.local.yaml add:
|
1 2 3 4 5 |
jenkins: baseUrl: https://jenkins.example.com username: XXXXXXXX projectCountLimit: 100 apiKey: XXXXXXXXXXXXXXX |
4. Annotation:
While creating the catalog file add the following annotations:
|
1 2 3 4 5 6 7 |
// Example apiVersion: backstage.io/v1alpha1 kind: Component metadata: name: artist-lookup annotations: 'jenkins.io/job-full-name': teamA/artistLookup-build |
Kubernetes Plugin
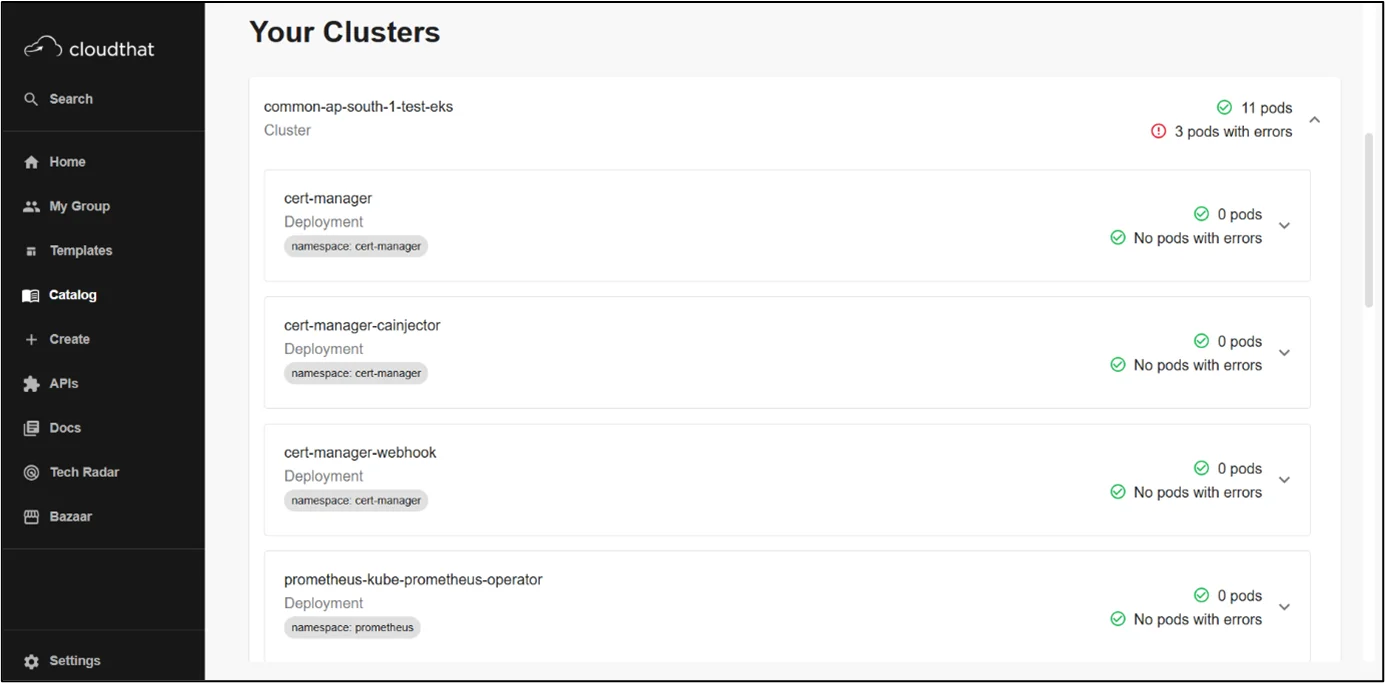
Kubernetes in Backstage is a tool that’s designed around the needs of service owners, not cluster admins. Now, developers can easily check the health of their services, regardless of how or where those services are deployed, whether it’s on a local host for testing or in production on dozens of clusters around the world.
It will elevate the visibility of errors where identified and provide drill-down information about deployments, pods, and other objects for a service.
Installation Steps
- Frontend package:
From your Backstage root directory
|
1 |
yarn --cwd packages/app add @backstage/plugin-kubernetes |
Once the package has been installed, you need to import the plugin into your app by adding the “Kubernetes” tab to the respective catalog pages.
|
1 2 3 4 5 6 7 8 9 10 11 12 |
packages/app/src/components/catalog/EntityPage.tsx import { EntityKubernetesContent } from '@backstage/plugin-kubernetes'; const serviceEntityPage = ( <EntityLayout> {/* other tabs... */} <EntityLayout.Route path="/kubernetes" title="Kubernetes"> <EntityKubernetesContent refreshIntervalMs={30000} /> </EntityLayout.Route> </EntityLayout> ); |
2. Backend package:
From your Backstage root directory
|
1 |
yarn --cwd packages/backend add @backstage/plugin-kubernetes-backend |
Then add it to your backend packages/backend/src/index.ts file:
|
1 2 3 4 |
const backend = createBackend(); // Other plugins... backend.add(import('@backstage/plugin-kubernetes-backend')); backend.start(); |
3. Configuration:
Backstage supports multiple Kubernetes provider integrations. Let’s configure it for Amazon EKS
If you have generated static AWS security credentials, the configuration block (app-config.yaml) for AWS will look like this:
|
1 2 3 4 5 6 7 8 9 10 11 12 13 14 15 16 17 18 19 20 |
aws: accessKeyId: ${AWS_ACCESS_KEY_ID} secretAccessKey: ${AWS_SECRET_ACCESS_KEY} sessiontoken: ${AWS_SESSION_TOKEN} region: ${AWS_REGION} The Kubernetes configuration looks like this: kubernetes: serviceLocatorMethod: type: 'multiTenant' clusterLocatorMethods: - type: 'config' clusters: - url: https://<unique-identifier>.<region>.eks.amazonaws.com name: ${CLUSTER_NAME_TO_DISPLAY} authProvider: 'aws' caData: ${EKS_CA_DATA} authMetadata: kubernetes.io/aws-assume-role: ${ROLE_ARN_TO_ASSUME} kubernetes.io/aws-external-id: ${ID_FROM_AWS_ADMIN} kubernetes.io/x-k8s-aws-id: ${CLUSTER_NAME_IN_AWS_CONSOLE} |
You get both the cluster URL and CA directly from the AWS console by going to Amazon EKS > Your cluster > Overview > Details. You will find them under ‘API server endpoint’ and ‘Certificate authority’, respectively.
4. Annotation:
There are many ways to surface your Kubernetes components as part of an entity. But the label selector takes precedence over the annotation/service id.
|
1 2 |
annotation: 'backstage.io/kubernetes-label-selector': 'app=my-app,component=front-end' |

ArgoCD Plugin
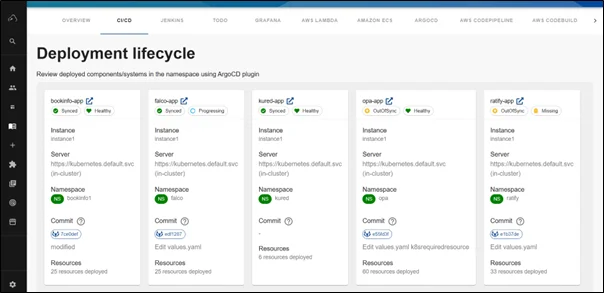
The ArgoCD plugin for Backstage brings GitOps principles directly into your developer portal, creating a seamless connection between your Git repositories and Kubernetes deployments. This integration embodies the GitOps philosophy, where Git serves as the single source of truth for declarative infrastructure and applications. With ArgoCD in Backstage, teams can visualize the entire GitOps workflow from code commits to production deployment without switching contexts.
Installation Steps
- Frontend package:
Install AgroCD plugin using the following command:
|
1 |
yarn workspace app add @backstage-community/plugin-redhat-argocd |
Add deployment summary and deployment lifecycle to EntityPage.tsx:
|
1 2 3 4 5 6 7 8 9 10 11 12 13 14 15 16 17 18 19 20 21 22 23 24 25 26 27 28 29 30 31 32 |
import { ArgocdDeploymentSummary, ArgocdDeploymentLifecycle, isArgocdConfigured, } from '@backstage-community/plugin-redhat-argocd'; const overviewContent = ( <Grid container spacing={3} alignItems="stretch"> ... <EntitySwitch> <EntitySwitch.Case if={e => Boolean(isArgocdConfigured(e))}> <Grid item sm={12}> <ArgocdDeploymentSummary /> </Grid> </EntitySwitch.Case> </EntitySwitch> ... </Grid> ); const cicdcontent = ( <EntitySwitch> {/* ... */} {/* highlight-add-start */} ... <EntitySwitch.Case if={e => Boolean(isArgocdConfigured(e))}> <Grid item sm={12}> <ArgocdDeploymentLifecycle /> </Grid> </EntitySwitch.Case> {/* highlight-add-end */} </EntitySwitch> ); |
2. Backend package:
To install it in your backend package, run:
|
1 |
yarn --cwd packages/backend add @backstage-community/plugin-redhat-argocd-backend |
Then add the plugin to your backend in packages/backend/src/index.ts:
|
1 2 3 |
const backend = createBackend(); // ... backend.add(import('@backstage-community/plugin-redhat-argocd-backend')); |
3. Configuration:
In app-config.yaml add:
|
1 2 3 4 5 6 7 |
argocd: appLocatorMethods: - type: 'config' instances: - name: instanceA url: https://instance-a.com token: ${ARGOCD_AUTH_TOKEN} |
The following customResources component is added under the Kubernetes configuration in the app-config.yaml file:
|
1 2 3 4 5 6 7 8 9 |
Kubernetes: ... customResources: - group: 'argoproj.io' apiVersion: 'v1alpha1' plural: 'rollouts' - group: 'argoproj.io' apiVersion: 'v1alpha1' plural: 'analysisruns' |
4. Annotation:
Add one of the following annotations to the entity’s catalog-info.yaml file to enable Argo CD features in the backstage instance:
|
1 2 3 |
annotations: ... argocd/app-selector: 'rht-gitops.com/janus-argocd=quarkus-app' # format: `label.key=label.value` |

Grafana Plugin
The Grafana Dashboard plugin transforms Backstage into a metrics powerhouse by integrating observability data directly into your developer portal. It eliminates tool-switching, provides contextual metrics, speeds decision-making, and reduces incident resolution time by centralizing performance data alongside service documentation and deployment information.
Installation Steps
- Frontend package:
Add the plugin to your frontend app:
|
1 |
cd packages/app && yarn add @backstage-community/plugin-grafana |
2. Configuration:
Add the command in app-config.yaml file:
|
1 2 3 4 5 6 7 |
proxy: '/grafana/api': # May be a public or an internal DNS target: https://grafana.host/ grafana: domain: https://monitoring.company.com unifiedAlerting: false |
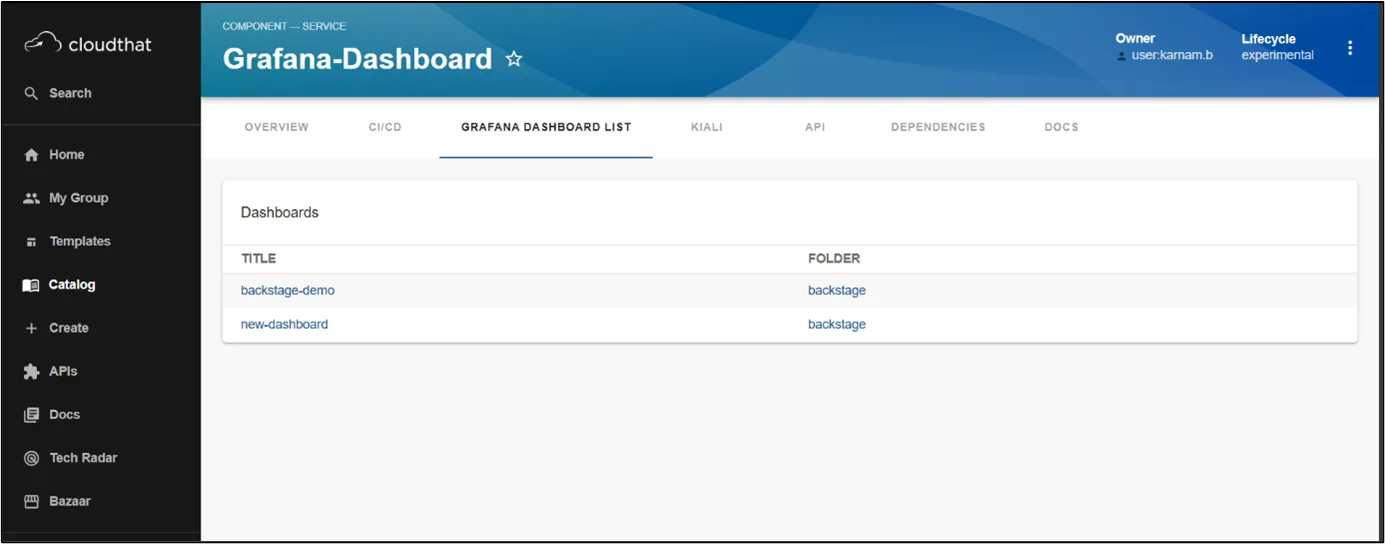
Adding the EntityGrafanaDashboardsCard component to an entity’s page will display a list of dashboards related to that entity.
|
1 2 3 4 5 6 7 8 9 10 11 |
import { EntityGrafanaDashboardsCard } from '@backstage-community/plugin-grafana'; // ... const serviceEntityPage = ( <EntityLayout> //… <EntityLayout.Route path="/grafana/list" title="Grafana Dashboard List" if={(entity) => Boolean(isDashboardSelectorAvailable(entity))}> <EntityGrafanaDashboardsCard /> </EntityLayout.Route> //... </EntityLayout> ); |
3. Annotations:
The following annotation returns the Grafana dashboards that have tags my-service (example)
|
1 2 |
annotations: grafana/dashboard-selector: my-service |
Conclusion
This holistic toolkit eliminates tool fragmentation while empowering teams with unprecedented visibility and control.
Please check out Part 1 here.
Drop a query if you have any questions regarding Backstage and we will get back to you quickly.
Empowering organizations to become ‘data driven’ enterprises with our Cloud experts.
- Reduced infrastructure costs
- Timely data-driven decisions
About CloudThat

WRITTEN BY Karnam Bhargava
Karnam Bhargava, Research Associate at CloudThat, combines AWS knowledge with DevOps skills. His passion for cloud technologies and infrastructure automation translates into insightful technical content. Continuously expanding his knowledge across containerization, GitOps, and emerging cloud services to deliver valuable community insights and innovative solutions.


Comments