

 Login
Login

 June 20, 2023
|
Voiced by Amazon Polly |
Introduction
This blog continues with Part 1 of Improve Accuracy by tuning the PSM values of Tesseract, where I have discussed the Page Segmentation Modes of PSM 0 to PSM 5. I will elaborate more about PSM 6 to PSM 13 with examples.
This blog discusses improving accuracy by adjusting the PSM (Page Segmentation Mode) in Tesseract, an Open-Source OCR Engine developed by Google.
Let’s deep dive into the remaining PSM mode with examples.
Pioneers in Cloud Consulting & Migration Services
- Reduced infrastructural costs
- Accelerated application deployment
PSM Mode 6: Assume a single uniform block of text
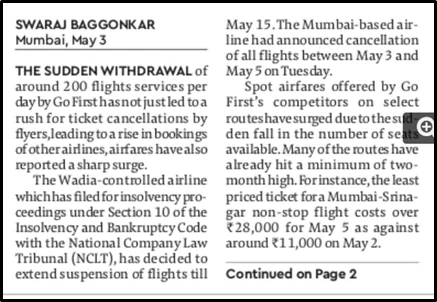
If your input image follows a consistent font type, for example, you are scanning an OCR for Novels, Books, Newspapers, etc. PSM mode 6 will give you the most accurate results.
Input Image:

Output:

PSM Mode 7: Treat the image as a single text line
In this mode, the tesseract assumes that the input image consists of a single line of uniform text. This will be useful when scanning any Number Plates, Title based on the use case, etc.
Input Image:

Output:

PSM Mode 8: Treat the image as a single word
If you have a single word of uniform text, then PSM mode 8 could help with better accuracy. PSM modes 7 and 8 can be used interchangeably.
Input Image:

Output:

With PSM Value 3, output as below

PSM Mode 9: Treat the image as a single word in a circle
PSM mode 9 is used in Tesseract when you want to recognize text arranged in a circular pattern. In this mode, Tesseract treats the image as a single word in a circle and tries to recognize the characters in that circular arrangement. It can be useful when extracting text from logos, emblems, or circular graphics containing text. However, it may not be as accurate as other modes designed for standard text arrangements.
Note: I tried with PSM value 9 for many images of circular oriented text, but the accuracy is poor.
Input Image:

Output:
Since the confidence is very low, it produced no OCR text.

PSM Mode 10: Treat the image as a single character
This works when you have an input image having just 1 character, and this could be useful when you want to recognize each character in a word after doing ROIs
Input Image:

Output:

When there is no PSM, the output follows as below.

PSM Mode 11: Sparse text. Find as much text as possible in no particular order
When dealing with images that contain a large amount of text, using the sparse text mode can be advantageous. This is because the mode focuses solely on extracting the text rather than its organization or arrangement within the image. Therefore, it can be useful when the primary goal is to capture as much text as possible without being concerned with its structure.
Note: OSD is not performed in this mode
Input Image:
Output:


PSM Mode 12: Sparse text with OSD
PSM Mode 12 works the same way as 11 if we have done OSD first, then PSM 11.
Note: The result is the same as tested with the above PSM 11.
PSM Mode 13: Raw line. Treat the image as a single text line, bypassing Tesseract-specific hacks
This mode will bypass all the performance functions, attributes, and segmentation methods and treats the input image as a single text line.
Input Image:

Output Image:
When PSM = 13
![]()
When PSM = 3

Conclusion
Note: Always stick to PSM–3, the default one, even after approaching all segmentation modes. If the results are not promising, then give it a try with PSM –13. PSM is not the only way to increase accuracy, and you also will have to pay attention to various Image Processing techniques for better results.
Making IT Networks Enterprise-ready – Cloud Management Services
- Accelerated cloud migration
- End-to-end view of the cloud environment
About CloudThat
FAQs
1. What is PyTesseract?
ANS: – PyTesseract is a Python wrapper for the Tesseract OCR engine. It allows you to use Tesseract’s OCR functionality in your Python code, making extracting text from images, PDFs, and other scanned documents easier.
2. Can I use Tesseract to recognize text in multiple languages?
ANS: – Yes, Tesseract supports the recognition of text in multiple languages. You can specify the language using the “lang” parameter.

WRITTEN BY Ganesh Raj
Ganesh Raj V works as a Sr. Research Associate at CloudThat. He is a highly analytical, creative, and passionate individual experienced in Data Science, Machine Learning algorithms, and Cloud Computing. In a quest to learn and work with recent technologies, he strives hard to stay updated on advanced technologies along efficiently solving problems analytically.


Comments