

 Login
Login

 October 20, 2020
|
Voiced by Amazon Polly |
This article talks about configuring subdomain with Amazon Simple Email Service (Amazon SES), to avoid any inconsistency with data.
Start Learning In-Demand Tech Skills with Expert-Led Training
- Industry-Authorized Curriculum
- Expert-led Training
Inconsistency Observation:
When multiple email addresses are configured in SES active rule, some of the mails/data left undelivered to SES.
Step 1: SES – Verifying the Domain
- Login to your AWS account and navigate to the SES service of AWS. Select Verify a New Domain

- Note: We have chosen Northern Virginia (us-east-1) as the AWS region2. Once you have clicked on the Verify a New Domain, you will get a dialog box for configuring your Domain.
- Configure Domain as mail-datasync.company.co
- Enable the Generate DKIM settings
- And completed the step by clicking on Verify This Domain

- It will give you a list of the record sets to complete the verification process.

Step 2: Route 53 – Creating a record set for completing the domain verification
- Go to Route 53 service of AWS. Choose the domain co under Hosted Zones

- Click on Create Record Set and add all the recordset which we received from SES in Step1 point 3.

- Once all the record sets are added in Route 53, you will able to see Domain as verified in SES.

Note: It may take some time to verify
Step 3: S3 – Creating a bucket for storing all the received mails
- Go to the S3 service of AWS. Create a bucket with name misdata.ses in the US-East-1 region

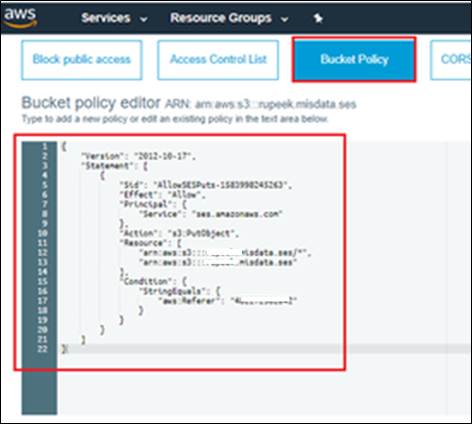
- Add bucket policy in S3 to allow SES to put objects in the bucket
12345678910111213141516171819202122{"Version": "2012-10-17","Statement": [{"Sid": "AllowSESPuts-1585263","Effect": "Allow","Principal": {"Service": "ses.amazonaws.com"},"Action": "s3:PutObject","Resource": ["arn:aws:s3:::company.misdata.ses/*","arn:aws:s3:::company.misdata.ses"],"Condition": {"StringEquals": {"aws:Referer": "<account_id>"}}}]}
Step 4: SES – Creating a rule set in SES to process the mails
- Go to the SES service of AWS. Click on the Rule Sets section of SES

- Click on create a rule set with name data-sync-project.

- Once the rule-set has been created, click on the rule set data-sync-project. Select Create Rule.

- Add Recipient as mail-datasync.company.co. and click on Add Recipient and then click on Next Step

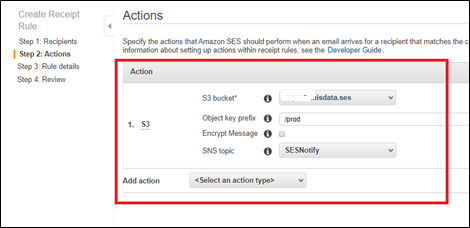
- Add actions as an S3 bucket, which created in the previous step. And add object or path of the bucket where data need to be stored and then click on Next Step
- Provide a rule name as company.misdata and click on Next Step

- Review the details and create the rule.
- And make the Rule-Set data-sync-project as active
Step 5: S3 – Received mails in S3
As soon as you make Rule-set as active you will start receiving the mails in S3

Would you like to learn more about AWS services? visit https://cloudthat.in
Please share your feedback in the comment section and I will be happy to reply to any queries you have.
Upskill Your Teams with Enterprise-Ready Tech Training Programs
- Team-wide Customizable Programs
- Measurable Business Outcomes
About CloudThat

WRITTEN BY Sana Pathan
Sana Pathan is the Head of Infra, Security & Migrations at CloudThat and also leads the Managed Services and FinOps verticals. She holds 7x AWS and Azure certifications, spanning professional and specialty levels, demonstrating deep expertise across multiple cloud domains. With extensive experience delivering solutions for customers in diverse industries, Sana has been instrumental in driving successful cloud migrations, implementing advanced security frameworks, and optimizing cloud costs through FinOps practices. By combining technical excellence with transparent communication and a customer-centric approach, she ensures organizations achieve secure, efficient, and cost-effective cloud adoption and operations.


Naved Khan
Apr 18, 2021
Very Informative and Useful Article…Keep it up Sana!👍
Umesh Thakor
Nov 2, 2020
Do we also have to varify the email addresses after verifying the Domain?
Anjali Jadav
Oct 30, 2020
Good work. Please share blog for sending mails.
Sana Pathan
Oct 31, 2020
Thanks, sure we will do that soon.
Vian
Oct 30, 2020
Nice Work Sana .🙂
Sana Pathan
Oct 30, 2020
Thanks
Viral Patel
Oct 30, 2020
Can we use GoDaddy instead of Route53?
Sana Pathan
Oct 31, 2020
Yes, GoDaddy can be used, just make sure all the recordset are added properly.
Soha Khan
Oct 30, 2020
Very useful blog, keep it up!!
Khushboo
Oct 30, 2020
Nice blog Sana!😊
Farhaz Saiyed
Oct 30, 2020
Very useful & informative
Vivek
Oct 30, 2020
Wow. What a beautifully explain. Nice work Sana☺️👍
To the point and step by step explanation.
Virendra Chauhan
Oct 30, 2020
We have faced this problem with SES, we will try out your solution. Great blog
Sana Pathan
Oct 31, 2020
Sure. Please let us know.