

 Login
Login- Consulting
- Training
- Partners
- About Us
x
AWS, Cloud Computing
 5 Mins Read

 June 13, 2021
Businesses globally are finding flexible ways of enabling their workforce to work from remote locations, using remote technologies for business continuity. This has led to a significant rise in the virtual desktop infrastructure issue as a large number of users connect to their systems simultaneously.
The possible reasons could be related to one or more issues as mentioned below:
AWS offers a virtual desktop solution that enables you to provision workspaces on the spot for all the users with security. Amazon WorkSpaces is also known as Desktop-as-a-service, and it is the same as your office computer and functionality from the office computers. You can create Windows or Linux desktop configuration which will have all the software and application that your team uses in office and access to your file systems as well.
In this post, I have demonstrated the steps involved in the deployment of software on WorkSpaces using Systems Manager.
Here I am deploying a notepad++ application on a Windows 10 client.
Note: The WorkSpaces service is not available in all the AWS region so chose the region where the service is available.


|
1 2 3 4 5 6 7 8 9 10 |
$code = "activation-code" $id = "activation-id" $region = "region" $dir = $env:TEMP + "\ssm" New-Item -ItemType directory -Path $dir -Force cd $dir (New-Object System.Net.WebClient).DownloadFile("https://amazon-ssm-$region.s3.amazonaws.com/latest/windows_amd64/AmazonSSMAgentSetup.exe", $dir + "\AmazonSSMAgentSetup.exe") Start-Process .\AmazonSSMAgentSetup.exe -ArgumentList @("/q", "/log", "install.log", "CODE=$code", "ID=$id", "REGION=$region") -Wait Get-Content ($env:ProgramData + "\Amazon\SSM\InstanceData\registration") Get-Service -Name "AmazonSSMAgent" |

The WorkSpaces is now a managed instance. It is displayed with the prefix “mi” in Systems Manager.
|
1 2 3 4 5 6 7 8 9 10 11 12 13 14 15 |
Write-Host "Downloading $packageName" $webClient = New-Object System.Net.WebClient $webClient.DownloadFile($package.url,$destinationPath) } } foreach ($package in $packages) { $packageName = $package.title $fileName = Split-Path $package.url -Leaf $destinationPath = $package.Destination + "\" + $fileName $Arguments = $package.Arguments Write-Output "Installing $packageName" Invoke-Expression -Command "$destinationPath $Arguments" } } Install-Npp |


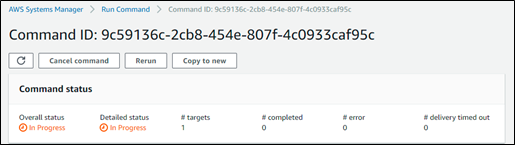
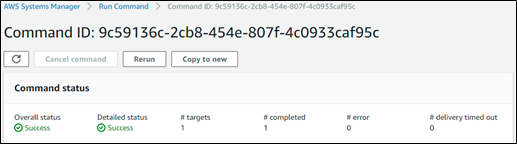

Now you can control the WorkSpaces environment with the help of the System Manager which makes it easier to execute the commands in a centralized panel. When setting up the WorkSpaces, you will have the option of AlwaysOn which will be for full-time flat fee use or the AutoStop option which gets charged only when the instance is running.
This solution of WorkSpaces and System manager will help you to deploy software resources your teams need. And it helps to overcome the technical challenges in managing multiple virtual desktop environments such as patching the OS, monitoring and many others. It is crucial to make your team have everything they need to help your business to be productive and successful.
Learn more about Amazon WorkSpaces: Transforming Traditional IT Environments here.
|
Voiced by Amazon Polly |
SHARE

Agentic AI, Prompt Engineering
By Himisha Raval
Jul 14, 2026


Azure, Cloud Training
By Himisha Raval
Jun 26, 2026


Our support doesn't end here. We have monthly newsletters, study guides, practice questions, and more to assist you in upgrading your cloud career. Subscribe to get them all!

Comments