

 Login
Login- Consulting
- Training
- Partners
- About Us
x
Cloud Computing, OpenStack, Private Cloud
 6 Mins Read

 May 20, 2014
In my previous blog, I wrote about my experience installing a single-node OpenStack Icehouse on a desktop/laptop using RDO. In this blog I will be demonstrating how to set up a simple Multi-Node OpenStack installation on AWS (Amazon Web Services). This is ideal in situations where we do not have access to hardware for setting up a multi-node installation or simply don’t have the time to setup machines for the same.
Since I intend to just demonstrate the possibility of running OpenStack on AWS, I will keep the architecture simple. I would also like to state that such setups should be used purely for trying out OpenStack and not for production.
My architecture will contain 1 Controller Node & 2 Compute Nodes. I will also try to keep the costs as low as possible. So I will use the smallest EC2 instance that will do the job. Unfortunately we cannot use t1.micro instances which are eligible for free tier since the memory in them is very low. (I did try though and it failed with “not enough memory” error message).
AWS Services:
Well, before we can install OpenStack we have to get the EC2 instances running.
Click Launch Instances in EC2 Dashboard.
Select an Amazon Machine Image (AMI)
I choose Red Hat Enterprise Linux 6.5 (PV) 64 bit for the purpose of this demonstration. You can also choose the Red Hat Enterprise Linux 6.5 (HVM), however the available instance types may be change.

Next I choose the Instance Type, General purpose m1.small.

The next step is to configure the instances. Here there are 3 important things you need to ensure is set correctly.

Next is the storage, the default is 10 GB. I changed the it to 20 GB. I did not add any additional storage since I was just testing.

Finally in the Security Groups configuration section, choose an existing security group or create a new one that has at least SSH (Source IP restricted) and HTTP / HTTPS traffic enabled (from any source). I have created a new Security group called OpenStack and I have enabled all traffic on all protocols from everywhere. This a test environment and at this point it does not matter.

Review and click on Launch to fire up the instances. When you click on Launch it will ask to either create or choose an existing Key Pair. If creating a new one, it let’s you enter a name and downloads the Private Key for you. Store it safe as this is very important.
I already had one created, so I choose that and acknowledged that I have the Private Key.

Click Launch Instances, sit back and relax. Let AWS fire up the instances for you and get it running.
Before moving on to the next step, make a note of the Public IPs assigned to all the 3 instances. They will be required to SSH in and later at the end access the OpenStack dashboard. It is also recommended to name the EC2 instances as Controller Node, Compute Node etc. This will help in easier identification of the IP addresses later.
Step 2: OpenStack Installation
Connect to all the 3 instances using Public IP of the EC2 instance and the private key. The default user to login to AWS EC2 instance is ‘ec2-user“. Note that root login is disabled in EC2 instances and all the commands will be performed using ec2-user. So, using sudois required. Once SSH’d, run the below commands on all 3 instances.
Update the packages.
|
1 |
sudo yum update -y |
Set SELinux to permissive mode. This is again done for a smooth installation just for the purposes of this demonstration.
|
1 |
sudo setenforce permissive |
Run the next set of commands only on the EC2 instance that will function as the Controller Node.
Download & install the RDO installer rpm package.
|
1 |
sudo yum install https://rdo.fedorapeople.org/rdo-release.rpm -y |
Install packstack.
|
1 |
sudo yum install openstack-packstack -y |
The next command will create the Public-Private RSA key.
|
1 |
sudo ssh-keygen |
Print the newly created Public RSA key on the screen.
|
1 |
sudo cat /root/.ssh/id_rsa.pub |
Copy the public key printed on the screen. It looks something like this.

Perform the next set of steps on all 3 EC2 instances.
|
1 |
sudo vi /root/.ssh/authorized_keys |
Add the copied public key into the authorized_keys file. I would like to emphasize here that it needs to be added or appended to the file and not replaced. So you should have two keys in there. One for EC2 key pair and other for the root account of the Controller Node. It should look something like this below:

We also need to copy the same public key into authorized_keys file under the ec2-user account.
|
1 |
sudo vi ~/.ssh/authorized_keys |
Again ensure you are adding/appending the key to the file. Finally it should have two keys in there.
We are copying the RSA public key to authorized_keys file for both root and ec2-user to ensure smooth installation of OpenStack. Lack of this public key in either one of them will throw an error similar to the one below:
![]()
Check you are able to ssh into the other EC2 instances from any one of them using both ec2-user and root account.
|
1 |
sudo ssh ec2-user@<private ip> |
|
1 |
sudo ssh root@<private ip> |
Perform the below steps on the EC2 instance which is the Controller Node.
|
1 |
sudo packstack --gen-answer-file=answer-file.txt |
Edit the answer file to change the IP address of the NOVA_COMPUTE_HOSTS
|
1 |
sudo vi answer-file-5172014.txt |
Locate CONFIG_NOVA_COMPUTE_HOSTS and replace it with the Private IP address of the other two EC2 instances (which will server as Compute Nodes). It should look something like in the screenshot below.
|
1 |
CONFIG_NOVA_COMPUTE_HOSTS=<Private IP of Compute Node1>,<Private IP of Compute Node2> |
NOTE: There are many other customizations that can be done through the answer file like specifying passwords, choosing which OpenStack components to install and where etc, but we won’t deep dive into that here.

Finally start the OpenStack installation.
|
1 |
sudo packstack --answer-file=answer-file.txt |
Again time to relax, grab a coffee and watch packstack do the magic.
Once the installation is completed it will print some additional information like IP address of the Horizon dashboard, location of log files etc. It will look something like this:
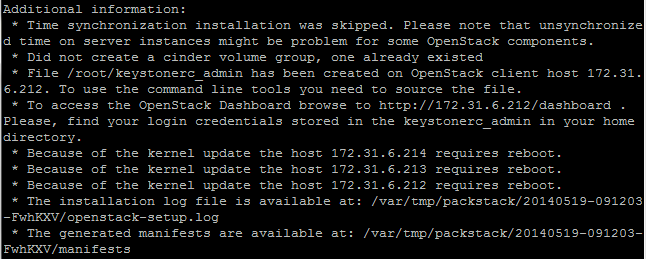
If there is a mention about rebooting the instance, please do so.
Perform the below steps on the Controller Node.
|
1 |
sudo vi /etc/openstack-dashboard/local_settings |
Change “ALLOWED_HOSTS” to reflect
|
1 |
ALLOWED_HOSTS = [ ' * ' ] |
Restart httpd service to reflect the changes done above.
|
1 |
sudo httpd restart |
It’s time now to finally access the Horizon dashboard and this is where the tricky part is. Although the installation completion report stated that the IP address of the Horizon dashboard was the Private IP, we can only access it from outside (the VPC) using the Public IP of the Controller Node EC2 instance.
On the EC2 instances dashboard, click on the instance that is the Controller Node and make a note of the Public IP. Something like below:

Open a browser, type the Public IP address & GO.
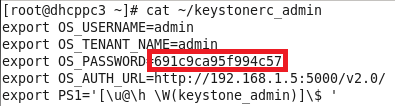
The default login is “admin” and in order to get the password for the first time login, open a terminal and run the commands below as root:
|
1 |
<strong>cat ~/keystonerc_admin</strong> |
This will printout the keystone credential details for admin user, note down the password.
Enter username and password at the Horizon Dashboard login screen and sing in.

If you are interested in learning more about OpenStack and getting some hands-on, we offer Red Hat OpenStack Administration (CL210) course. If you are interested, click here for more details and to fill out the form. And we will get back to you.
If you liked the post, please share and keep coming back for more articles around OpenStack.
|
Voiced by Amazon Polly |
SHARE

AI/ML, AWS, Cloud Computing
By Balaji M
Apr 20, 2026

AWS, Cloud Computing, Data Analytics
By Bineet Singh Kushwah
Apr 20, 2026

AWS, Cloud Computing
By Bineet Singh Kushwah
Apr 20, 2026

AWS, Cloud Computing, Data Analytics
By Nisarg Desai
Apr 20, 2026

AWS, Cloud Computing, DevOps
By Daniya Muzammil
Apr 20, 2026

AI/ML, AWS, Cloud Computing
By Daniya Muzammil
Apr 20, 2026

Cloud Training
By Himisha Raval
Apr 14, 2026


Our support doesn't end here. We have monthly newsletters, study guides, practice questions, and more to assist you in upgrading your cloud career. Subscribe to get them all!

Rajesh
Sep 18, 2021
Hi,
I have tried the above procedure on RHEL 8 EC2 instance. I am getting the below error when I run “packstack –gen-answer-file=answer-file.txt”.
ERROR : Local IP address discovery failed. Please set a default gateway for your system.
Pratik
Jan 22, 2020
Thank you for this nice article.
I am trying to install openstack stein on AWS.
I am able to install it.
After successful installation it is showing “you can access dashboard on http://private-ip/dashboard”
I want to access it publicly.
How can I do that? Can you please help.
I am really bad at networking.
Sangram Rath
Oct 2, 2020
Did you change ALLOWED_HOSTS to ‘*’ in /etc/openstack-dashboard/local_settings?
Abhijith
Oct 15, 2018
Hi,
I followed the same steps. And the installation is completed too. But I’m not able to access the Openstack webpage using public ip. I tried ‘publicip/dashboard’ and I tried with just public ip on browser too, that time I’m getting dash board of Apache default page. Please advice.
Sangram Rath
Oct 2, 2020
Did you change ALLOWED_HOSTS to ‘*’ in /etc/openstack-dashboard/local_settings?
Eric Swenson
Jul 21, 2017
Can Heat and Kubernetes be installed on top of this deployment by following appropriate instructions on openstack/kubernetes sites?
K.L.
Mar 29, 2017
This really helps! I’ve deployed an openstack on AWS using this guide. However, the OS I used is centos 7.
Ankita
Jul 25, 2016
Thank you sangram
many doubt are clear by your explanation.
Sangram Rath
Mar 3, 2017
Thanks :), feel free to check out our new courses based on latest openstack releases.
Kokil
Aug 26, 2015
Nice Post! Thnx
Sangram Rath
Mar 3, 2017
Thanks 🙂
Ratheesh
Apr 11, 2015
I was trying to follow these instructions. Now stuck at an error
Error: Package: python-nova-2014.2.2-1.el7.noarch (openstack-juno)
Requires: python-jinja2
I installed this python package but still returning error. Which rdo release did you used?
Sangram Rath
Mar 3, 2017
I am a little late in responding to this, did you manage to solve this? RDO Icehouse was used for this post. (its been a long time since icehouse)
vedsar kushwaha
Jan 15, 2015
how can i access instance after launching it from dashboard?
hermes
Mar 22, 2015
@edsar Kushwaha
I hope I’ve found the solution. It depends on the user name and password you chose. Otherwise, it can be:
User: admin
Pass: admin
I hope I understood your request.
Sangram Rath
Mar 3, 2017
You should use ssh/rdp to access your instance depending on whether its linux/windows. Ideally when accessing it from outside you’ll need floating IPs assigned to the instances.
Denny Johny
Jun 30, 2014
Thanks for explaining evrything in very brief. We have now one controller and Two node and if one cotroller failed then we will loss all 3 Nodes right? How we can do a setup with two controllers ?
Sangram Rath
Mar 3, 2017
No, not all the nodes go down. The compute nodes will remain and any instances already provisioned will continue running. Depending on the configuration and setup many of the networking capabilities will be lost, plus you can’t perform tasks like launching horizon, provisioning new resources etc.
To overcome this you should setup two controllers in a active/active or active/passive mode, using technologies like haproxy/keepalive and database clustering.