

 Login
Login- Consulting
- Training
- Partners
- About Us
x
Azure, Cloud Computing
 7 Mins Read

 August 16, 2017
Automation is a buzzword in modern Cloud Computing world. Various tools and services are available to deploy resources in Cloud. I’m going to discuss about Azure ARM Templates in series of blog articles. In the first part of this article, I’ll be discussing about the benefits of Azure ARM Template, different ways to create Azure ARM Template and how you can kick start deploying templates from Marketplace. So, let’s get started!
Azure ARM Template comes with different kinds of benefits, which helps you to automate resource deployment, combine multiple resources under single template and deploy it repetitively. Below are the core benefits of ARM Templates:
Using ARM Templates, you can combine different kind of resources under one template and deploy it based on your architecture. A single script can hold all the configuration of resources.
One of the biggest advantage is, you can repeat the cycle of deploying resources again and again using the same template. So, build once and deploy it multiple times. You can create different templates for different kind of workload, for example create separate templates for dev, stage and prod environment and redeploy it as and when required.
To kick start with template creation, you can create it on your own or you can deploy resources from preconfigured template. Azure has many preconfigured templates in Marketplace, that are tested, verified and made available to deploy resources with pre-defined configuration.
If you are good at templatizing resources and have idea about property configuration, then you can create your own custom template. You can also publish that template to Marketplace and make it available for public usage or you can release it as paid template.
When deploying resources, you may have one main template with several sub templates with dependencies and deploy resources with customized solution.
One of the biggest advantage is that, you can deploy all the resources using Azure portal and export ARM Template from the portal. This will help you to redeploy the same resource again and again. You can also export template using entire resource group, so in future you can have all the resources deployed in the same resource group.
ARM Template is based on JSON (JavaScript Object Notation). JSON is one of the simplest descriptive scripting language, that allows you to define key value pair and configure resources.
You can deploy templates using different methods as follows:
Azure Marketplace or GitHub, using one of these options you can deploy preconfigured ARM Template. These templates are developed, tested and made available in Marketplace for public usage. You can also build your own template and publish it for other people to use it. Marketplace or GitHub consists of simple to complex environment templates to deploy resources in your Azure subscription. To do so follow the below steps:
Step 1: Click on this URL: https://github.com/Azure/azure-quickstart-templates to view ARM Templates.
To begin with, search for 101-vm-simple-windows template. You will get below list of simple VM launch options:

Once you click on the template you will get below landing page:

There are two options to explore ARM Template:
Deploy to Azure Button: To deploy template, click on this button which will redirect you to https://portal.azure.com. Use your Azure credentials to login and deploy VM resource.
Visualize Button: This button will take you to a page, where you can visualize the template architecture and identify how the resources are linked with each other.
Step 2: Once you click on Deploy to Azure button you will get redirected to Azure portal. Sign in with your Azure credentials and you will jump on to below blade:

Provide all the required details like:
After completing all the steps, you will see the progress of resource deployment:

Once the process gets completed, VM gets deployed under the vmdeployment resource group:

In the above example, we have seen how to deploy template from preconfigured template. You can also write your own template and deploy resources. To do so, follow the below steps:
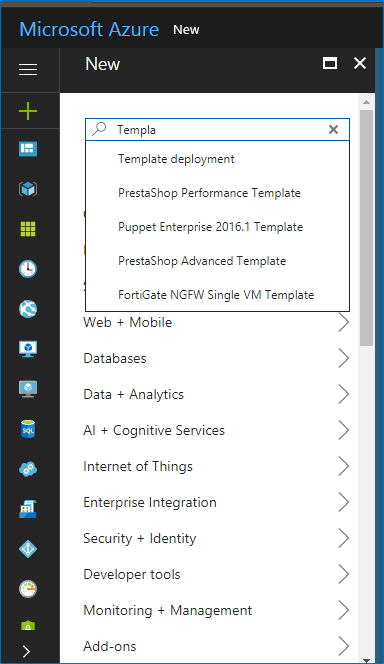
Step 1: Log in to https://portal.azure.com with Azure credentials and click on New and then search for Template deployment:
Step 2: Click on Create button to create custom template:

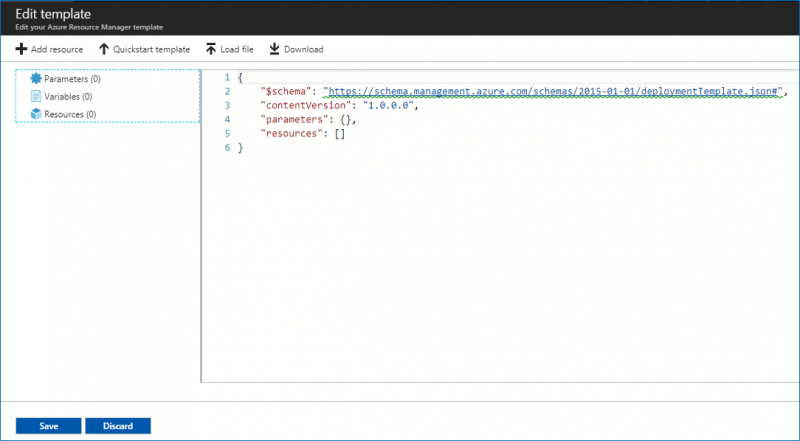
Step 3: You have multiple options to create template. Out of all the below options, click on Build your own template in the editor and you will jump on to the blank template:
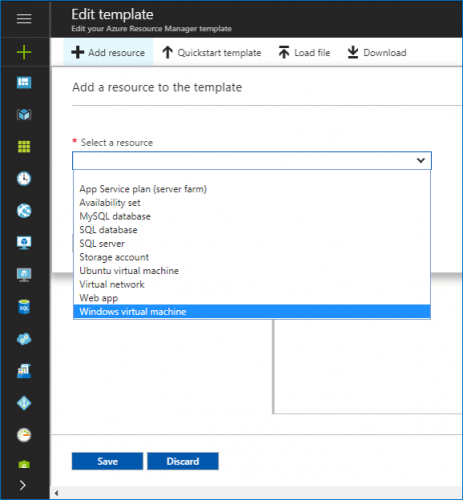
Step 4: To add new resource, click on +Add resource button and select a Windows virtual machine:
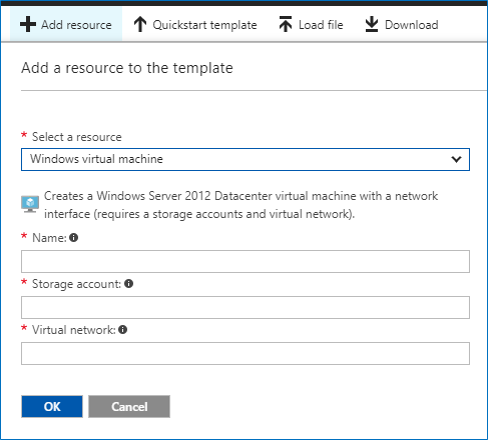
Step 5: Provide appropriate details to create new template like name of resource, storage account name, virtual network name and click on OK.
Step 6: You will see that new resource details gets updated in the blank template:

Click on Save button and proceed further to deploy VM.
Step 7: If you wish to edit or change any information in the template, you can click Edit template to change or modify values. Provide all the required details to create VM on the below screen:

After submitting all the parameters, you can click on Purchase and launch VM.
PowerShell is one of the scripting tool which you can use for deploying, configuring and deleting resources. You can deploy ARM Templates using PowerShell as well. Here, the commands are slightly different than regular Windows commands. You must configure Azure PowerShell modules and write scripts to work with Azure resource deployment. If you are setting up PowerShell first time, then Click here to setup PowerShell.
Once you’re done with configuring Azure PowerShell modules, follow below steps to deploy ARM Template to provision Azure Storage resource.
Step 1: Here I am using sample template from GitHub, click here to copy JSON code to deploy storage account. Copy code and paste it in any text editor. If you’re familiar with Visual Studio you can use that for editing template.
Save the file with .json extension:

Step 2: To launch template using PowerShell, open your PowerShell cmdlet and type below command to log in to your Azure subscription:
Login-AzureRmAccount
This command will prompt you with a dialogue box to login.
Step 3: After logging in to subscription, type below command to provision a storage account:
New-AzureRmResourceGroup -Name ResourceGroupName -Location "East US"
New-AzureRmResourceGroupDeployment -Name NameOfDeployment -ResourceGroupName ResourceGroupName -TemplateFile JSONFilePath -storageAccountType Standard_GRS
Provide appropriate details like ResourceGroupName, location and path of JSON file to deploy template. Once you finish above steps, you will get below status on PowerShell screen:
ProvisioningState: Succeeded
Using Azure CLI:
If you are working on macOS, Linux or Windows OS, you can install Azure CLI package by clicking on this link. I have followed the same steps to create storage account using Azure CLI commands.
To login with Azure subscription use:
az login
For creating storage account:
az group create --name resourcegroupname --location "East US"
az group deployment create --resource-group resourcegroupname --template-file JSONFilePath
Let me know what do you think by providing comments in the comments section.
If you would like to learn more about Azure ARM Template, then you would want to check out CloudThat’s newly launched course i.e. Authoring Azure ARM Template. This course focuses on how to design and deploy ARM Template from scratch and automate resource deployment in Azure. You will also learn to configure custom parameters, setting up variable, securing resources using RBAC. This course will also help participants to prepare for one of the exam objectives that is, Design and Deploy ARM Templates which is part of the 70-533 exam: Implementing Microsoft Azure Infrastructure Solutions.Check it out.
|
Voiced by Amazon Polly |
CloudThat is a leading provider of cloud training and consulting services, empowering individuals and organizations to leverage the full potential of cloud computing. With a commitment to delivering cutting-edge expertise, CloudThat equips professionals with the skills needed to thrive in the digital era.
SHARE

Google Cloud (GCP)
By Laxmi Sharma
Mar 27, 2026


Agentic AI, AI, Gen AI
By Niti Aggarwal
Mar 25, 2026


Corporate Training
By Daliya V K
Mar 25, 2026


AWS
By Vijayanand K V
Mar 25, 2026

Our support doesn't end here. We have monthly newsletters, study guides, practice questions, and more to assist you in upgrading your cloud career. Subscribe to get them all!

Lora
Jan 6, 2021
I used to be recommended this blog by my cousin.
I am now not sure whether or not this submit is written by means of him as nobody else understand such designated approximately
my difficulty. You’re wonderful! Thank you!