

 Login
Login

 June 22, 2026
|
Voiced by Amazon Polly |
Introduction
Azure DevOps provides a comprehensive set of developer services that help teams plan work, collaborate on code, and build and deploy applications efficiently. To ensure security, collaboration, and effective CI/CD processes, it is essential to properly configure your Azure DevOps environment.
Azure DevOps settings are primarily divided into two levels: Organization Settings, which apply across the entire instance, and Project Settings, which are specific to individual projects. This article highlights five key configurations Users, Extensions, Service Hooks, Service Connections, and Agent Pools that form the foundation of a secure, scalable, and optimized development environment.
Pioneers in Cloud Consulting & Migration Services
- Reduced infrastructural costs
- Accelerated application deployment
Organization Settings
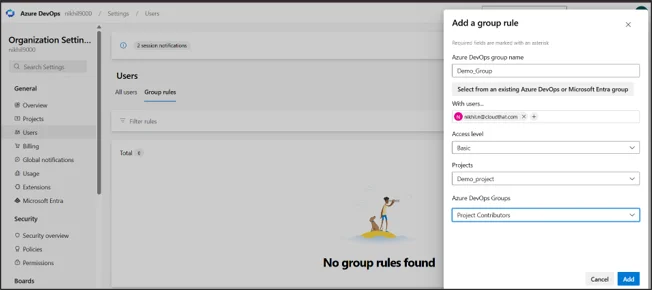
- Users: The Users setting is the central hub for managing identity and access. It controls who can access your Azure DevOps organization, assign access levels, and define project permissions. Effective user management is a key security practice that protects source code, pipelines, and other resources.
Configuration:
Go to Organization Settings in the bottom-left of the Azure DevOps portal and select Users under General to view or add members. Click Add users or Group rules, enter email addresses or service principal names, and assign the required access level and permissions based on roles.

Core Options:
- Access Level: Assigns the core capability tier.
- Basic: Select this for active developers who need full access to code repositories, pipelines, and agile boards.
- Stakeholder: Choose this for non-coding users who only need to view boards or approve releases. This is a free, unlimited tier.
- Add to projects: Select specific project environments (ex: Demo_project) that the user is allowed to access.
- Azure DevOps Groups: Assign users to built-in security groups such as Project Contributors for standard team members or Project Administrators for team leads who need elevated permissions.
2. Extensions:
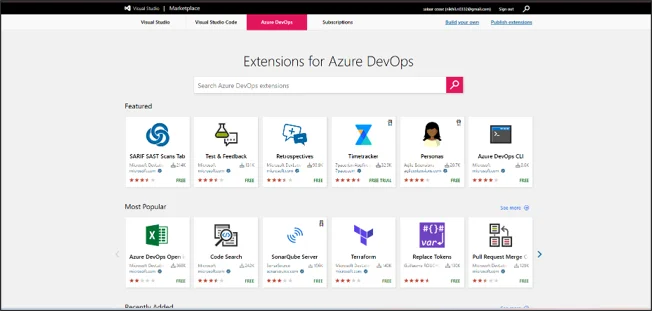
The Extensions setting lets you customize and expand Azure DevOps by integrating third-party tools and add-ons from the Visual Studio Marketplace. Its main purpose is to connect Azure DevOps with external tools such as security scanners and deployment frameworks.
Configuration:
Head over to Organization Settings and select Extensions. This overview displays all active add-ons in your organization. To integrate something new, click Browse marketplace at the top right. This action redirects you to the external marketplace tailored for Azure DevOps.
Core Options
Inside the Marketplace, you can search for specific functional needs. For example, SonarQube provides static code analysis, and Terraform supports infrastructure as code.
- Free Extensions: Select these for standard, highly popular community-supported integrations (such as Code Search or Test Feedback).
- Paid / Trial Extensions: Select these when enterprise-grade tools are necessary. You can usually initiate a free trial to evaluate the extension’s impact on your workflow before committing to a purchase.
Project Settings
- Service Hooks:
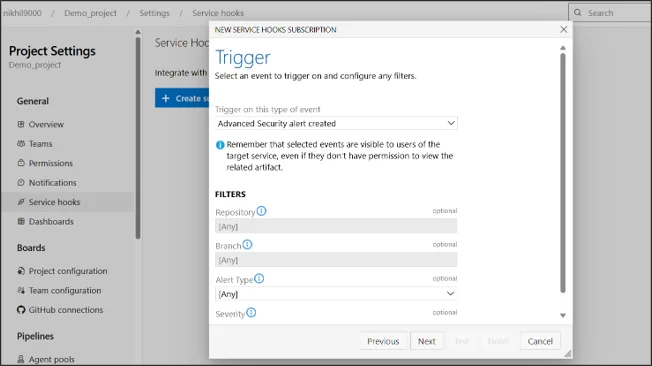
Service Hooks enable Azure DevOps to send automated notifications to external systems when specific events occur. They support event-driven automation, such as notifying a Slack channel about a failed deployment or triggering an external service when new code is pushed to a repository.
Configuration
Go to Project Settings and click Service Hooks. Click the Create subscription button to launch the configuration wizard.
Core Options
- Service Type: Choose the destination application from the available list. Select WebHooks if you have a custom-built API endpoint waiting to ingest the event data.
- Trigger Event: Define the exact catalyst for the hook. Choose options like Code pushed or Advanced Security alert created based on what you are trying to monitor. Check other Webhook service types (https://learn.microsoft.com/en-us/azure/devops/service-hooks/events?view=azure-devops)
- Filters: Narrow down the trigger scope by defining a specific Repository or target Branch so the hook doesn’t fire unnecessarily.
- Action URL & Authentication: Provide the endpoint URL. If the endpoint requires a username and password (Basic Auth), input them here. Always use the Test button to validate the connection before clicking Finish.
2. Service Connections:
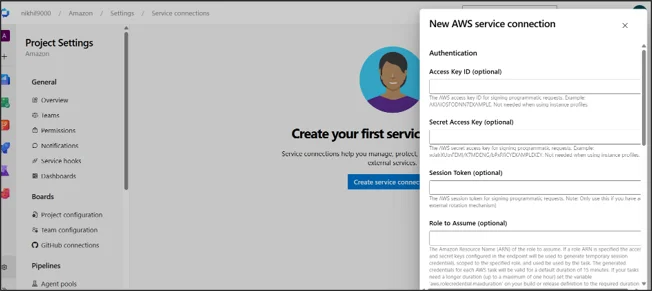
Service Connections are secure links that allow Azure Pipelines to authenticate and interact with external services. They are used for tasks such as deploying applications to Amazon Web Services (AWS), pushing images to Docker Hub, or managing Azure resources. They securely store credentials, eliminating the need to hardcode sensitive secrets in source code.
Configuration
Navigate to Project Settings, scroll down to the Pipelines group, and select Service connections. Click New service connection in the top-right corner, then browse the catalog of supported platform types.
Core Options
Configuration options depend entirely on the target platform. For instance, if you select an AWS connection, you have two primary authentication strategies:
- Access Key and Secret Key: Requires entering static AWS IAM credentials. Select this only for legacy workflows or simple sandboxes where key rotation isn’t strictly enforced.
- OIDC (OpenID Connect): This is the recommended modern approach, using identity federation to generate short-lived, temporary credentials instead of long-lived secrets. For enhanced security, create an AWS IAM role that trusts Azure DevOps and enable the OIDC option during service connection setup.
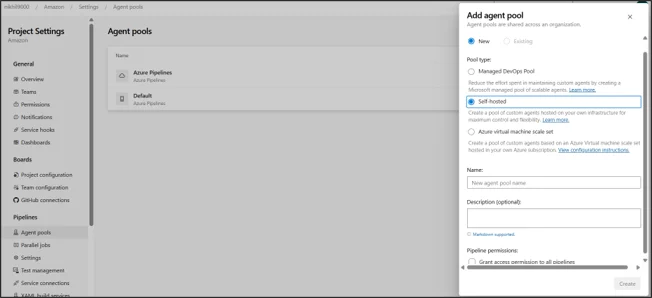
3. Agent Pool:
An Agent Pool is a collection of compute machines (agents) that run and execute your pipeline jobs. Its purpose is to manage the underlying infrastructure for CI/CD processes, including the operating system environment, installed software, and available build processing capacity.
Configuration
Head to Project Settings, under Pipelines, select Agent pools. Click Add agent pool to create an entirely new infrastructure group or click into an existing pool (like Default pool) to provision new agents inside it.
Core Options
- Pool Type:
- Microsoft-hosted: These agents are managed automatically by Microsoft in the cloud. Select this for maintenance-free operations where standard software is sufficient.
- Self-hosted: You provide the infrastructure (VMs, local hardware). Select this when you require highly customized software environments, direct access to private corporate networks, or specialized caching for faster builds.
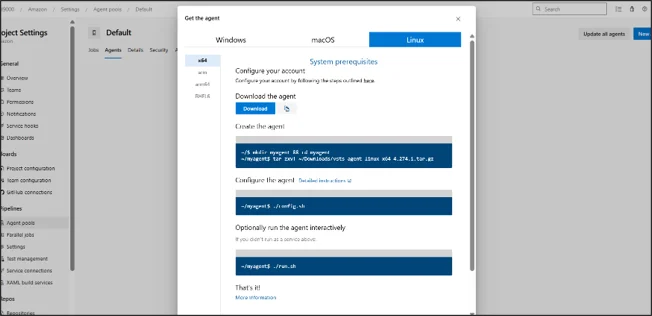
- Setting up a Linux Self-Hosted Agent: If you elect to run your own agent, open your chosen pool and click New Agent. Select the Linux tab. Follow the console commands provided on your local machine (see the steps in the image below).
Conclusion
Properly configuring your Azure DevOps environment is essential for maintaining a secure, efficient, and reliable development workflow. By effectively managing Users and Extensions, teams gain the right access and tools to collaborate productively.
Drop a query if you have any questions regarding Azure DevOps, and we will get back to you quickly.
Empowering organizations to become ‘data driven’ enterprises with our Cloud experts.
- Reduced infrastructure costs
- Timely data-driven decisions
About CloudThat
FAQs
1. What is the primary difference between Organization Settings and Project Settings in Azure DevOps?
ANS: – Organization Settings apply across the entire Azure DevOps platform, including billing, user management, and global extensions. Project Settings apply only within individual projects, such as repositories, service connections, and team boards.
2. Why should I choose an OIDC connection over traditional Access Keys for an AWS Service Connection?
ANS: – OIDC (OpenID Connect) improves security by using short-lived, temporary credentials via role assumption rather than static, long-term access keys. This approach reduces the risk of credential leakage and removes the need for manual key rotation.

WRITTEN BY Nallagondla Nikhil
Nallagondla Nikhil works as a Research Associate at CloudThat. He is passionate about continuously expanding his skill set and knowledge by actively seeking opportunities to learn new skills. Nikhil regularly explores blogs and articles on various technologies and industry trends to stay up to date with the latest developments in the field.


Comments