

 Login
Login- Consulting
- Training
- Partners
- About Us
x
Azure, Cloud Computing, Tutorials
 5 Mins Read

 August 20, 2015
IT industry today is fast paced compared to any other industries in this century. Growth, Upgrade, Mobility, Availability are the buzz words in today’s world. This is the only industry which is more fashion driven than women’s fashion. With the growth of Cloud Computing, people are moving their existing infrastructure to Cloud. Many tech-giants like Amazon, Microsoft, Google, VMWare are offering their services in cloud computing.
Amazon Web Services and Microsoft Azure are very frequent names for cloud services. Azure argues that its platform allows businesses to fully take advantage of hybrid cloud platforms. Azure Logic Apps works with your existing assets like legacy softwares, ERP, etc and extend it to Azure cloud. Thus with Azure, extensibility is in your control.
Problem Definition:
Cloud Consultant always get below requirements:
To setup the same environment on Azure from scratch, might be time consuming or complicated process. So in such cases we will want to migrate preconfigured server to Azure.
Solution:
To solve the above problem, I’ll take you through the below steps to migrate your AWS or on premise Windows Instance to Azure.
First we will convert our system hard drive to VHD so that we can use it to create & launch VM. To convert your EC2 system hard drive to VHD, we will use Disk2VHD utility. Disk2VHD is a free utility that creates VHD from your physical volume for use in Microsoft Virtual PC or Microsoft Hyper-V virtual machines.
Into your EC2 instance, download Disk2VHD utility from the below link:
https://technet.microsoft.com/en-us/sysinternals/ee656415.aspx
To create VHD go through the following steps:

Now that VHD is created, we need to push it to Azure. First create storage account, under that storage account we can push VHD under Blob Storage. So to perform that action go through the below steps:
Once the VHD is created, run the following script/cmdlets to push it to Azure Blob Storage.
You need Azure PowerShell to run these cmdlets. Click here to download Azure PowerShell.
Run the below cmdlet to add your Azure account.
|
1 2 |
#A new window will appear in PowerShell where you are supposed to give your Azure Credentials. Add-AzureAccount |
After adding Azure Account, we need to select the Subscription where we have created Storage account in step 1. So run the following cmdlet to accomplish that task:
|
1 2 |
#Give the subscription name that your Azure Account holds. Mine is “Pay-As-You-Go” so I used that one. Replace “Pay-As-You-Go” with your subscription name. Select-AzureSubscription –SubscriptionName Pay-As-You-Go |
Now we are ready to access Azure Services, use the following cmdlet to push the VHD to Azure’s storage account.
|
1 2 3 4 5 6 |
#Ignore the <> in below cmdlet. #Replace <testmachine> with the “Storage Account Name” that you have created in Azure. Also change the <win2012r2> to VHD name you provided while creation of VHD in EC2. #LocalFilePath is the path where you have saved the VHD or cloned disk. Set-AzureSubscription –SubscriptionName Pay-As-You-Go -CurrentStorageAccount <testmachine> Add-AzureVhd -Destination https://<testmachine>.blob.core.windows.net/vhds/<win2012r2>.vhd -LocalFilePath D:\win2012r2.vhd |
Once you run the above cmdlet, it will first calculate MD5 for that VHD file. MD5 hash of your file is to guarantee that your file is transferred correctly. After the MD5 is calculated successfully, a blob of the same size as the disk is allocated in your storage account. It will then start to upload your VHD to Azure.

Note: Uploading the VHD may take time, depending on the Internet connection and the size of the VHD.

Once the VHD is successfully uploaded, you will get the “Succeeded” message in PowerShell. You can then browse the VHD from Azure Storage. Before we can use the VHD as disk, it needs some configuration. We need to provide it some logical name that can be used in subsequent operations.

Configuration will allow us to make a disk from VHD from where we can specify that this particular VHD contains an Operating System to use it to create a VM from it. To accomplish this task, go through the following steps:

Now that the disk is created, we shall create a VM using that disk. To create VM from the disk, follow the below steps:

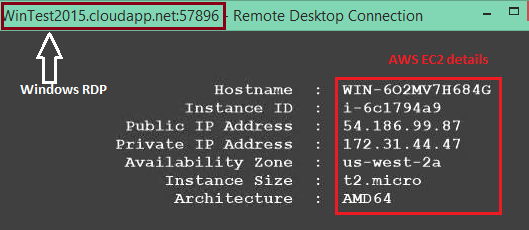
After completing above procedure, you can check the status of VM under Virtual Machines tab.
![]()
You can RDP into your VM and verify that your installed configurations on Amazon EC2 are the same on this VM on Azure. Even the wallpaper is not changed.
So in this way you can move your Windows Instance from AWS or on premise to Azure and you don’t need to configure it whole again.
I hope the blog enriched you with some good handy information and tactics. Stay tuned for more such blogs on various Cloud platforms.
|
Voiced by Amazon Polly |
CloudThat is a leading provider of cloud training and consulting services, empowering individuals and organizations to leverage the full potential of cloud computing. With a commitment to delivering cutting-edge expertise, CloudThat equips professionals with the skills needed to thrive in the digital era.
SHARE


AWS, Cloud Computing
By Sanket Gaikwad
Mar 18, 2026

Apps Development, Cloud Computing
By Nisha D V
Mar 18, 2026

Case Study
By Anusha R
Mar 18, 2026

Apps Development, Cloud Computing
By Rishav Mehta
Mar 18, 2026

Apps Development, Cloud Computing
By Rajveer Singh Chouhan
Mar 18, 2026


Apps Development, Cloud Computing
By Sonam Kumari
Mar 18, 2026


Our support doesn't end here. We have monthly newsletters, study guides, practice questions, and more to assist you in upgrading your cloud career. Subscribe to get them all!

Meet Ramani
Aug 21, 2015
Greate job done…arman.keep it up..bro
seva
Aug 21, 2015
Excellent work armaan 🙂 keep going 🙂
Arman Koradia
Aug 21, 2015
Thank you 🙂
Pooja Ganatra
Aug 21, 2015
Great Arman……….Keep it up. (y) Gently Explained.
Impressive lines “This is the only industry which is more fashion driven than women’s fashion.” 🙂 🙂
Arman Koradia
Aug 21, 2015
Thanks Pooja… It indeed is..
Rajan Desai
Aug 21, 2015
To do one thing, sometimes there are so many options but choosing one best suitable option is a choice of smart person. That smart person is our expert Arman.
Thanks for providing this easy way.
Arman Koradia
Aug 21, 2015
Thanks for your lines bro… Happy to help always..
chiranjiv
Aug 20, 2015
superb explanation…
Arman Koradia
Aug 21, 2015
Thank you Chiranjiv
Suhani kalola
Aug 20, 2015
Wonderful
rekha koradia
Aug 20, 2015
Nice
parth lathiya
Aug 20, 2015
Excellent work done by Arman….I’ll help many people ty …
Arman Koradia
Aug 21, 2015
Thanks Parth